

Clients Hub
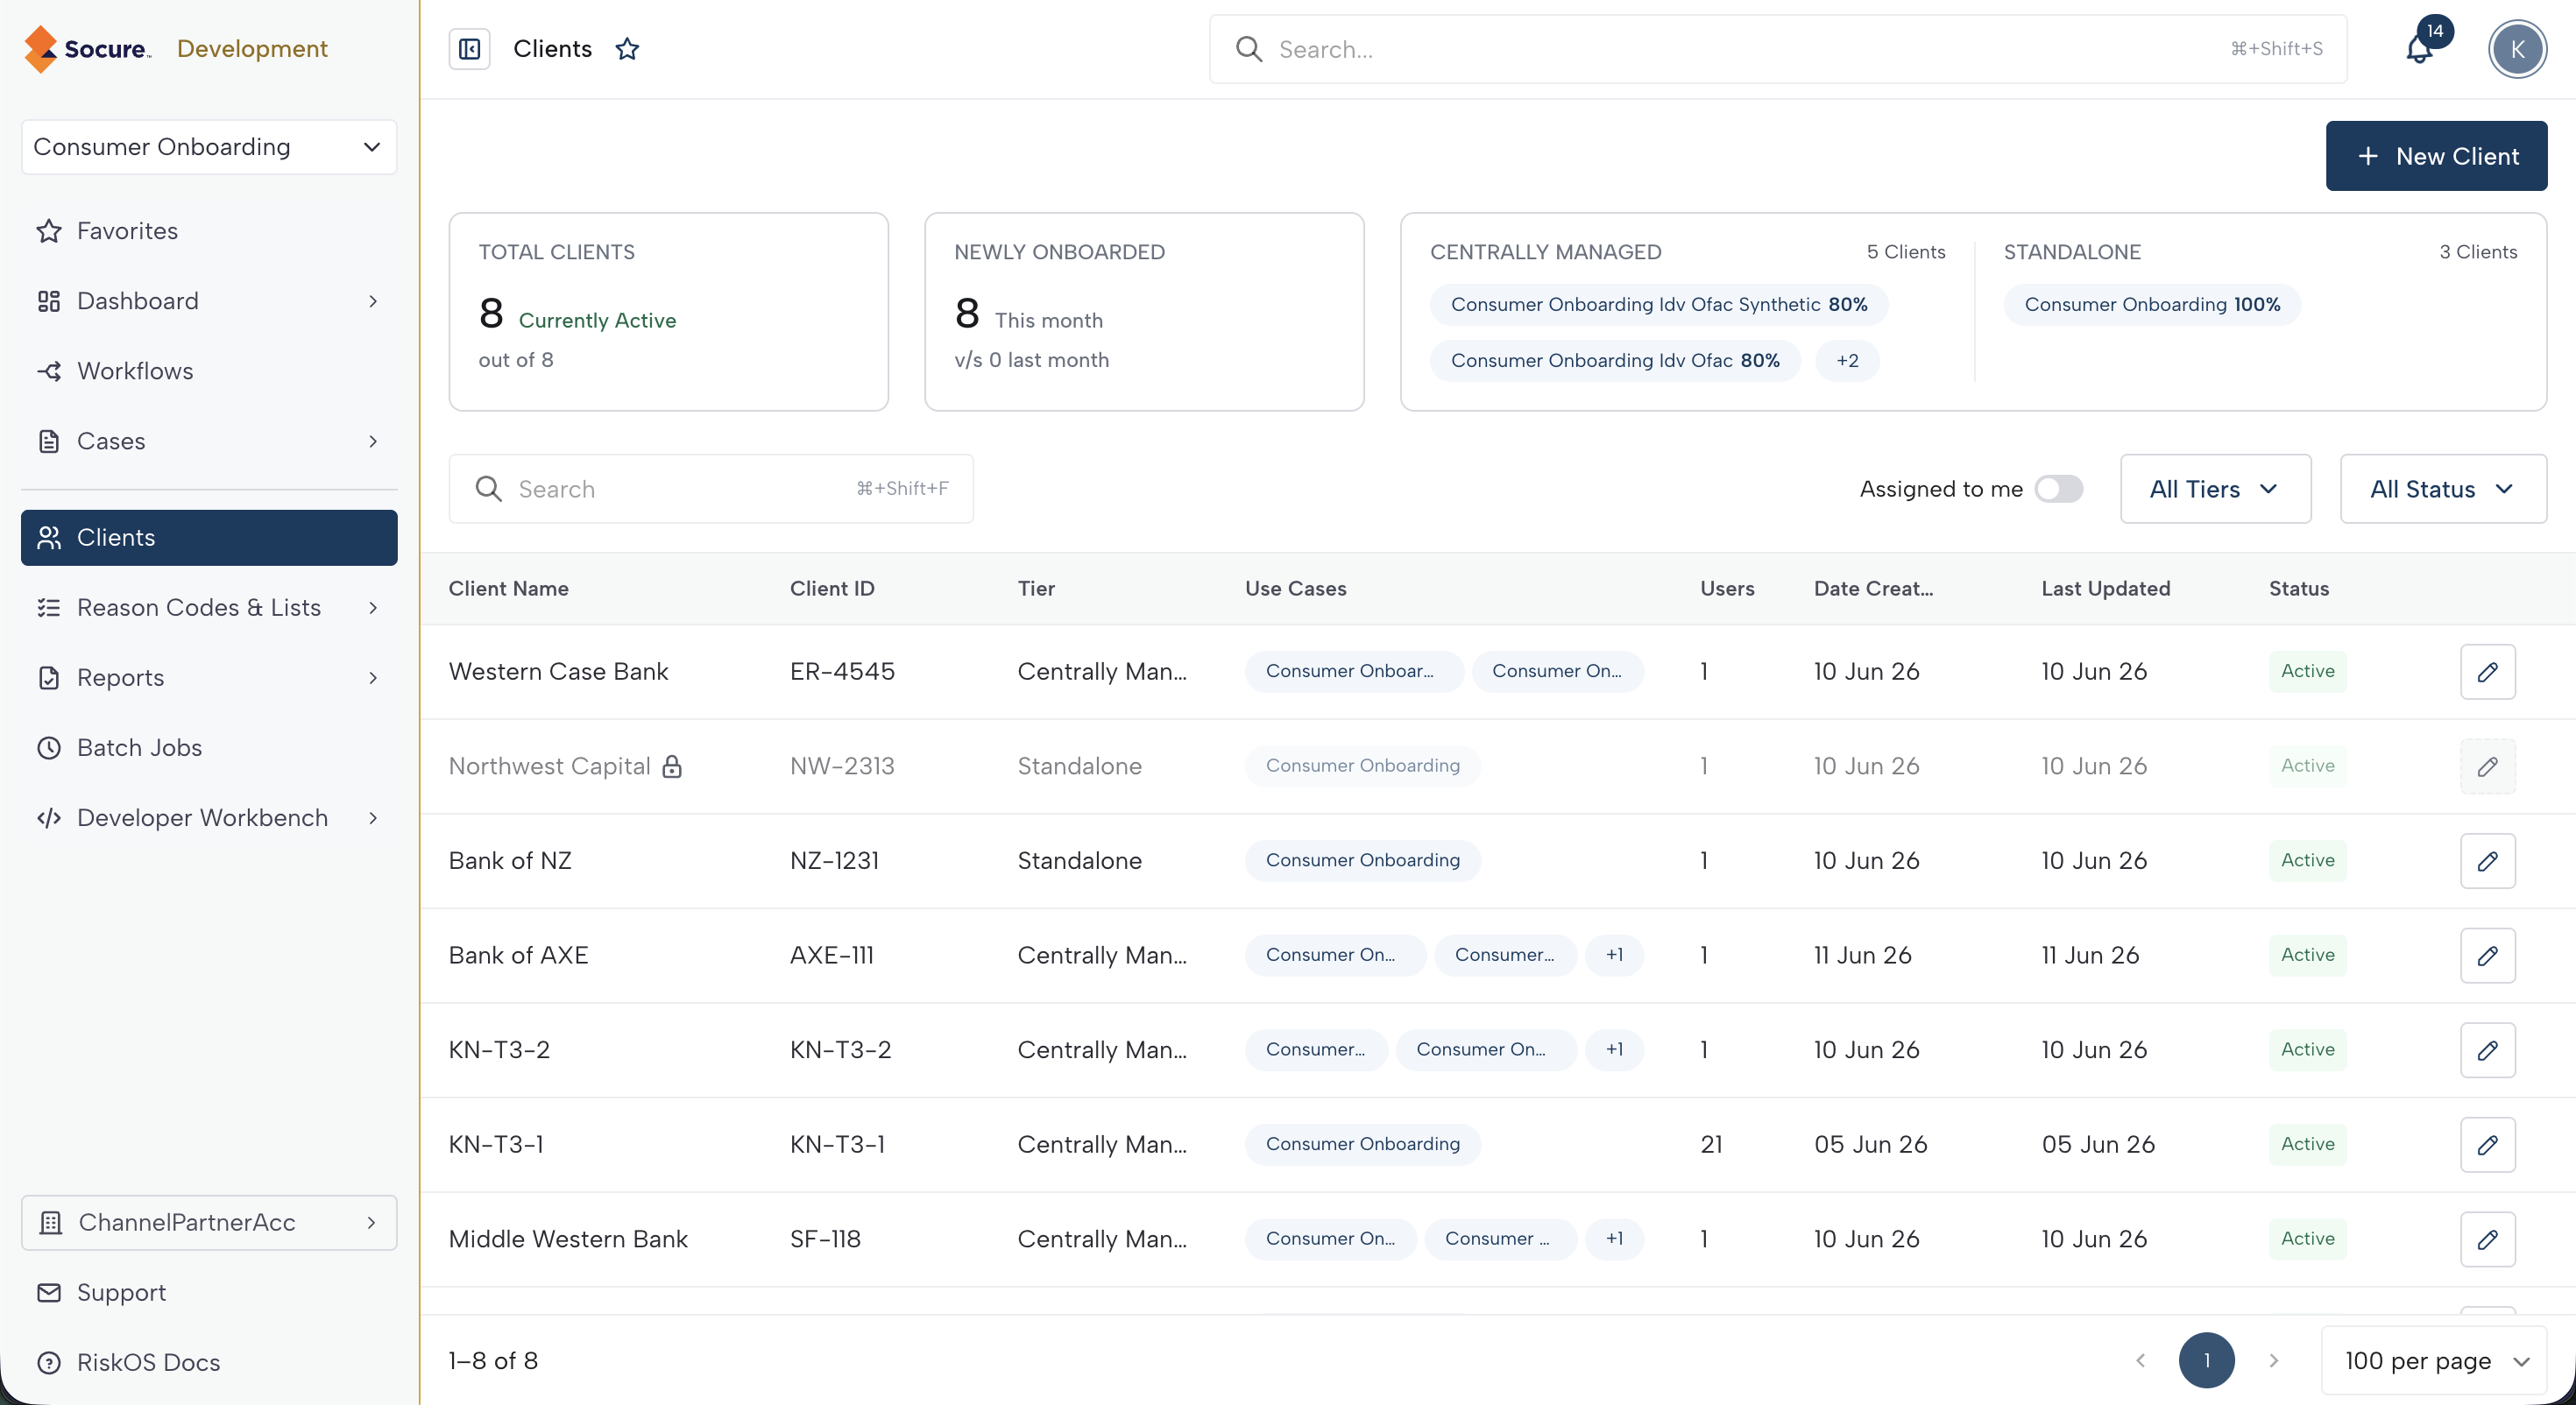
View, search, filter, and manage all client accounts from the Channel Partner Clients hub in RiskOS™.
The Clients hub is the first page you see when you log into your Channel Partner account. It provides a centralized view of all client accounts in your organization, with tools to search, filter, onboard new clients, and manage existing ones.
Applies to:
Channel Partners only. The Clients hub, client onboarding, and switching between client accounts are available only from a Channel Partner management account — they are not part of a direct customer account.
Why it matters
The Clients hub is your operational home base. From here you can monitor your client portfolio at a glance, find a specific client, and navigate to any client's account to configure their settings. Understanding how to use the metrics bar, filters, and table sorting saves time when managing dozens or hundreds of clients.
Before you begin
| Requirement | Details |
|---|---|
| Permission | You must have the Can View permission to Accounts. |
| Account context | Log into your Channel Partner management account. The Clients hub is not available from within a client's account. |
Metrics bar
At the top of the Clients page, a row of metric cards gives you a snapshot of your client portfolio:
| Card | What it shows |
|---|---|
| Total Clients | The number of active clients now and the total number of client accounts in your organization (for example, "12 now active out of 15"). |
| Newly Onboarded | The number of clients onboarded this month, compared to the previous month (for example, "3 This month v/s 1 last month"). |
| Tier Breakdown | A side-by-side summary of each tier showing the client count and provisioned use cases. Each tier displays up to two use case tags with percentage breakdowns. If there are more than two, hover over the overflow indicator to see the full list. |
While the data is loading, skeleton placeholders appear in place of the metric cards.
Search and filter
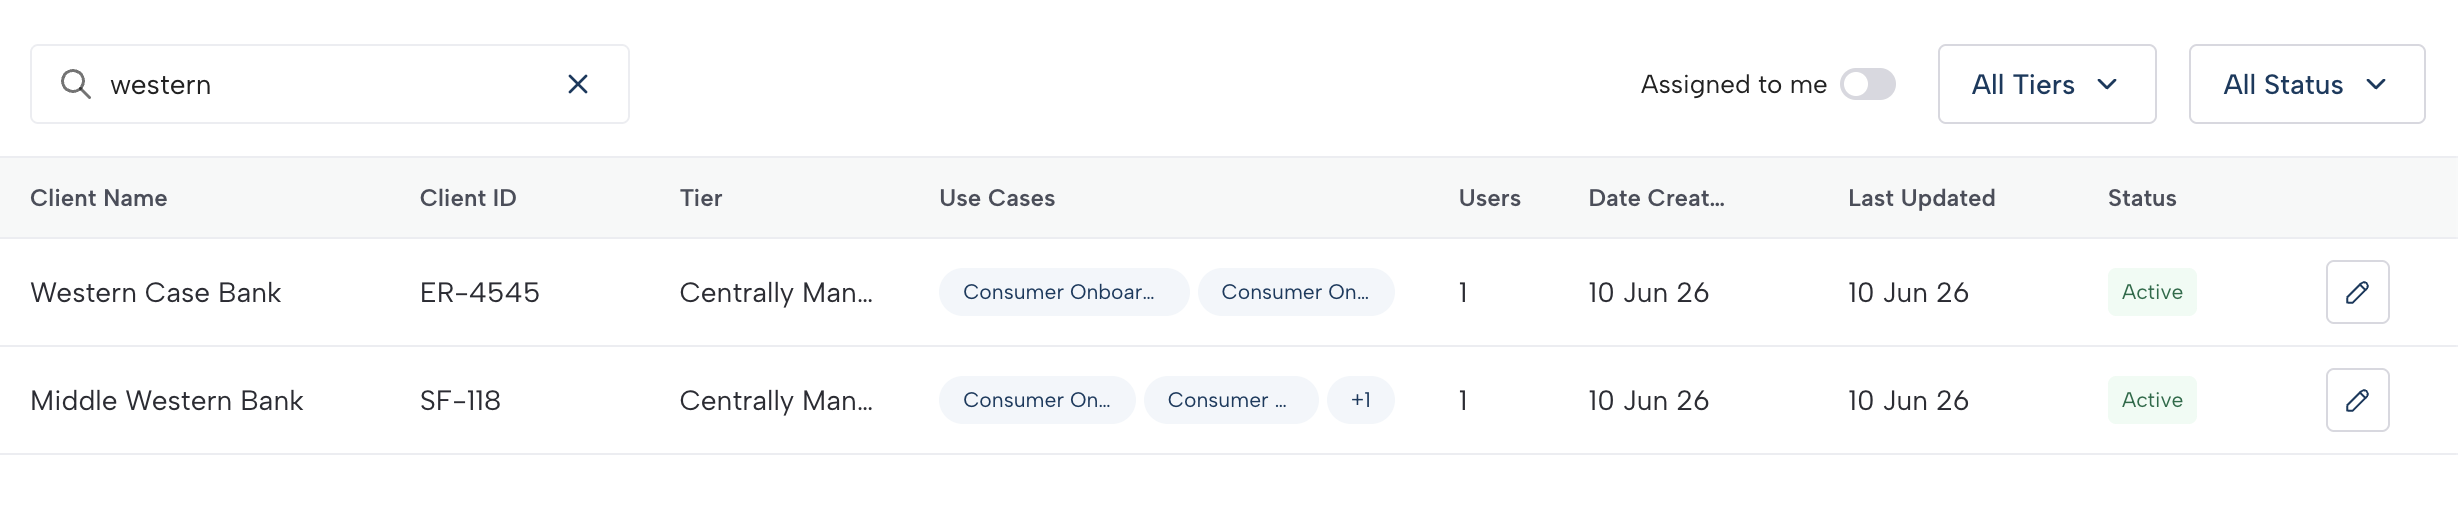
The toolbar above the client table provides several ways to narrow the list. All filters combine with AND logic — for example, filtering by "Standalone" and "Active" shows only active Standalone clients.
Search by name
Enter a client name in the Search field. The table filters in real time as you type.
Assigned to me
Enable the Assigned to me toggle to show only clients where you are the account owner. This is useful when an organization manages many clients across multiple account owners.
Filter by tier
- Click the Tier filter button.
- A dropdown appears with checkboxes for each available tier.
- Select one or more tiers. The button label updates to show how many tiers are selected (for example, "2 selected").
- To clear the filter, click Clear at the top of the dropdown.
Filter by status
- Click the Status filter button.
- Select Active, Inactive, or both.
- To clear the filter, click Clear at the top of the dropdown.
Client table
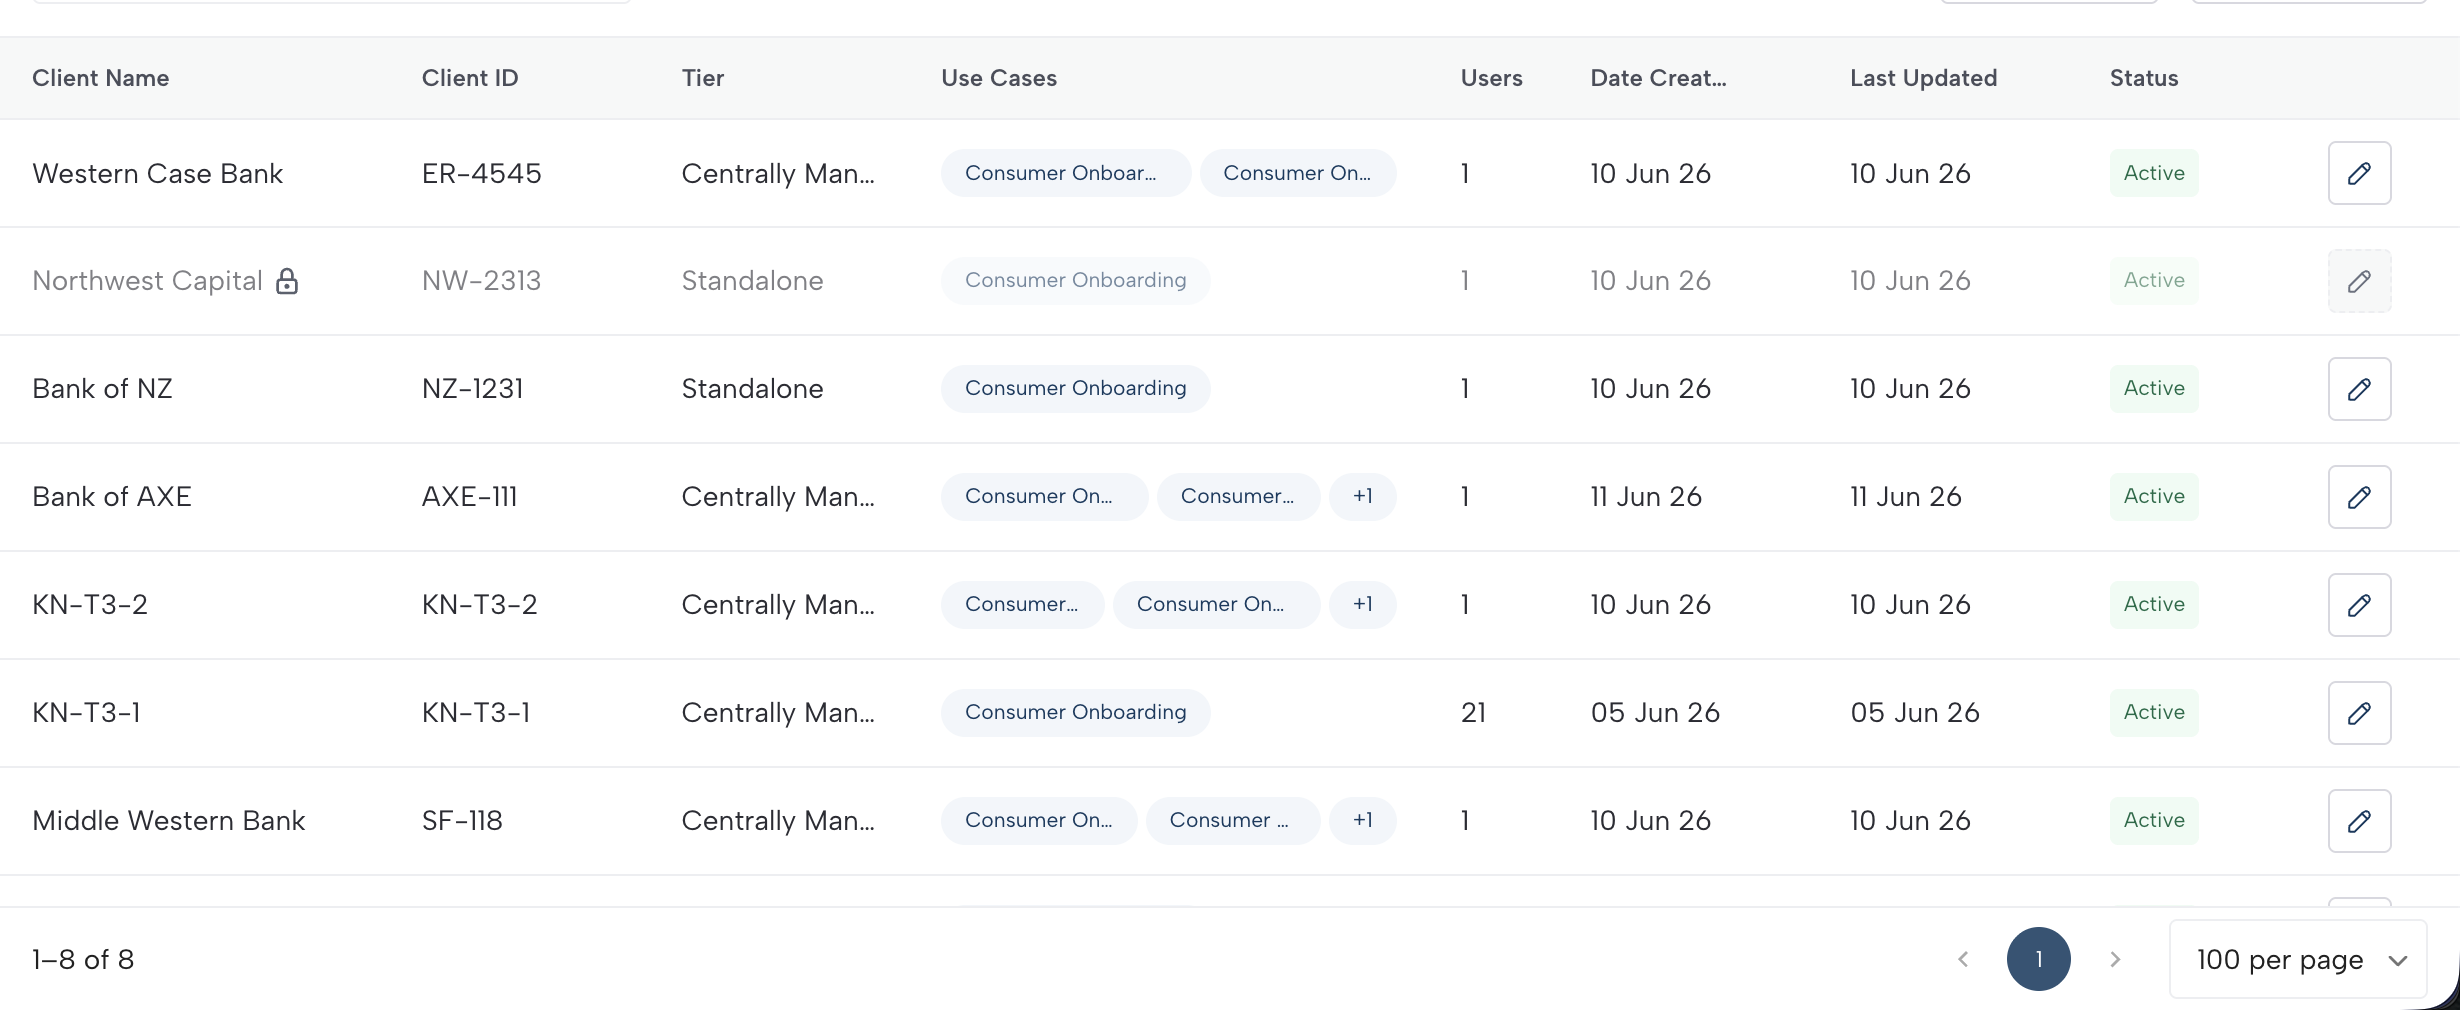
The client table displays the following columns:
| Column | Description | Sortable |
|---|---|---|
| Client Name | The organization name of the client. | Yes |
| Client ID | The unique identifier assigned during onboarding (for example, "CE-1234"). | No |
| Tier | The client's plan tier (for example, Standalone, Centrally Managed). | No |
| Use Cases | The use cases provisioned for this client, displayed as tags. Up to two tags appear inline; hover over the overflow indicator to see the full list. | No |
| Users | The number of users in the client's account. | No |
| Date Created | When the client was onboarded. | Yes |
| Last Updated | When the client record was last modified. | No |
| Status | A colored chip: green for Active, red for Inactive. | No |
| Actions | An edit button (pencil icon) to modify the client's details. | No |
Click a column header marked as sortable to sort the table by that column. Click again to reverse the sort order.
The table supports pagination with configurable page sizes of 10, 25, 50, or 100 rows per page.
Client Name and Client ID format
You set the Client Name and Client ID when you onboard a client, and both are read-only afterward. They follow these length and character restrictions:
| Field | Length | Allowed characters |
|---|---|---|
| Client Name | 5–255 characters | Letters (A–Z, a–z), digits (0–9), spaces, and the symbols . - _ & |
| Client ID | 1 character minimum; no enforced maximum | No character-set restriction enforced. We recommend short, ASCII, human-readable IDs such as CE-1234. |
Both values must be unique across all clients under your Channel Partner, and the uniqueness check is case-insensitive (Acme Corp and ACME CORP are treated as the same name). For the full validation rules, disallowed characters, and error messages, see Field validation rules.
Click a row to switch accounts
Clicking anywhere on a client row (except the edit button) switches you into that client's account. This is a shortcut equivalent to using the account switcher. After switching, RiskOS™ reloads in the client's account context.
Note:
When you switch into a client's account, a banner appears at the top of the dashboard showing which client you are viewing and their tier. Click the banner to return to your management account.
Edit a client
- Click the edit button (pencil icon) in the Actions column for the client you want to update.
- The Edit Client modal opens with the client's current details.
Editable fields:
| Field | Description |
|---|---|
| Website URL | Update the client's website address. |
| Account Owner First Name | Update the account owner's first name. |
| Account Owner Last Name | Update the account owner's last name. |
| Use Cases | Add use cases to provision using the checkbox list. You can't remove use cases that are already provisioned. |
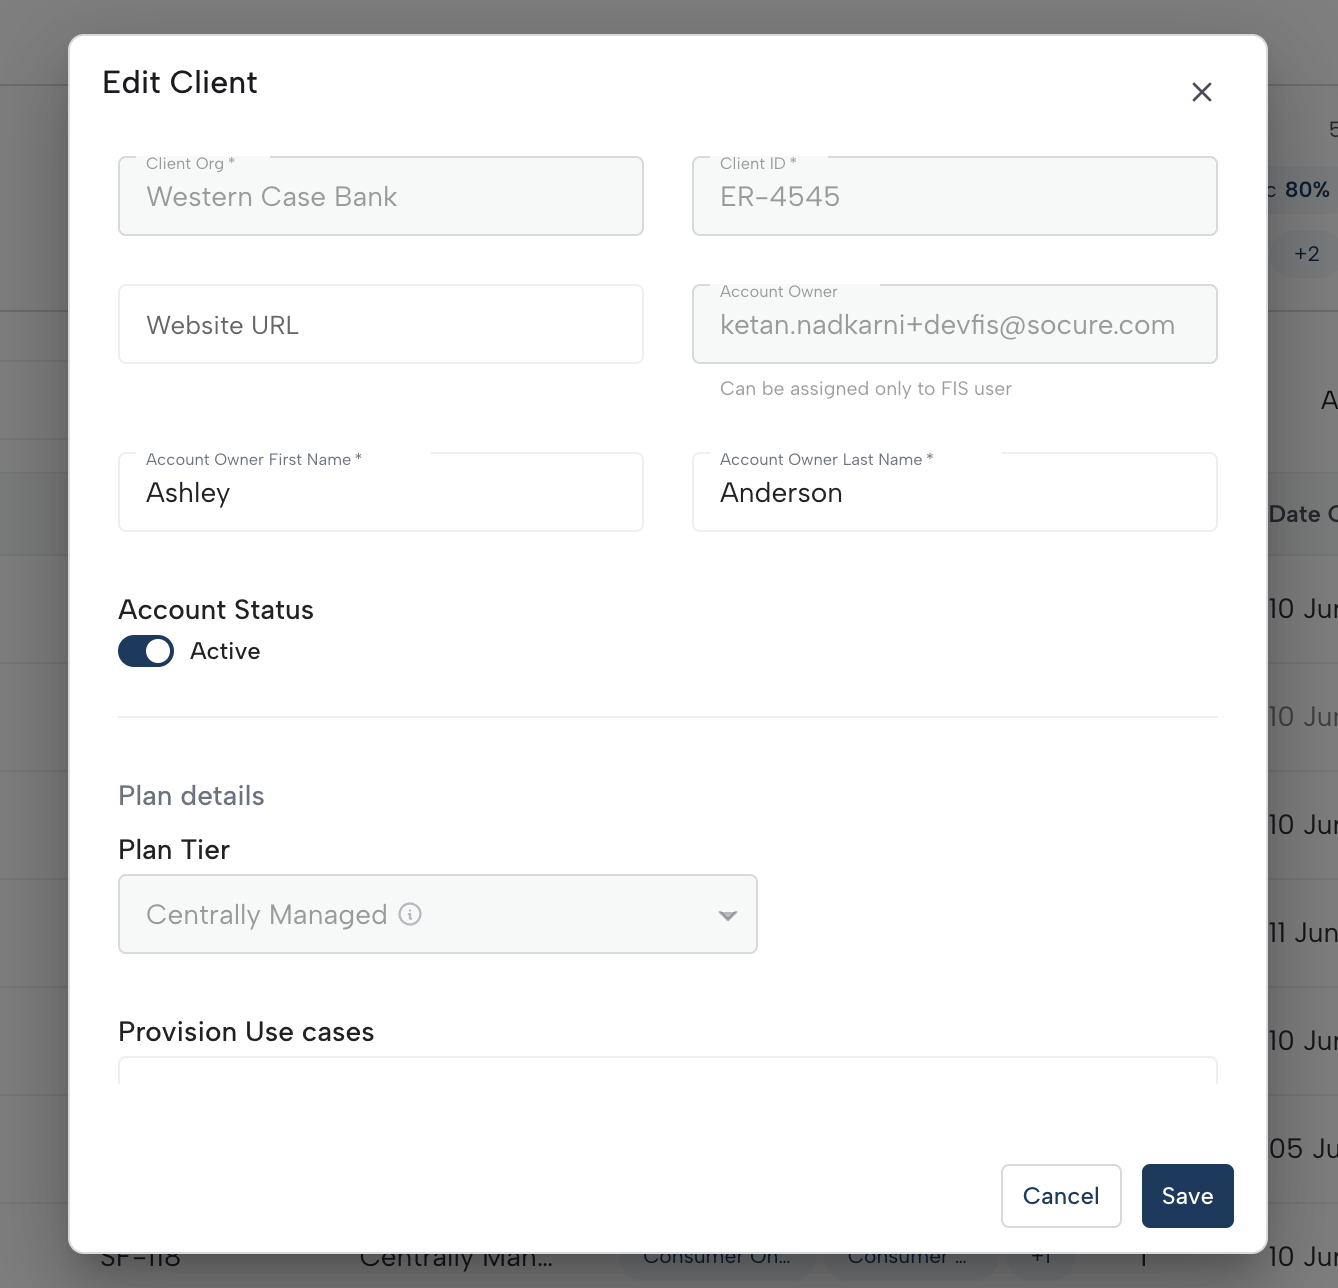
Read-only fields (cannot be changed after onboarding):
| Field | Description |
|---|---|
| Client Org | The client's organization name. |
| Client ID | The unique identifier assigned during onboarding. |
| Account Owner Email | The account owner's email address. |
| Plan Tier | The modal shows the current tier for reference, but you can't change it. |
- Click Save to apply the changes.
What happens after editing
| Effect | Timing |
|---|---|
| Changes to use cases take effect. | Immediate |
| The Clients table refreshes to reflect the updated details. | Immediate |
Note:
You can't change a client's plan tier from the Edit Client modal — the tier stays fixed once you onboard the client. Choose the tier carefully when you onboard a client, because it determines the client's feature access. For a comparison of what each tier allows, see the tier comparison table.
Onboard a new client
Click the + button in the top-right corner of the Clients page to open the onboarding wizard. For the full procedure, see Onboard a Client.
Troubleshooting
| Issue | Cause | Resolution |
|---|---|---|
| Clients page is empty or not loading | You don't have the Accounts Management Hub View permission. | Contact your organization's administrator to grant the required permission. |
| Metric cards show skeleton placeholders indefinitely | Data is still loading or a network issue occurred. | Refresh the page. If the issue persists, check your network connection. |
| Filters return no results | The combination of active filters excludes all clients. | Click Clear on each filter dropdown to reset, then reapply filters one at a time. |
| Can't find a specific client | The client may be inactive or the search term is too specific. | Clear the search field, remove status filters, and scroll through the full list. |
| Edit button isn't visible | The table row may not have loaded the Actions column. | Refresh the page. If the edit button still doesn't appear, verify you have the required permission. |
Related articles
| Task | Guide |
|---|---|
| Onboard a new client account | Onboard a Client |
| Set up users for a client | Manage Users |
| Define custom roles | Roles & Permissions |
| Configure product settings | Product Configuration |
| Switch into a client's account | Switch between accounts |
| Understand tier and account differences | Account Models and Tiers |
Updated 3 months ago