Watchlist Two-Step Workflow
Follow the two-step watchlist case management workflow in RiskOS™ with Analyst review, Supervisor approval, and escalation for compliance oversight.
The following article provides instructions for Compliance Supervisors to effectively oversee cases and optimize workforce management in a two-step workflow.
To configure your desired Case Management workflow, click your Profile icon (top right), then go to Settings > Case Manager.
Overview
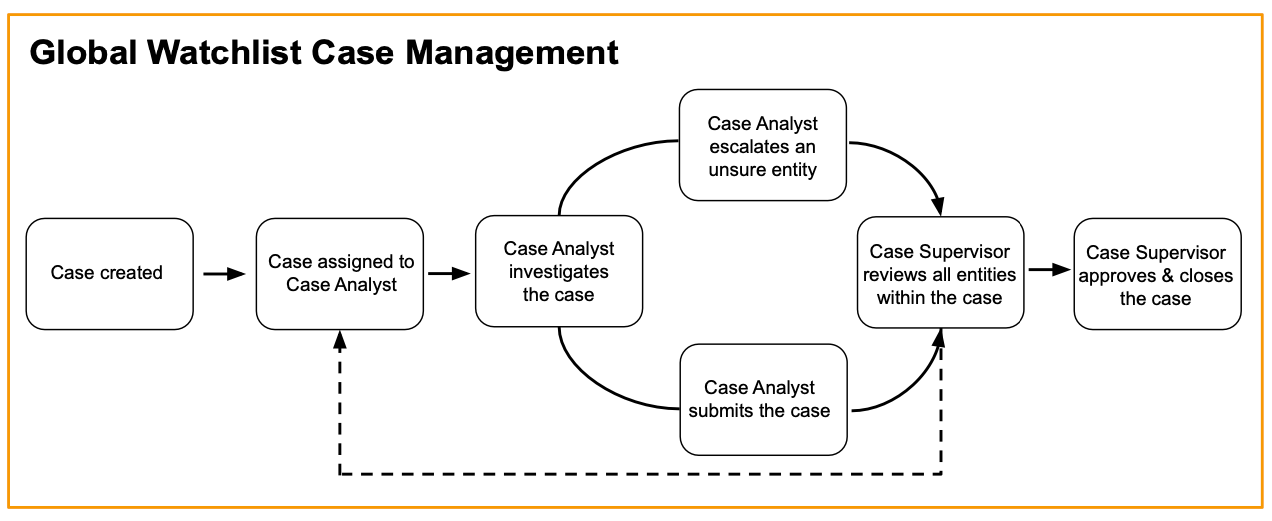
In a two-step workflow, watchlist cases are automatically assigned to users with the Compliance Analyst role. These users review and disposition each entity as a match or no match, and have the option to escalate cases for further examination if needed. The case is then submitted to a Compliance Supervisor, who reviews, approves, and closes the case after all entities are dispositioned. This workflow allows for additional oversight and quality control.
A typical two-step workflow looks like the following diagram:
Note:
Before switching to the two-step workflow, ensure that no users have Compliance Officer role, and there are no custom roles with can investigate permission for the Case Management page.
How it works
The following sections walk through each step a Compliance Analyst completes to investigate, disposition, and close a watchlist case in a two-step workflow.
-
Assign a case to Compliance Analyst
Watchlist cases are automatically assigned to Compliance Analysts in your workforce in a rotational manner. For more information, see Manage Cases and Workforce.
{" "} </p> <br /> <p> When a user with the Compliance Analyst role logs in to RiskOS™, they will see a list of their assigned cases on the <strong>Reassign</strong> page. </p> </div> -
Investigate a case
A Compliance Analyst can investigate an assigned case by completing the below steps:
-
Click the Case ID to open the
Transaction Information dialog box, which contains the following information:
- Queried Data: Data that was provided when creating the transaction.
- Watchlist Entities: The watchlist entities that match the queried data.
-
To begin reviewing the watchlist entities, click the Watchlist Entities s tab. If the transaction results in multiple entity cards, use the following filters to aid your investigation process:
- Filter by status: Click the Actions drop down menu, then select the status to filter. Entity cards have one of the following statuses: Match, No Match, Not Reviewed, Escalate, Approve.
- Filter by category/lists: Click the Category/Lists drop down menu, then select the category or list to filter.
- Sort cards by Match Score or Last Updated.
-
To view the details of a watchlist entity, click the entity card. Each entity card displays the following information:
- The entity's full name
- Last updated timestamp
- Status (Match, No Match, Not Reviewed)
- Profile image (if available)
- List of source lists where the entity is included
- To review the details found in each source list, expand the respective list. Carefully compare these details with the queried data to ensure accuracy and identify any potential matches or discrepancies. See Resolve a Watchlist Match for best practices for reviewing and resolving a Watchlist match.
- After you finish reviewing the entity hits, mark the entity as Match or No Match by selecting the corresponding label under the Status heading. If available, upload additional documents that support the dispositioning. You can also add comments by clicking the comment icon. Comments can be edited and saved, or removed from the card. **Note:** If an entity requires additional review, you can escalate it using the Not Escalated/Escalated toggle switch. When you submit the case for approval, the case status is set to Escalated to indicate to the Compliance Supervisor that you had questions about one or more entities.
- Click the Previous/Next icons to review the next entity card. Follow steps 3-5 to disposition the next entity accordingly.
-
Click the Case ID to open the
Transaction Information dialog box, which contains the following information:
-
Submit a case for approval
After reviewing and dispositioning all the entity cards listed in the Results tab, click Submit Case to send it to your Compliance Supervisor for approval or further review.
Note: If you need to make changes to a case you have already submitted, click Retract Case, then follow the steps outlined in the Investigate a case process to re-investigate the case.
-
Compliance Supervisor approves and closes a case
The Compliance Supervisor reviews cases submitted for approval and closes them after approving each of the dispositioned entities. They can also reassign the case back to the Compliance Analyst for additional review.
Review and approve submitted cases:
- Click the Case ID to open the Transaction Information dialog box, which contains the following information:
- The decision for each entity is shown on the watchlist entity card. Click a card to view additional details for an entity.
- Thoroughly compare the entity's details found in the source lists with the queried data to ensure accuracy and identify any possible matches or discrepancies. Carefully review any uploaded documents or comments provided by the Compliance Analyst for additional context on the investigation process. See Resolve a Watchlist Match for best practices for reviewing and resolving a Watchlist match.
- Once you have completed reviewing the entity hits, use the Entity Approval toggle switch to approve the decision made by the Analyst. Additionally, you can provide comments by clicking on the comment icon.
- Click the Previous/Next icons to review the next entity card. Follow steps 3-5 to disposition the next entity accordingly.
Review escalated cases:
- Go to Watchlist Monitoring page and select the case that has an Escalated status to review.
- Proceed with the review process by following the steps outlined in Review and approve submitted cases process.
- Approve the case accordingly based on your organization's guidelines and procedures.
Reassign cases:
During case review, the Compliance Supervisor can reassign it to the Compliance Analyst for further examination by clicking Reassign. The case will then appear on the Compliance Analyst's dashboard with the status set as In-Progress.
Close cases:
If the Compliance Supervisor is satisfied with the results and conclusions of a submitted case, they can close it by clicking Close Case. Once a case is closed, it can be reopened for review as a new case.
Upload supported documents
You can view or upload additional documents that support the investigating and dispositioning process through the Uploaded Documents tab. Supported file formats include JPEG, PDF, DOC, CSV, XLSX, TIFF, TXT, HTML, GIF, PNG, and PPTX. Each file uploaded must not exceed 20 MB in size.
Watchlist Monitoring
Finding and filtering cases
The Watchlist Monitoring tab provides an overview of all cases within your account. Watchlist Cases are automatically assigned to Compliance Supervisors in your workforce in a rotational manner.
Use the search feature to quickly find a watchlist case by the case ID. You can also filter your case list based on date, case status, assigned Compliance Analyst, reporting Compliance Supervisor, and case type for quick reference and efficient case management.
Case status
The Case Status column on the Watchlist Cases tab indicates the current state of each case using the following values:
NEW: The case has just been created.NOT REVIEWED: The case has not been reviewed by the assigned Compliance Analyst yet.IN PROGRESS: The assigned Compliance Analyst is currently reviewing and investigating the case.REVIEWED: The assigned Compliance Analyst has reviewed, dispositioned, and submitted the case to the Compliance Supervisor.ESCALATED: The assigned Compliance Analyst has requested further examination of the case.CLOSED: The Compliance Supervisor has approved and closed the case.
Case-created timestamp
Use the case-created timestamp to track when a case was created. All timestamps are displayed in your local timezone.
Bulk closing cases
Compliance Supervisors can close watchlist cases in bulk by following the steps below:
- Go to the Batch Jobs page, then click the Plus (+) icon on the Account menu and select Watchlist Case Closure.
- Drag and drop the
.csvfile or browse to select the file to upload. The file must include the following columns:caseId: The unique identifier for the case.transactionId: ThereferenceIdfor the transactions you want to close.comment: Additional context about the case closure. This column is optional.
- Click Upload to initiate the batch job.
- When the batch job is complete, go to the Batch Jobs page, then click the Download link to download a report that contains the results of the bulk closure.
Note:
If both
caseIdandtransactionIdare present in the same row, only thecaseIdwill be processed.
Updated 2 days ago