Set up Workforce Verification
Configure Workforce Verification in the RiskOS™ Dashboard for instant identity risk decisions across the employment journey, from application to onboarding.
Before you start
Make sure you have the following:
- Your account owner or administrator can enable this for you. If you're unsure who to contact, reach out to support for assistance.
- If this is your first time working with workflows, review the Workflow overview to understand inputs, enrichments, routing logic, and decisions.
How it works
Workforce Verification evaluates identity, fraud, and compliance signals across multiple stages of the candidate lifecycle. It allows organizations to apply the right level of friction at the right time:
- Top of the funnel — Passive identity and fraud checks
- Mid funnel — Document Verification for higher assurance
- Bottom of the funnel — Selfie re-verification before onboarding
Final outcomes include:
- Accept
- Review
- Reject
How Workforce Verification fits into a workflow
In RiskOS™, workflows are built by connecting reusable components. Workforce Verification is delivered as a preconfigured use-case workflow composed of enrichments, scorecards, conditions, and decisions.
Once triggered, the workflow orchestrates all required checks and returns a unified decision outcome with reason codes and audit trails.
For more detail on workflow components, see Workflow Steps.
Execution flow in RiskOS™
Workforce Verification runs synchronously, with conditional asynchronous steps (such as Document Verification or Selfie Re-verification) applied only when needed.
-
Configure Workflow
Ensure optimal balance between fraud prevention and smooth candidate experience:
- Top of the funnel Passive Check (e.g. when a new job application is submitted)
- Mid-funnel Document Verification (e.g. at the interview stage or when a candidate has accepted an offer)
- Bottom of the funnel Selfie Re-verification (e.g. at the onboarding stage)
-
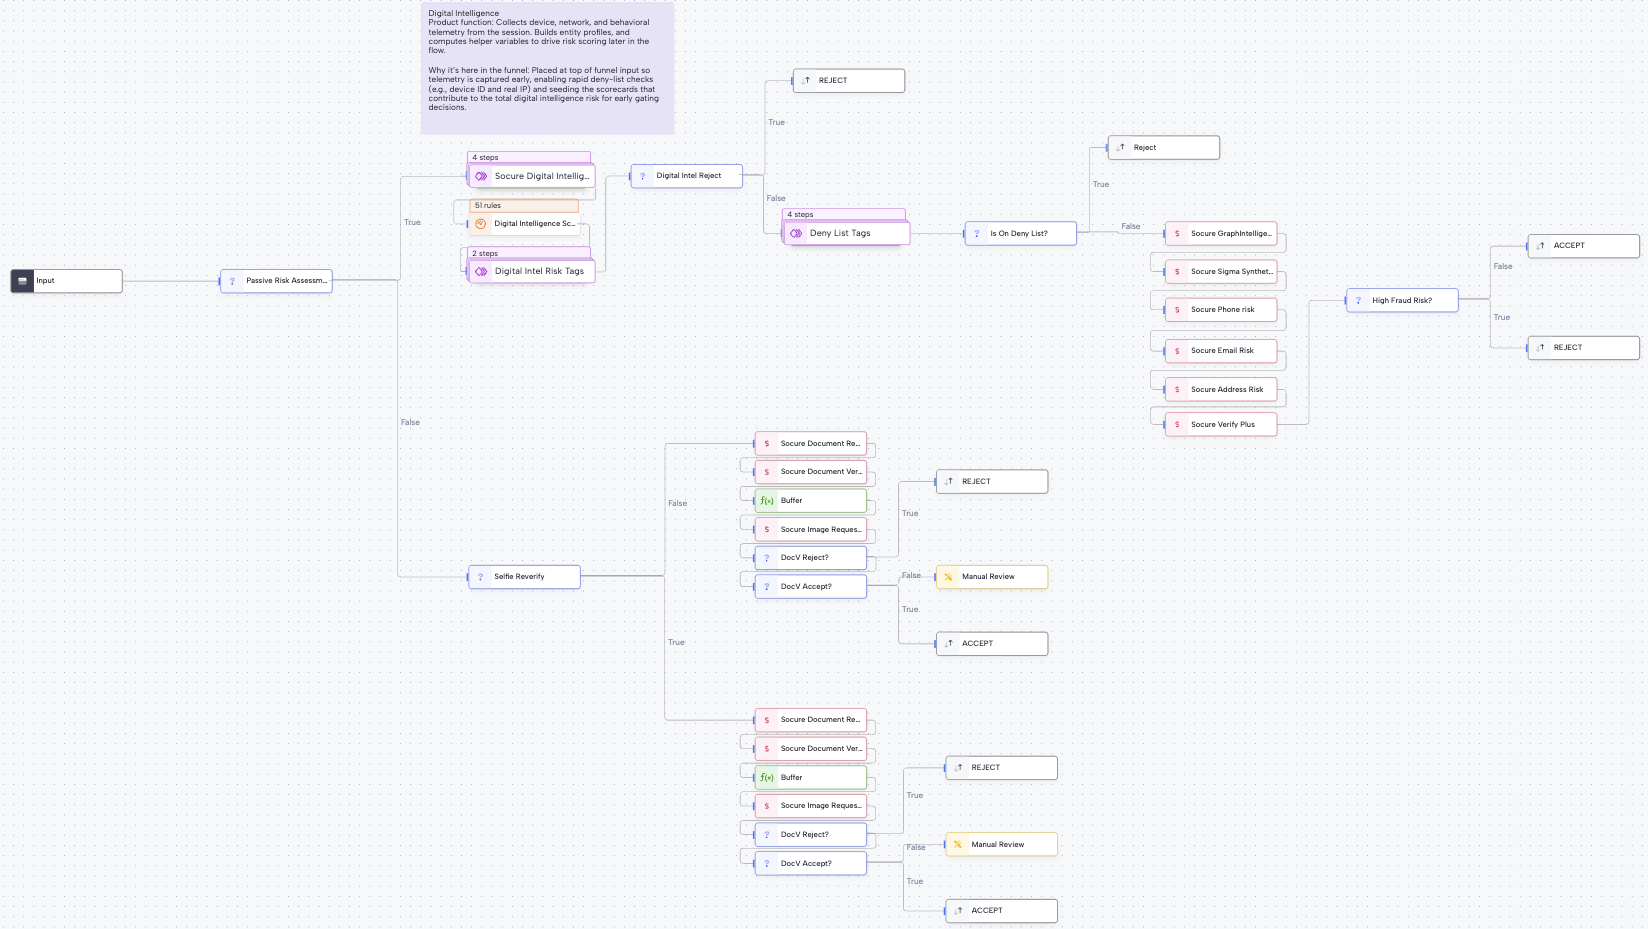
Top of the funnel Passive Check
Perform the following checks:
- Check Digital Intelligence (DI) Risk – Device, behavioral, and entity profiler signals are scored using a configurable weighted scorecard. Reject outcome based on DI risk threshold.
- Check Deny Lists – Verify if Email, Phone, Device, or IP are on a deny list. Reject outcome if matched.
- Check Fraud Risk – Evaluate Email Risk, Phone Risk, Sigma Identity Fraud, Sigma Synthetic, Address Risk, and Socure’s Graph Intelligence. Reject outcome based on thresholds.
- Verify identity – Confirm the identity of individual using Socure Verify or Verify Plus.
- Check Education (Optional) – Confirm whether the individual actually attended or graduated from the claimed institution.
-
Mid-funnel Document Verification (e.g. at the interview stage or on offer accepted)
Request Document Verification: Prompt the individual to submit a government-issued ID and a biometric selfie. RiskOS™ evaluates facial match and authenticity to confirm identity with high assurance. Workflow configured to accept/reject based on DocV decision.
-
Bottom of the funnel Selfie Re-verification (e.g. at the Onboarding state)
Request Selfie Reverification: Prompt the individual to submit a biometric selfie for facial match and authenticity checks. RiskOS™ evaluates the selfie to confirm identity with high assurance. Workflow configured to accept/reject based on selfie reverification decision.
-
Consent to Identity Verification
Capture candidate consent: Use a required question for any necessary legal language or links to documents (e.g., a candidate privacy policy) or to collect any required consents for workforce verification. For example, you may require a user to answer "I Consent" before submission. Consult your legal team for any specific requirements.
Workflow components used by Workforce Verification
| Component | Purpose |
|---|---|
| Input | Collect candidate and session data |
| Enrichment | Evaluate identity, fraud, and compliance |
| Rule Score Cards | Aggregate device and fraud risk |
| Condition | Apply thresholds and stage-based routing |
| On Hold | Pause workflow for DocV or Selfie capture |
| Decision | Emit final candidate outcome |
Configure Workforce Verification
Enable required enrichments
Your Socure account team provisions a standard Workforce Verification workflow with the following entitlements:
- Digital Intelligence
- Verify Plus
- Phone Risk
- Email Risk
- Address Risk
- Sigma Identity Fraud + Graph Intelligence
- Sigma Synthetic Fraud
- Document Verification (DocV)
- Selfie Re-verification
- Education Verification (optional)
Apply the right level of friction
Design your workflow to:
- Keep early stages frictionless
- Introduce document or selfie verification only when risk warrants
- Avoid unnecessary candidate drop-off
Configure Allow / Deny lists
Configure allowlists and denylists for:
- Email addresses
- Phone numbers
- IP addresses
- Devices
These lists are evaluated early in the workflow.
Configure inputs and routing
Typical configuration includes:
- Digital Intelligence scorecard to weight device and behavioral risk
- Reject conditions for high-risk fraud or deny-list matches
- Step-up routing to DocV or Selfie Re-verification when signals conflict
If you’re unsure how to tune thresholds, reach out to support with context about your use case.
Save and publish
Once your workflow is configured, publish it to go live.
Most customers start with a Socure-provided best-practice workflow and iterate over time.
Workflow testing checklist
Use this checklist to confirm accuracy, resilience, and completeness before production launch.
Updated 2 days ago