Okta SSO
This guide walks you through configuring Okta as a SAML Identity Provider for RiskOS™ authentication.
Before you begin
You will need your socure_public_account_id, available in the RiskOS™ Dashboard on the Developer Workbench > API Keys page under the Customer ID section.
Set up Single Sign-On (SSO) with Okta
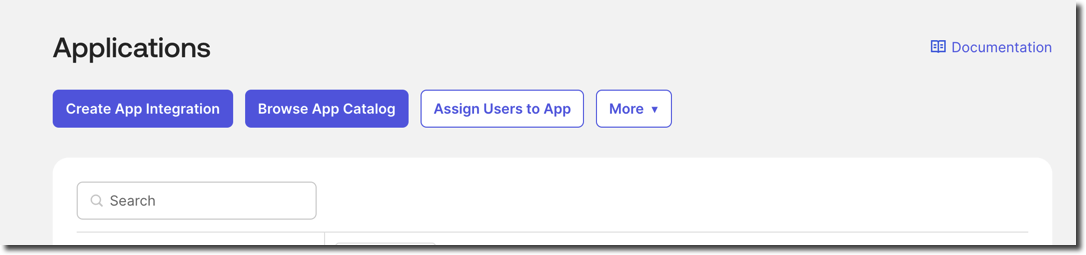
- In Okta, go to Applications > Create App Integration.
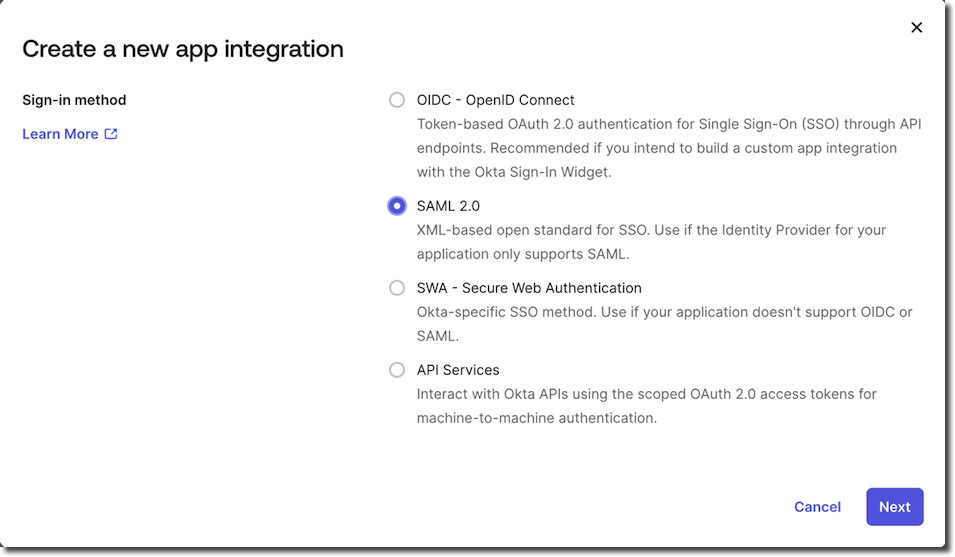
- Select SAML 2.0 as the sign-in method.
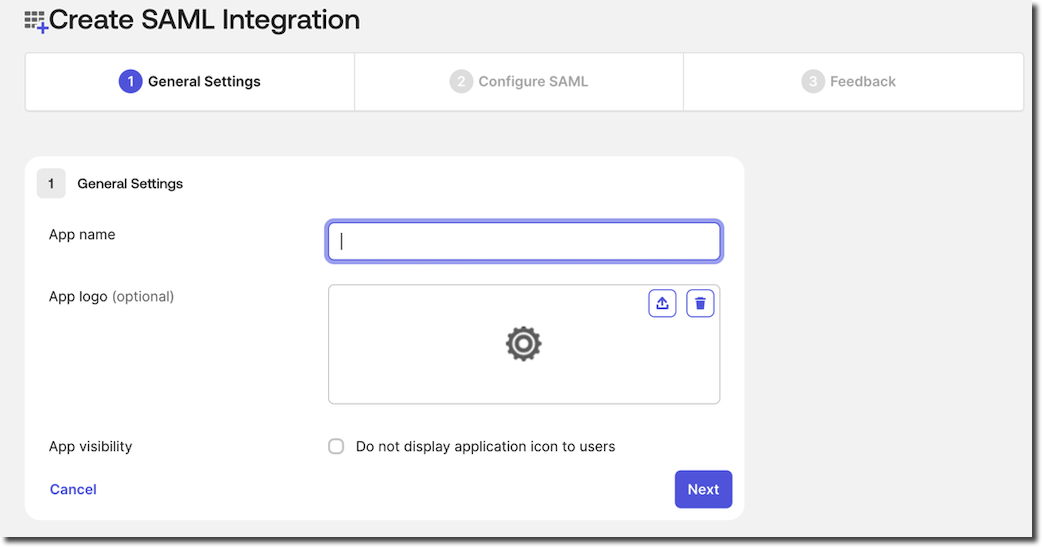
- Complete the General Settings:
- Provide an application name. For example, RiskOS™ Sandbox.
- (Optional) Add a logo or description.
Note:
RiskOS™ Sandbox and RiskOS™ Production have different access URLs. You must configure two applications in your Identity Provider:
- RiskOS™ Sandbox:
- Audience URI (SP Entity ID) to be specified:
https://riskos.sandbox.socure.com/saml2/socure_public_account_id- RiskOS™ Production:
- Audience URI (SP Entity ID) to be specified:
https://riskos.socure.com/saml2/socure_public_account_id
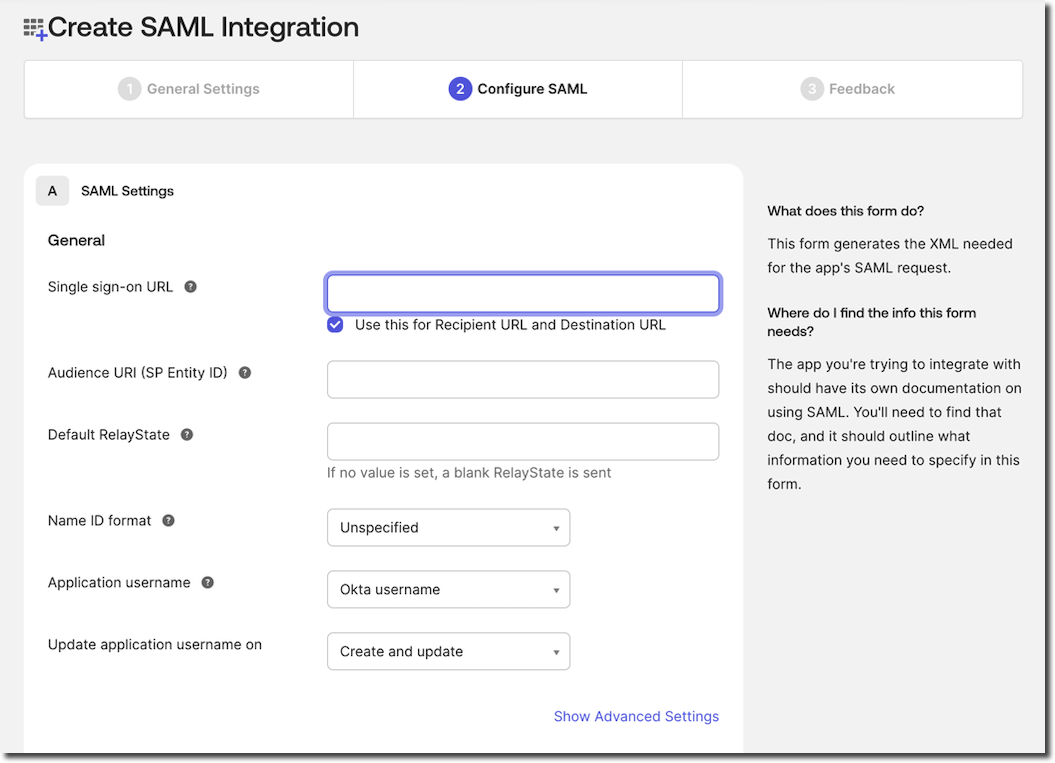
- On the Configure SAML tab, complete the following settings:
| Setting | Value |
|---|---|
| Single Sign-On URL | https://api-dashboardv2.socure.com/saml2/SSO Check the box for Use this for Recipient URL and Destination URL. |
| Audience URI (SP Entity ID) |
|
| Default Relay State | Leave blank |
| Name ID Format | Unspecified |
| Application Username | Okta username |
| Update application username on | Create and update |
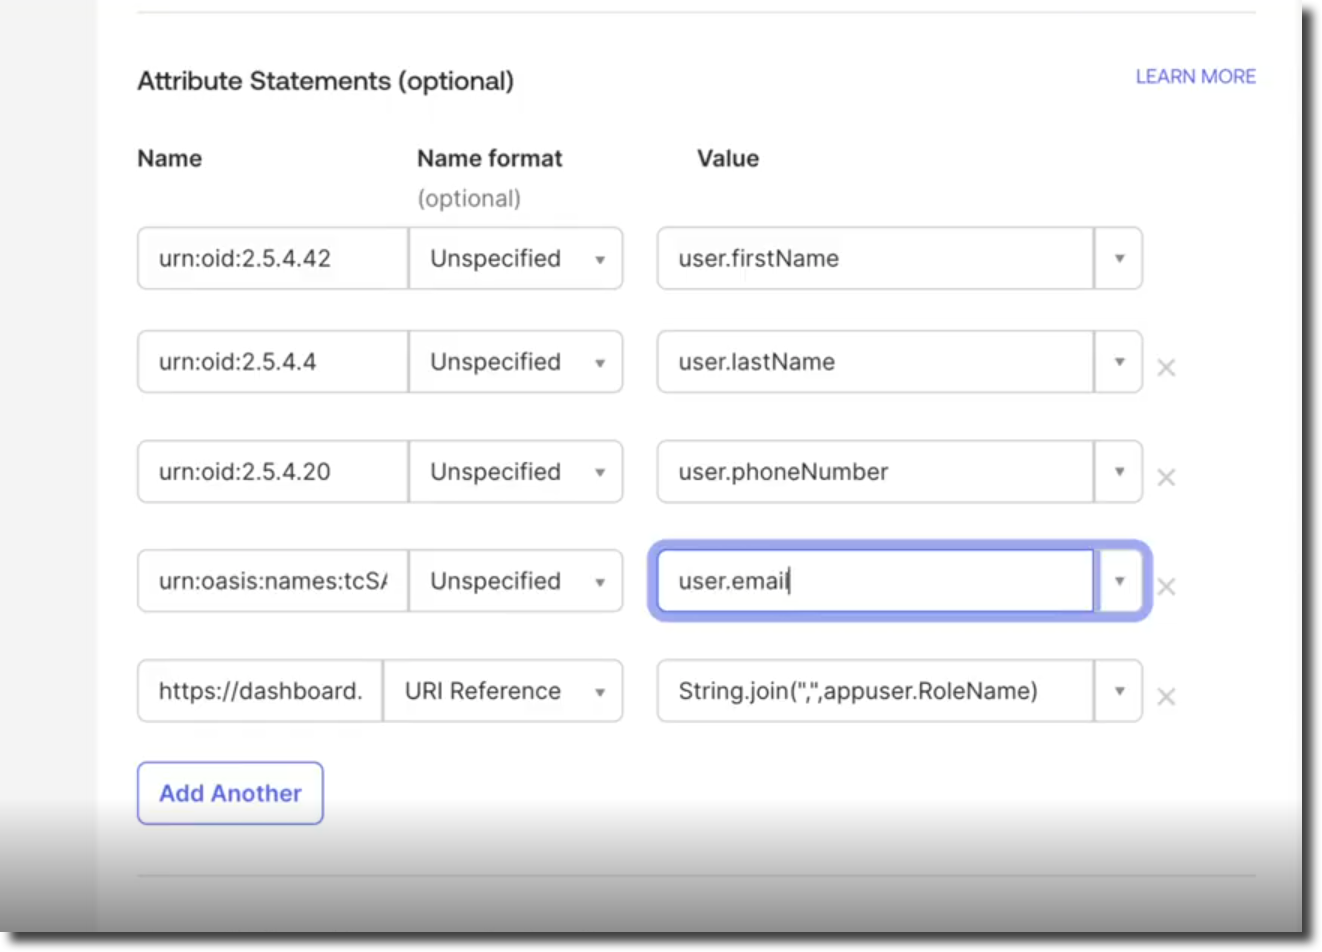
- Add the following attribute statements:
| Name | Name Format | Value | Required? |
|---|---|---|---|
urn:oid:2.5.4.42 | Unspecified | user.profile.firstName | Yes |
urn:oid:2.5.4.4 | Unspecified | user.profile.lastName | Yes |
urn:oid:2.5.4.20 | Unspecified | user.profile.mobilePhone | Yes |
urn:oasis:names:tc:SAML:1.1:nameid-format:emailAddress | Unspecified | user.profile.email | Yes |
https://dashboard.socure.com/attributes/role | URI Reference | String.join(",", appuser.RoleName) | Optional |
Note:
Group Attribute Statements are not required.
- Click Next to continue.
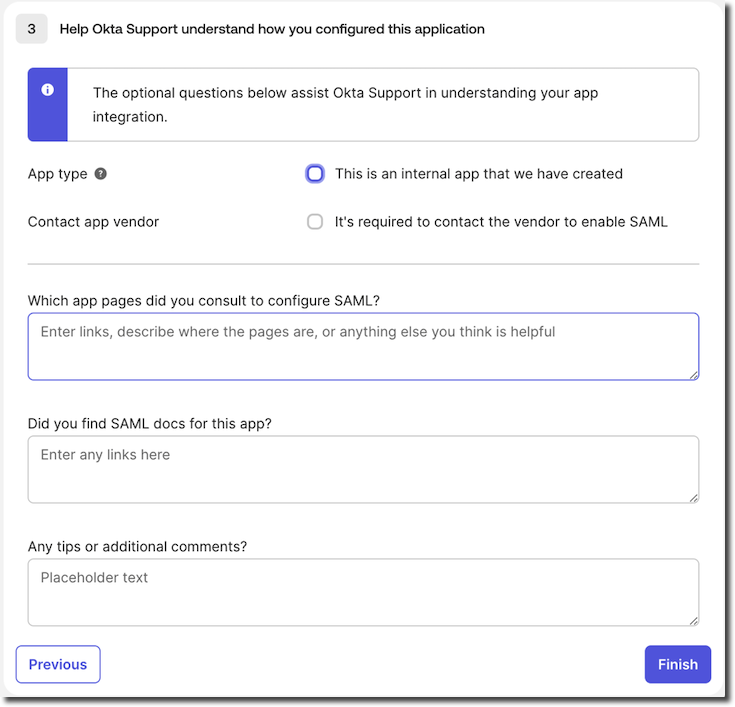
- Complete the optional Okta questions if you prefer.
- If you want to manage which role(s) to users who are given access to the RiskOS™ application, you would need to click on the application and add a new Attribute called RoleName
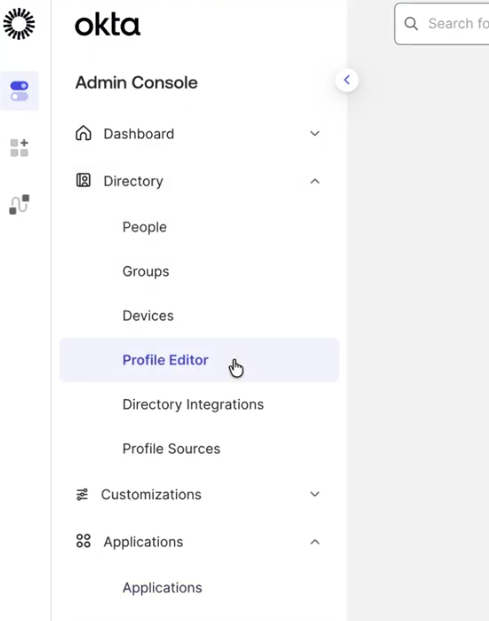
- Select the application by navigating to Directory -> Profile Editor
- Select the application you have configured e.g. "RiskOS™ Sandbox"

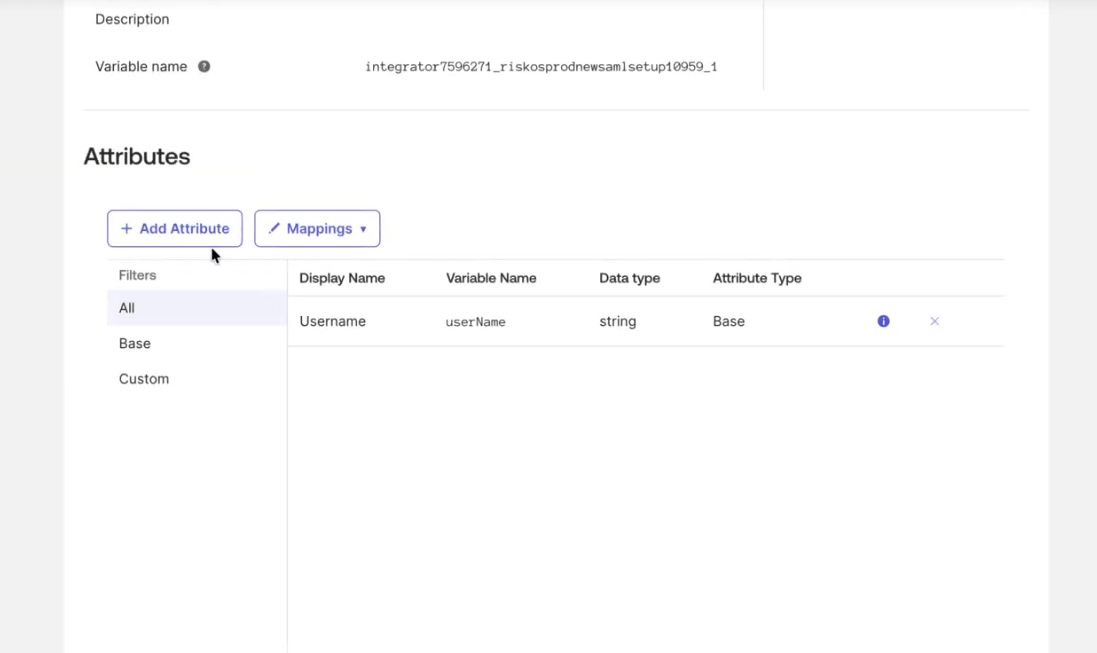
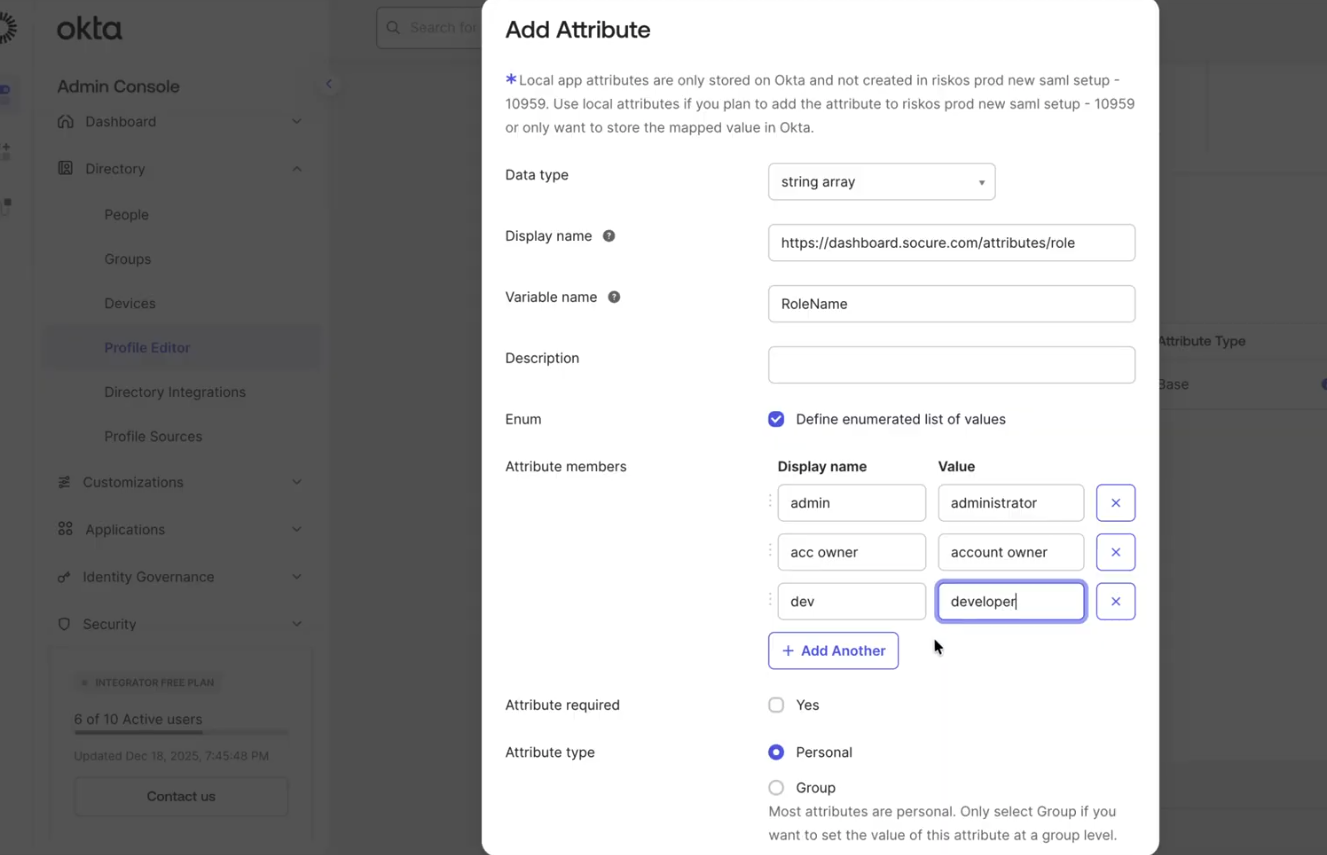
- If you want to manage role assignment in Okta, you will need to add a new custom attribute. Start by clicking on Add Attribute
- Fill out the details of the new custom attribute as follows:
- Data type: string array
- Display Name:
https://dashboard.socure.com/attributes/role - Variable Name: RoleName
- Enum: Checked
- Attribute Members:
- Display name is flexible and can be defined as you prefer, however the value has to match a valid RiskOS™ role name.
The following table lists the valid role names available in RiskOS™:
| Example Display Name | Value |
|---|---|
| Admin | administrator |
| Acc Owner | account owner |
| Dev | developer |
| Fraud Analyst | fraud analyst |
| Compliance Analyst | compliance analyst |
| Compliance Officer | compliance officer |
| Compliance Supervisor | compliance supervisor |
- In future, RiskOS™ will support custom roles, in which, you can add the custom role name as a valid value.

- Make sure you save the new custom attribute for RoleName. Once saved successfully, the new attribute RoleName will show in the list of Attributes (see screenshot below)
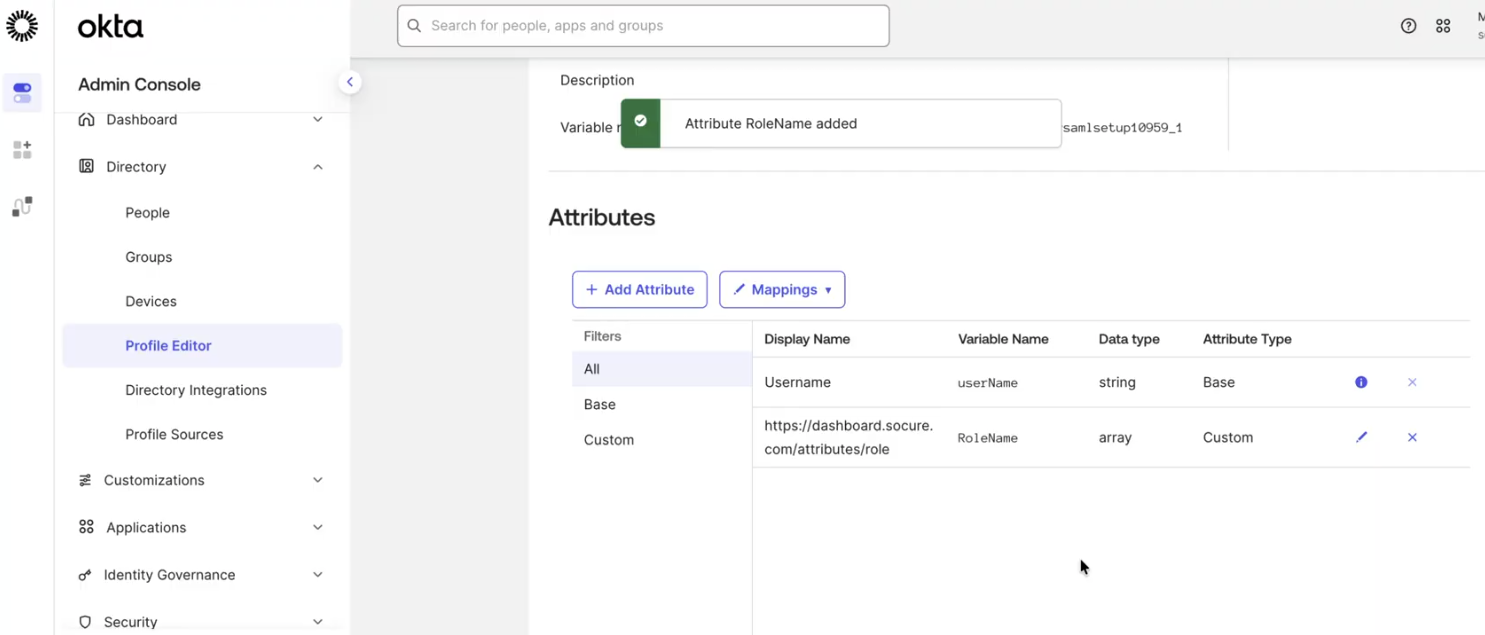
- You will be able to assign a specific role or roles to user when you are ready to assign the RiskOS™ Sandbox application to the user.
- Collect the SAML metadata that needs to be shared with Socure by clicking View SAML setup instructions.
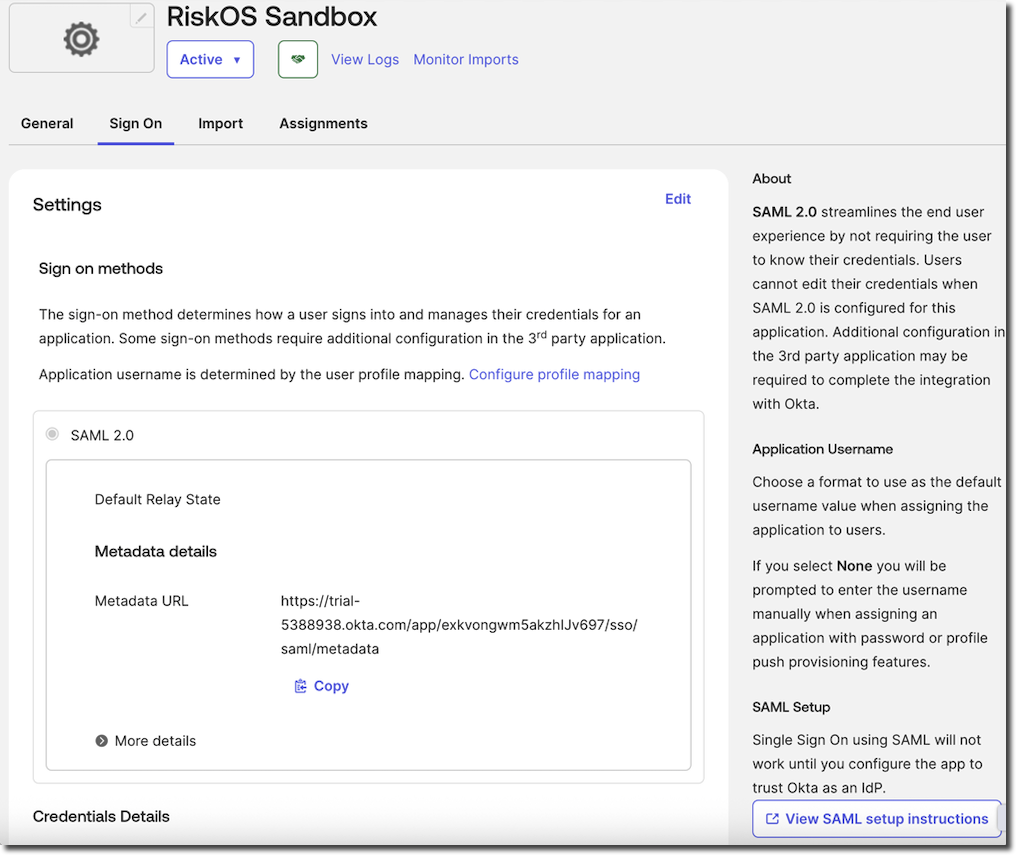
- Under Optional, copy all the content in the Provide the following IDP metadata to your SP provider field. Paste the content into a text editor (e.g. Notepad) and save the file as an XML file (i.e. with a .XML file extension).
Important:
Do not copy and paste just the X.509 certificate from the SAML Setup Instructions page.
Socure requires the full SAML metadata file (XML format), which includes your entity ID, endpoints, and certificates.
After receiving your SAML metadata file, your Technical Project Manager will confirm when SAML is enabled for your account.

- For reference, see the sample metadata file below.
Sample metadata
  <?xml version="1.0" encoding="UTF-8"?><md:EntityDescriptor entityID="http://www.okta.com/exkvongwm5akzhIJv697" xmlns:md="urn:oasis:names:tc:SAML:2.0:metadata"><md:IDPSSODescriptor WantAuthnRequestsSigned="false" protocolSupportEnumeration="urn:oasis:names:tc:SAML:2.0:protocol"><md:KeyDescriptor use="signing"><ds:KeyInfo xmlns:ds="http://www.w3.org/2000/09/xmldsig#"><ds:X509Data><ds:X509Certificate>MIIDqjCCApKgAwIBAgIGAZlyVmpNMA0GCSqGSIb3DQEBCwUAMIGVMQswCQYDVQQGEwJVUzETMBEG
  A1UECAwKQ2FsaWZvcm5pYTEWMBQGA1UEBwwNU2FuIEZyYW5jaXNjbzENMAsGA1UECgwET2t0YTEU
  MBIGA1UECwwLU1NPUHJvdmlkZXIxFjAUBgNVBAMMDXRyaWFsLTUzODg5MzgxHDAaBgkqhkiG9w0B
  CQEWDWluZm9Ab2t0YS5jb20wHhcNMjUwOTIyMTY1MDI5WhcNMzUwOTIyMTY1MTI5WjCBlTELMAkG
  A1UEBhMCVVMxEzARBgNVBAgMCkNhbGlmb3JuaWExFjAUBgNVBAcMDVNhbiBGcmFuY2lzY28xDTAL
  BgNVBAoMBE9rdGExFDASBgNVBAsMC1NTT1Byb3ZpZGVyMRYwFAYDVQQDDA10cmlhbC01Mzg4OTM4
  MRwwGgYJKoZIhvcNAQkBFg1pbmZvQG9rdGEuY29tMIIBIjANBgkqhkiG9w0BAQEFAAOCAQ8AMIIB
  CgKCAQEA3J9Y7au46sADYATZ3Aom8PtLhWcbyeS9MzJWWDCEBd+wlbpyHgj6Mk+Gw2VBti+IZFCI
  hH318jOiiWJKc8zQ0jzVhiVi+TUrUr2xrYln6uMdh3ExxRU5v4aalBAllE67dsqzZClRQ2Nm8MI0
  1ulUGSvlsM1IxtAHKDwa1MPyIqR8trP0vUJy1aQBidHEO9AITHXsYGWaVhe7EcVwM2CUc0sDgX9j
  BkPerlK2BiGaL6YGLj8X+AMoGL7MXhc9jhzHQdf/0agUNSZ9p5ayhfhKkkQEJUss/uoxC6b1VGCY
  PlPtfm3kr9D7FDA+3dsfwX4Y7Cjft+yixAej2C04Hn5gMwIDAQABMA0GCSqGSIb3DQEBCwUAA4IB
  AQB9U4i7Yy9p7gwGMz33hhGY6gWQej2qValzT+yjwNDb+sTW/VutjKkoSPRojprndcYT6I+GLPxr
  4pVaCeTeYIY/LSJmg8ULcJHtW296ARwe6+4etctdGAiUuZmx4pqg+hwwTN+Pl28zMdpArDxK76d0
  K4SBqoPrbDlvOo6tJR+u/R4K58ZeRHfSZaiVNC5zX7P5agtNq0fpDSz0xx0g6zK/nGMyo33owa/a
  OPfRY20DMx7v+rhBnz9rVC5rDxayIZyvPPMpBBGBMlUQPiIV5UIkxwmcA5qBzOwE47AX4DLp1+5j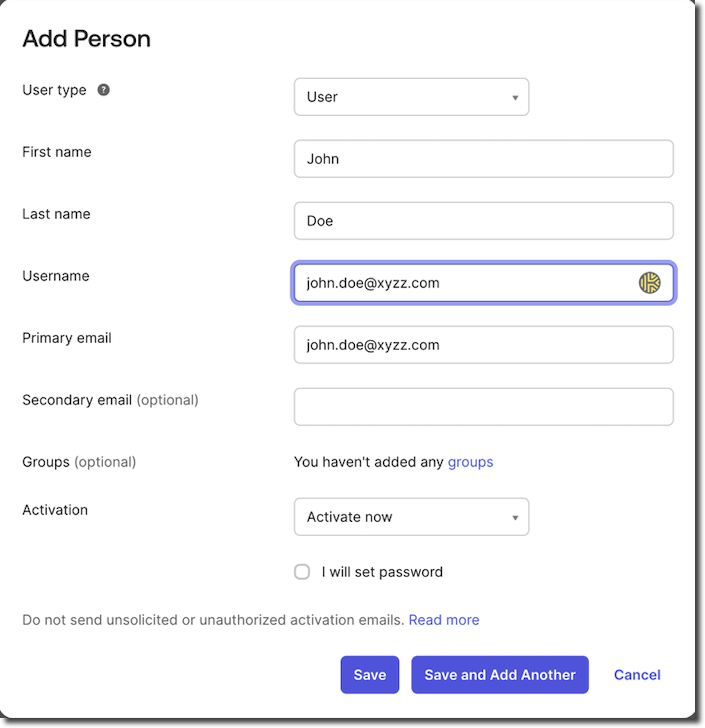
9GJWBSXHuvurnHOnM9D6nFgt4/EME+3iX3HeD93M</ds:X509Certificate></ds:X509Data></ds:KeyInfo></md:KeyDescriptor><md:NameIDFormat>urn:oasis:names:tc:SAML:1.1:nameid-format:unspecified</md:NameIDFormat><md:NameIDFormat>urn:oasis:names:tc:SAML:1.1:nameid-format:emailAddress</md:NameIDFormat><md:SingleSignOnService Binding="urn:oasis:names:tc:SAML:2.0:bindings:HTTP-POST" Location="https://trial-5388938.okta.com/app/trial-5388938_riskossandbox_1/exkvongwm5akzhIJv697/sso/saml"/><md:SingleSignOnService Binding="urn:oasis:names:tc:SAML:2.0:bindings:HTTP-Redirect" Location="https://trial-5388938.okta.com/app/trial-5388938_riskossandbox_1/exkvongwm5akzhIJv697/sso/saml"/></md:IDPSSODescriptor></md:EntityDescriptor>- Next, assign users by going to People > Add Person.
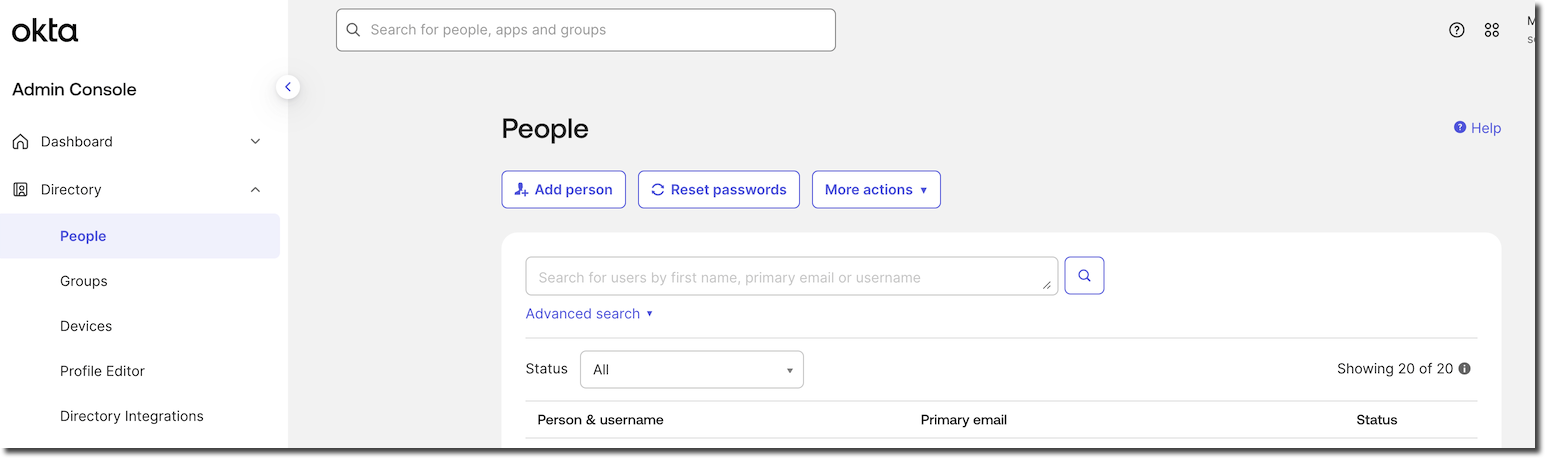
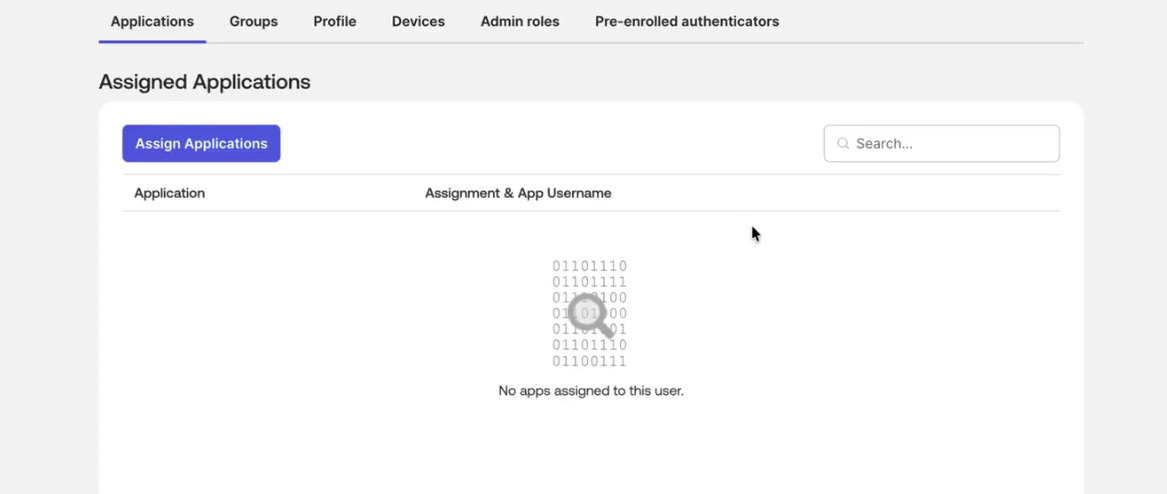
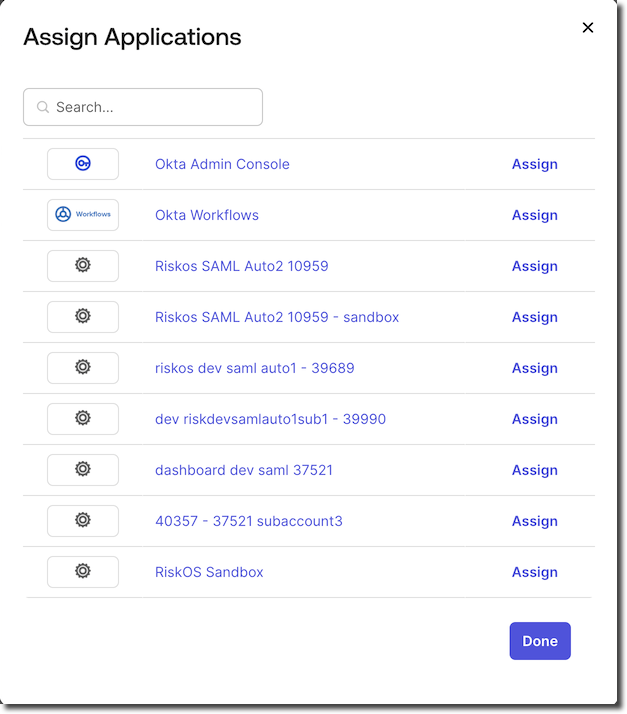
- Assign the user to the RiskOS™ Sandbox application.
- Now that you have created the user, you can assign the application by clicking on Assign Applications
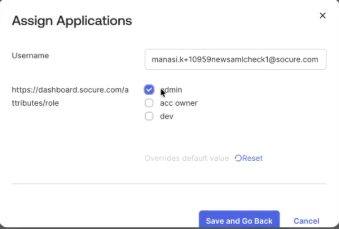
- If you are planning to manage role assignment to user and you have configured the custom SAML attribute for RoleName, you can assign a role to the user when assigning the application.
IMPORTANT NOTES:
RiskOS™ can have only 1 user assigned as Account Owner.
A role assigned to user is applicable in both Sandbox and Production. That is, if you assign a Developer role to a user, the user will have Developer role in both RiskOS™ Sandbox and RiskOS™ Production. In early 2026, we will be enhancing role-based access management to allow customers to assign roles by environment (e.g. assign [email protected] Administrator role only in Sandbox and assign only Developer role in Production).
- Once assigned, the user can log in through the IdP dashboard and access RiskOS™ Sandbox.
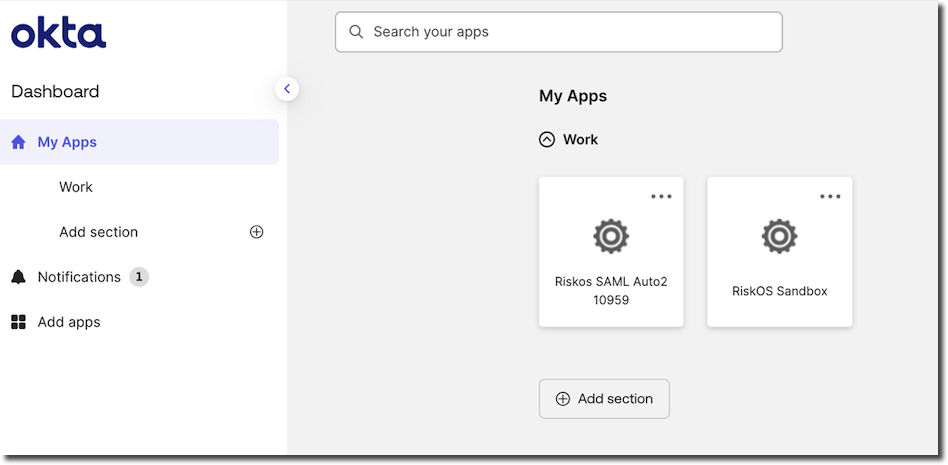
End user experience
When John Doe ([email protected]), who is assigned to the RiskOS™ Sandbox application, signs in to the Identity Provider (e.g., Okta), they will see RiskOS™ Sandbox listed among available apps. Selecting it redirects them to the RiskOS™ Sandbox environment.
User management in RiskOS™
- User permissions are managed through roles.
- You can create users in RiskOS™ first, or let RiskOS™ auto-create users when they access RiskOS™ via SAML.
- If
RoleName(new custom SAML attribute, introduced as a new feature in December 2025) is not specified in the SAML assertion, users that are auto-created will be assigned Analyst role by default. Administrators can change the role in the RiskOS™ Dashboard from the Users page. - Ensure the email address matches exactly between RiskOS™ and your IdP.
Note:
Users must re-authenticate every 12 hours by default. You can shorten this interval with the
maxAuthenticationAgeparameter.
FAQs
Answers to common questions about configuring SAML with Okta for RiskOS™.
Do I need to configure an app for each sub-account?
No, if you want access to the parent and all sub-accounts. Socure can enable SAML for all sub-accounts with a single metadata file.
Yes, if you want to restrict access to specific sub-accounts. Configure each sub-account as a separate Okta app.
Are all attribute statements required?
The following attribute statements are required:
| Name | Name Format | Value |
|---|---|---|
urn:oid:2.5.4.42 | Unspecified | user.profile.firstName |
urn:oid:2.5.4.4 | Unspecified | user.profile.lastName |
urn:oid:2.5.4.20 | Unspecified | user.profile.mobilePhone |
urn:oasis:names:tc:SAML:1.1:nameid-format:emailAddress | Unspecified | user.profile.email |
Are attribute statements case sensitive?
Yes. Enter the names, formats, and values exactly as shown.
Can I manage role assignment via SAML?
Yes. You can add the following attribute statement in addition to the four attribute statements that are required:
| Name | Name Format | Value |
|---|---|---|
https://dashboard.socure.com/attributes/role | URI Reference | String.join(",", appuser.RoleName) |
| You will also need to add a new custom attribute with variable name set to RoleName as an enumerated list with valid values matching RiskOS™ role names. |
Updated 2 days ago