Handle DocV and Final Decision
Handle Document Verification when an evaluation pauses for document capture, then process the final decision returned via webhook.
Step 1: Detect Document Verification
Use this guide to handle Document Verification when an evaluation pauses for document capture before RiskOS™ returns a final decision.
Identify Document Verification by checking for all of the following in the evaluation response:
eval_status = evaluation_pauseddata_enrichmentscontains an object whereenrichment_provider = "SocureDocRequest"
Extract handoff assets
Locate the SocureDocRequest object and extract the following from response.data:
| Field | Purpose |
|---|---|
docvTransactionToken | Required. Pass this to your frontend to initialize the DocV SDK. |
url | Optional. Use for direct mobile redirects to the Capture App. |
qrCode | Optional. Base64 PNG for desktop-to-mobile handoff. |
Example response
{
  "decision": "REVIEW",
  "status": "ON_HOLD",
  "eval_status": "evaluation_paused",
  "data_enrichments": [
    {
      "enrichment_provider": "SocureDocRequest",
      "response": {
        "data": {
          "docvTransactionToken": "70c6a4bc-f646-4c6a-94c1-9cd428e356ef",
          "url": "https://verify.socure.com/..."
        }
      }
    }
  ]
}Note:
The
REVIEWdecision in this response is non-terminal and indicates the evaluation is paused for DocV.Do not use this value for routing.
What to do:
- Locate the
SocureDocRequestobject indata_enrichments. - Extract
docvTransactionTokenfromresponse.data. - Persist the
eval_idanddocvTransactionToken. - Send the token to your frontend and launch DocV.
- Wait for the final terminal result (
ACCEPTorREJECT) via webhook or updated evaluation.
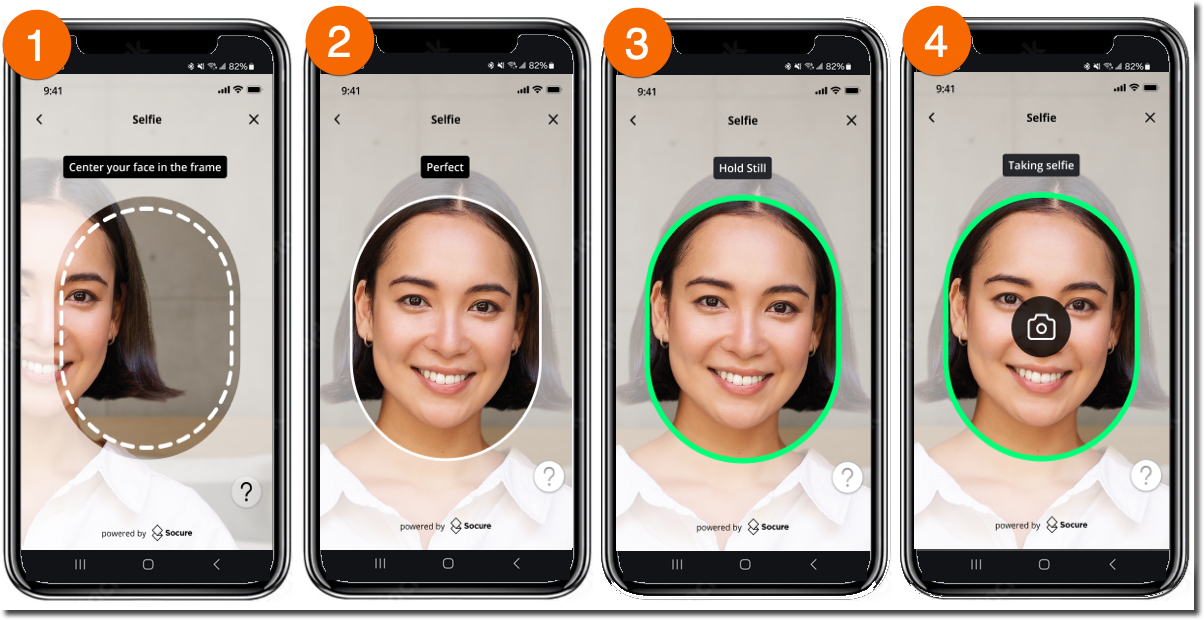
Step 2: Launch the DocV Web SDK
The DocV Web SDK is a client-side JavaScript library that embeds the RiskOS™ document verification experience directly into your application.
It renders the Capture App, a secure mobile experience that guides the user through:
- Capturing a government-issued ID
- Taking a selfie
- Completing liveness verification
The Capture App UI is configurable from the DocV App page in the RiskOS™ Dashboard.
- Include the DocV Web SDK script in your application.
- Pass your SDK key (from the RiskOS™ Dashboard) and
docvTransactionTokentoSocureDocVSDK.launch().
<html>
  <head>
    <script src="https://websdk.socure.com/bundle.js"></script>
  </head>
  <body>
    <button onclick="start()">Start Verification</button>
    <div id="websdk"></div>

    <script>
      var config = {
        onProgress: function (event) {
          /* Called during capture */
        },
        onSuccess: function (response) {
          /* Called on success */
        },
        onError: function (error) {
          /* Called on error */
        },
        qrCodeNeeded: true, // Show QR code option
        disableSmsInput: false, // Enable SMS input
        closeCaptureWindowOnComplete: true, // Auto-close tab after document upload confirmation
        autoOpenTabOnMobile: true, // Skip "Continue on New Tab" screen on mobile and launch Capture App in a new tab
      };
      function start() {
        SocureDocVSDK.launch(
          'SDKKey', // Replace with your SDK Key
          'docvTransactionToken', // Replace with the docvTransactionToken
          '#websdk',
          config // optional
        );
      }
    </script>
  </body>
</html>
Handoff options
Depending on your integration pattern, users can access the Capture App using:
- QR code for desktop-to-mobile handoff
- Secure SMS link for desktop or mobile
- Mobile redirect URL using
response.data.url
No retry or resubmit
Document Verification runs once per evaluation. To retry Document Verification, create a new evaluation.
The following conditions result in a REJECT decision:
- DocV returns
rejectorresubmit - The DocV request does not reach
SESSION_COMPLETE - The session expires
- The user declines consent
- DocV request or response errors occur
iOS and Android apps:
You can launch the Capture App by redirecting the user to the DocV URL returned in the Evaluation response.
data_enrichments[n].response.data.urlIf you include
data.individual.docv.config.redirect.urlin your Evaluation request, the Capture App redirects the user back to your app after capture completes. See the integration guides for iOS Webview or Android Webview for advanced SDK configuration and mobile patterns.
Step 3: Receive the final decision
DocV is asynchronous. After the Capture App flow completes, RiskOS™ resumes the paused evaluation and returns the final result.
To receive the final decision by webhook, configure a webhook endpoint on the Developer Workbench > Webhooks page in the RiskOS™ Dashboard.
Final routing
After DocV completes:
- Wait for the
evaluation_completedwebhook - Route based on the terminal response
- Do not re-submit DocV for the same evaluation
Routing outcomes:
ACCEPT→ Continue onboarding (for example, create account or grant access)REJECT→ Route to your fallback, manual review, or decline flow
Important:
Do not route on the initial response.
Although the response may include
decision = REVIEW, this is not a final outcome.Wait for the
evaluation_completedwebhook and route only on:
ACCEPTREJECT
Example routing logic
if (data.decision === "ACCEPT") {
  router.push("/success");
}

if (data.decision === "REJECT") {
  router.push("/review");
}
Key takeaways
- Detect Document Verification using
SocureDocRequestindata_enrichments. - Persist
eval_idanddocvTransactionTokenfor webhook correlation. - DocV runs once per evaluation.
- Do not route on the initial response (
decision = REVIEW). - Wait for the
evaluation_completedwebhook before routing. - Document Verification failures, including
reject,resubmit, expired sessions, consent decline, request/response errors, or a DocV request that does not reachSESSION_COMPLETE, result in REJECT.
Error handling
If the API returns an HTTP error (4xx or 5xx), your application should handle it before processing any evaluation logic.
| Status code | Meaning | What to do |
|---|---|---|
400 | Bad request — missing or invalid fields | Check request body against required fields. |
401 | Unauthorized — invalid or missing API key | Verify your Authorization header. |
404 | Not found — invalid eval_id or endpoint | Confirm the eval_id and endpoint URL. |
429 | Rate limited | Back off and retry after the Retry-After header value. |
500 | Internal server error | Retry with exponential backoff (max three attempts). |
For the full error schema and all error codes, see the Errors Reference.
Store required data
Persist these fields for tracking and reconciliation:
| Field | Description |
|---|---|
id | Unique identifier for the request |
eval_id | Evaluation identifier |
decision | Final decision outcome (ACCEPT or REJECT; initial REVIEW is non-terminal) |
status | Overall request status |
eval_status | Evaluation processing status |
workflow | Workflow name |