
Onboard a Client
Walk through the three-step wizard to onboard a new client account as a Channel Partner in RiskOS™.
Onboarding a new client creates a managed account under your Channel Partner organization. The onboarding wizard guides you through three steps: entering client information, selecting a plan tier and use cases, and reviewing the details before confirmation.
Applies to:
Channel Partners only. Client onboarding is available only from a Channel Partner management account — it is not part of a direct customer account.
Why it matters
Every client relationship in RiskOS™ starts with onboarding. The choices you make during this process — particularly the plan tier and use case selections — determine what the client can do on their own and what requires your involvement. Getting onboarding right reduces follow-up configuration work and support requests.
Before you begin
| Requirement | Details |
|---|---|
| Permission | Your assigned role must grant the Accounts permission at the Can Edit level. Accounts is one of the permission categories on a role; Can Edit is its highest access level and is what allows onboarding and editing clients. To check or change this, see Roles & Permissions, or ask your administrator which role you have. |
| Account context | Log into your Channel Partner management account. |
| Information needed | Client organization name, unique client ID, account owner email (must belong to a user in your organization), account owner first and last name. |
| Decisions needed | Choose the plan tier (Standalone or Centrally Managed) and the use cases to provision. You set the tier now and can't change it after onboarding, so see Choosing the right tier if you are unsure. |
| Estimated time | 5–10 minutes. |
| Production impact | The client account is created immediately and appears as Active in the Clients table. No staging or approval workflow. |
Open the onboarding wizard
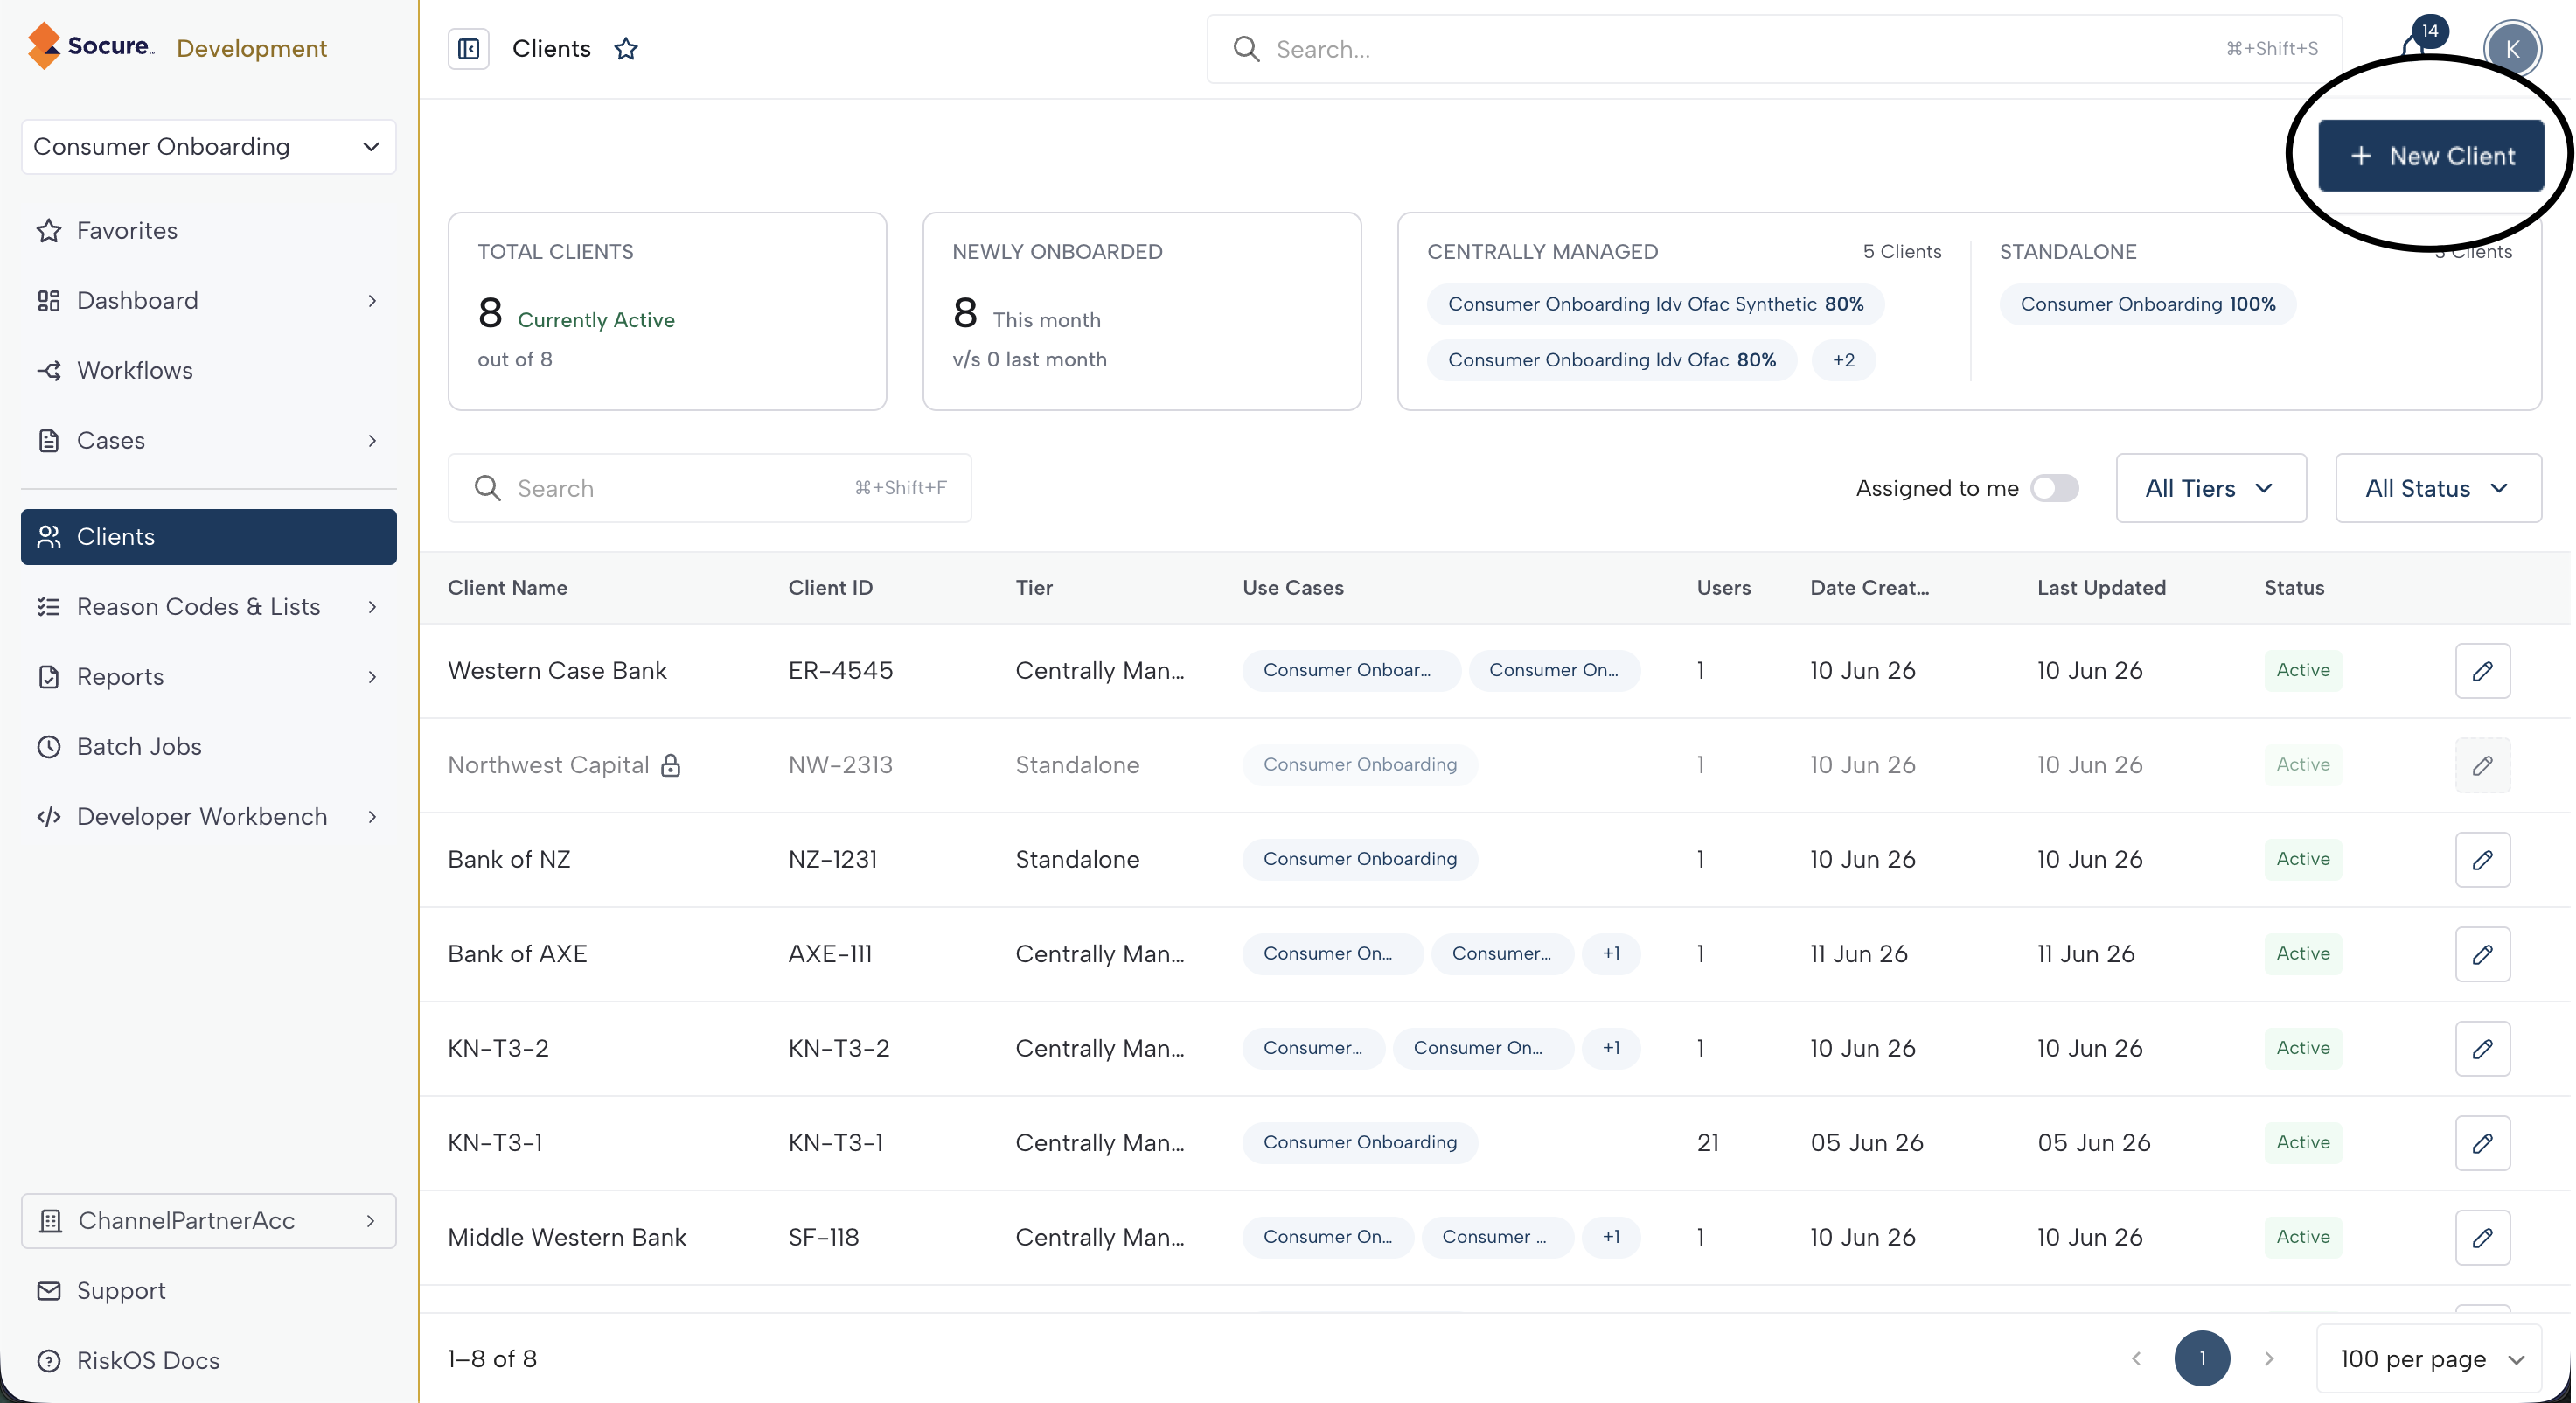
On the Clients page, click the + button in the top-right corner. The Onboard Client modal opens with a three-step wizard.
A stepper at the top of the modal shows your progress through the three steps: Client Info > Plan Details > Review. You can click any previously completed step to go back and make changes.
Step 1: Client information
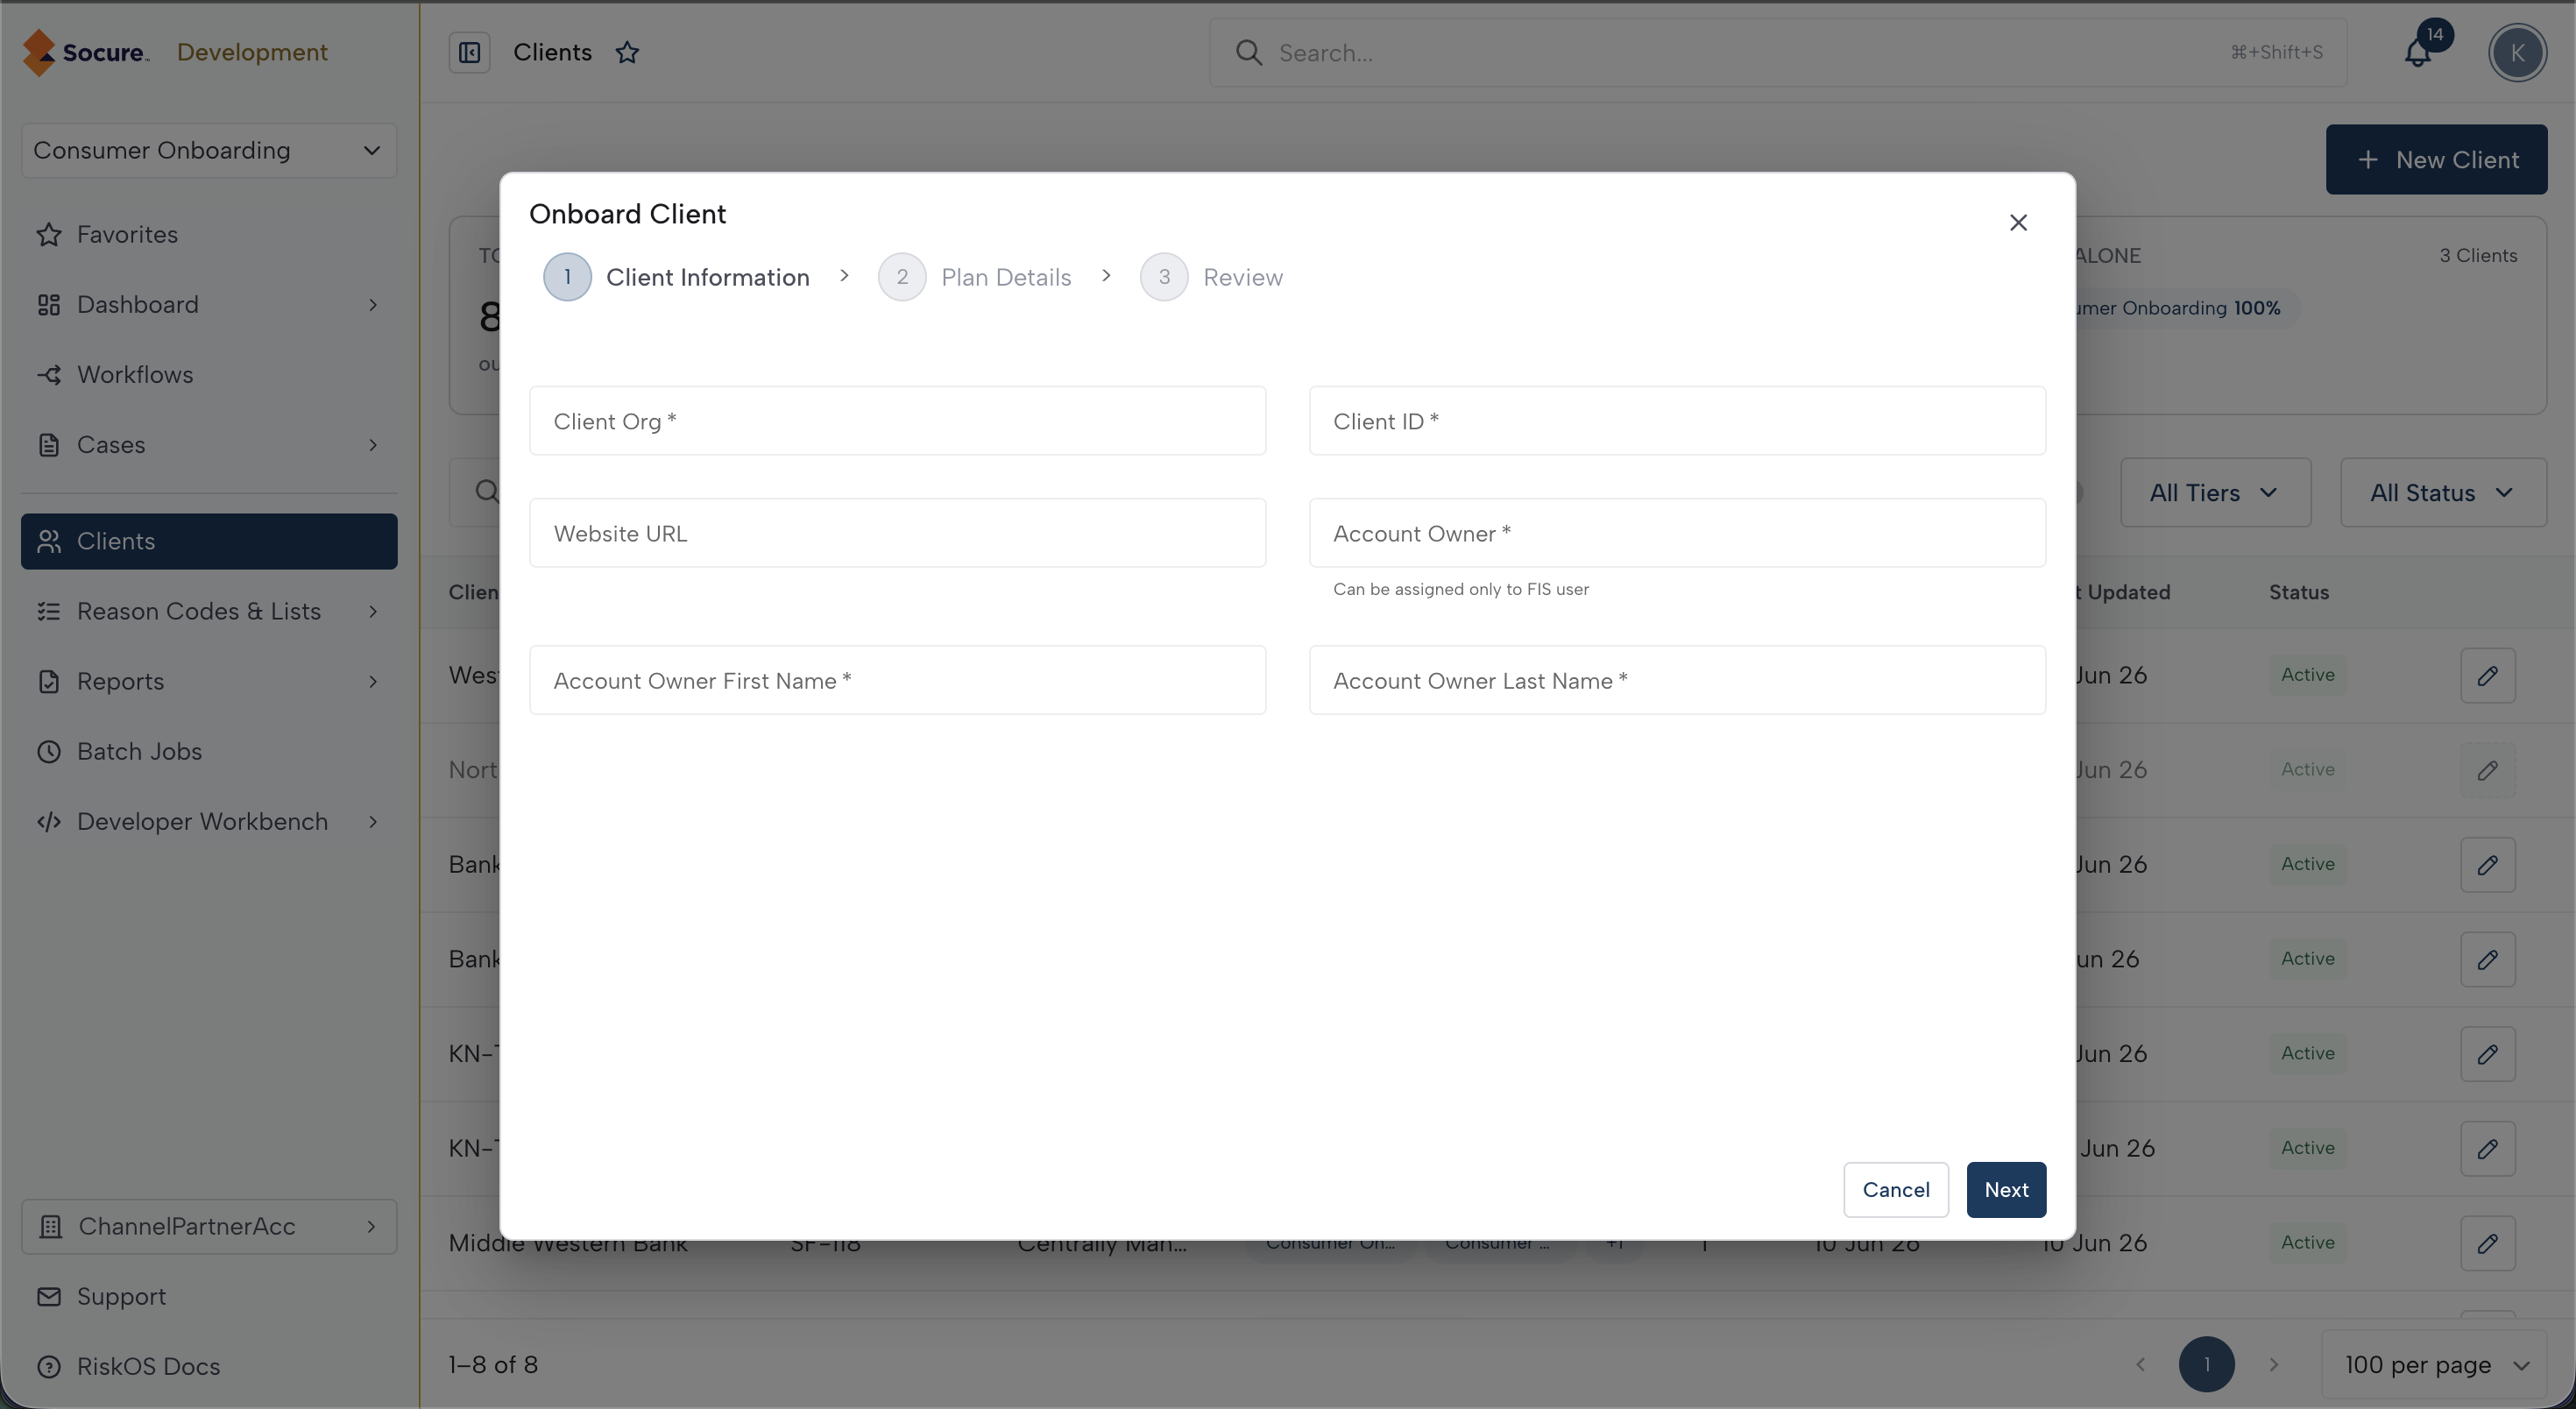
Fill in the client's details:
| Field | Required | Placeholder | Description |
|---|---|---|---|
| Client Org | Yes | For example, Example Corp | The client's organization name. Must be 5–255 characters, use only letters, digits, spaces, and the symbols . - _ &, and be unique under your Channel Partner. |
| Client ID | Yes | For example, CE-1234 | A unique identifier for this client. It must be unique under your Channel Partner. The service accepts any characters, but we recommend short, ASCII, human-readable IDs. |
| Website URL | No | For example, https://examplecorp.com | The client's website. If provided, must be a valid URL. |
| Account Owner | Yes | For example, [email protected] | The email of the designated account owner. Must belong to a user within your organization. |
| Account Owner First Name | Yes | For example, John | The account owner's first name. |
| Account Owner Last Name | Yes | For example, Doe | The account owner's last name. |
Click Next to proceed to Step 2.
Field validation rules
When you click Next, RiskOS™ validates the Client Org and Client ID fields. Both must satisfy the following rules.
Client organization name
| Rule | Value |
|---|---|
| Required | Yes |
| Minimum length | 5 characters |
| Maximum length | 255 characters |
| Allowed characters | Letters (A–Z, a–z), digits (0–9), spaces, and the symbols . - _ & |
| Disallowed characters | Any other special character (for example , / \ @ # ! ? : ; " ' ( ) * + =), emojis, non-ASCII letters, and control characters |
| Uniqueness | Must be unique across all clients under the same Channel Partner. The check is case-insensitive, so Acme Corp and ACME CORP are treated as the same name. |
| Spaces | Leading and trailing spaces count toward the length and are not stripped. Avoid them. |
Valid examples: Acme Corp, Smith & Jones LLC, Client_42, Acme-Health.AI
Invalid examples: AB (too short), Acme, Inc. (contains ,), Café Corp (contains é), Acme/Health (contains /)
Client ID
| Rule | Value |
|---|---|
| Required | Yes |
| Minimum length | 1 character |
| Maximum length | No upper limit enforced by the service |
| Allowed characters | No character-set restriction enforced by the service; any string is accepted |
| Uniqueness | Must be unique across all clients under the same Channel Partner. The check is case-insensitive, so ab-1234 and AB-1234 are treated as the same ID. |
Tip: Although the service accepts any Client ID, keep IDs short, ASCII, and human-readable — for example
CE-1234(uppercase letters, digits, and hyphens). This keeps them safe to embed in URLs, logs, and downstream system references.
Validation messages
| Message | Cause |
|---|---|
client organization name is required | The Client Org field is blank. |
invalid client organization name format | The name has fewer than 5 characters, more than 255 characters, or contains a disallowed character. |
client org name "<name>" is already in use under channel partner … | Another client under the same Channel Partner already uses this name (case-insensitive match). |
client ID is required | The Client ID field is blank. |
client id "<id>" is already in use under channel partner … | Another client under the same Channel Partner already uses this ID (case-insensitive match). |
Note:
The Account Owner field validates that the email belongs to a user within your organization. If you enter an external email address, a validation error appears for the field.
Step 2: Plan details
Select a plan tier
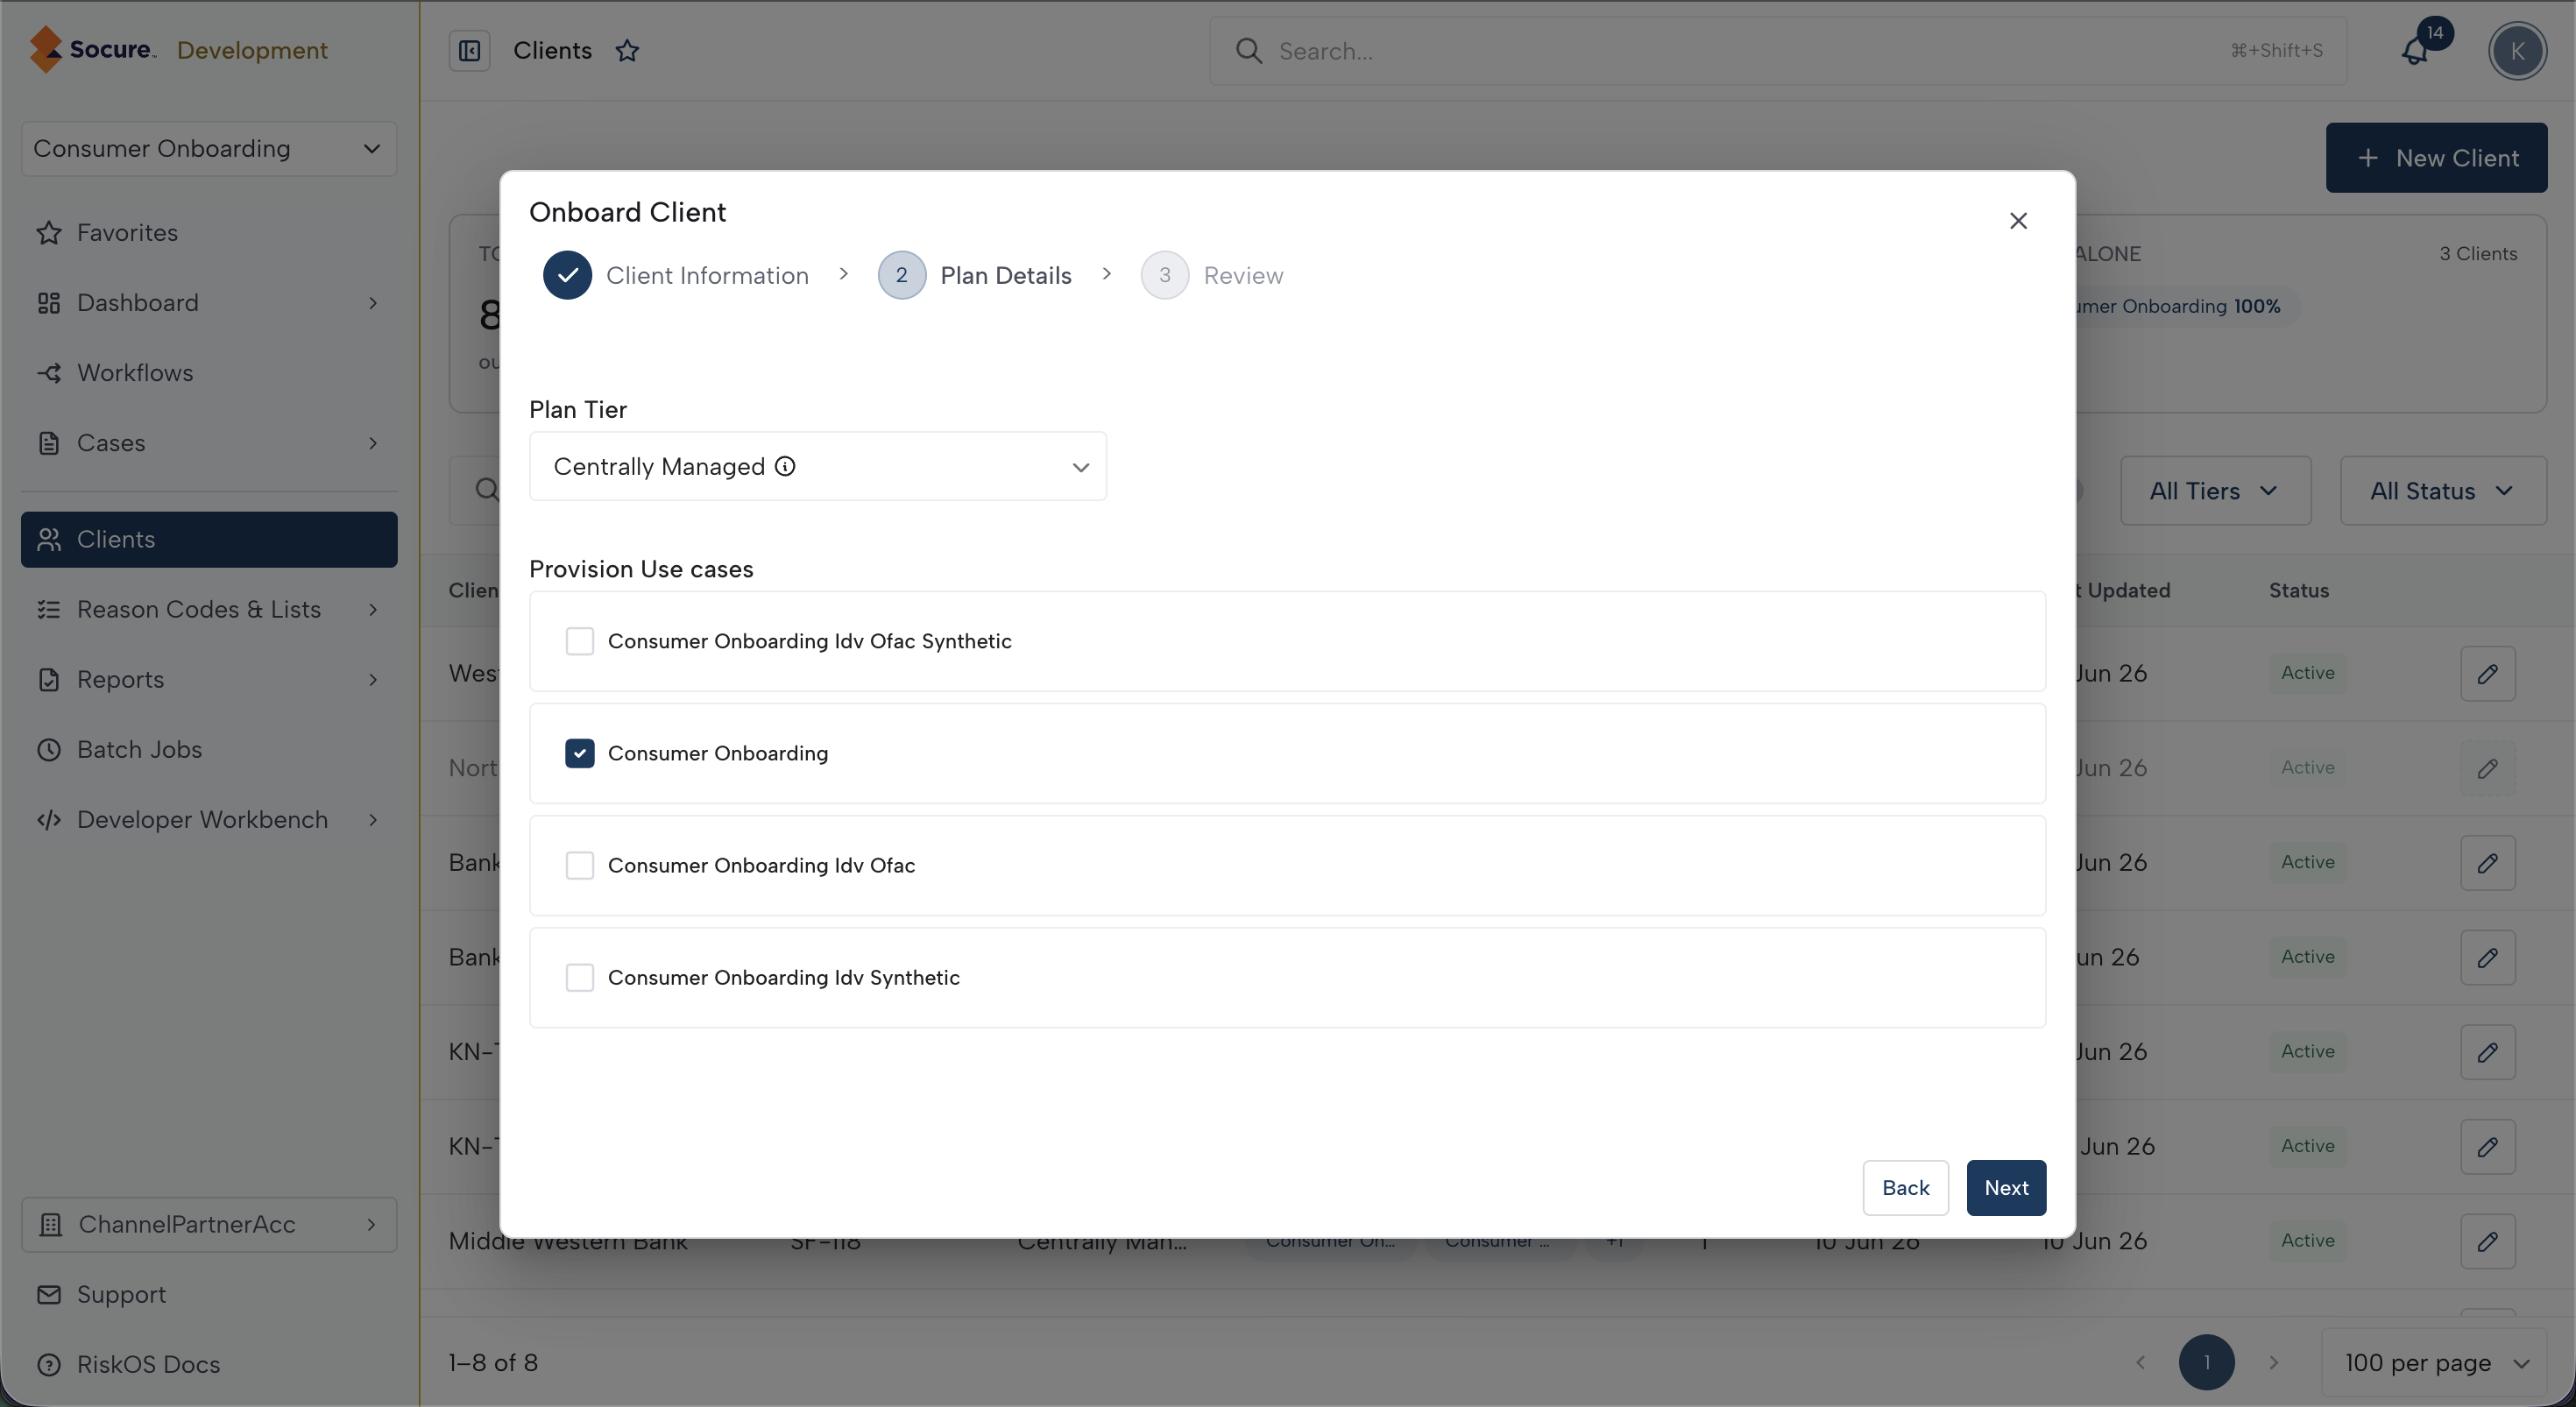
Select a Plan Tier from the dropdown. The tier determines which RiskOS™ features the client can access:
- Standalone — Full workflow capabilities (create, modify, test, deploy), plus access to configurations, allow/deny lists, and reason codes.
- Centrally Managed — View-only access for most features. The Channel Partner manages workflows and configurations on the client's behalf.
For a complete comparison, see the tier comparison table. For a decision guide, see Choosing the right tier.
Provision use cases
Under Provision Use Cases, select at least one use case to enable for this client. Each use case appears as a bordered checkbox item showing:
- The use case display name
- An optional description
Select each use case you want to provision by clicking the checkbox or anywhere on the row.
Important:
The plan tier you choose here directly controls the client's feature access. Centrally Managed clients can't create, modify, or delete workflows — they can only view them. You set the tier during onboarding and can't change it afterward, so choose carefully. For a decision guide, see Choosing the right tier.
Click Next to proceed to the review step.
Step 3: Review and confirm
The review step displays a read-only summary of everything you entered, organized into three sections:
Client information
- Organization name and client ID
- Website URL
Plan details
- Selected tier
- Provisioned use cases (displayed as tags)
Account owner
- Full name
- Email address
Review all details. To make changes, click Back or click the relevant step in the stepper to return to it.
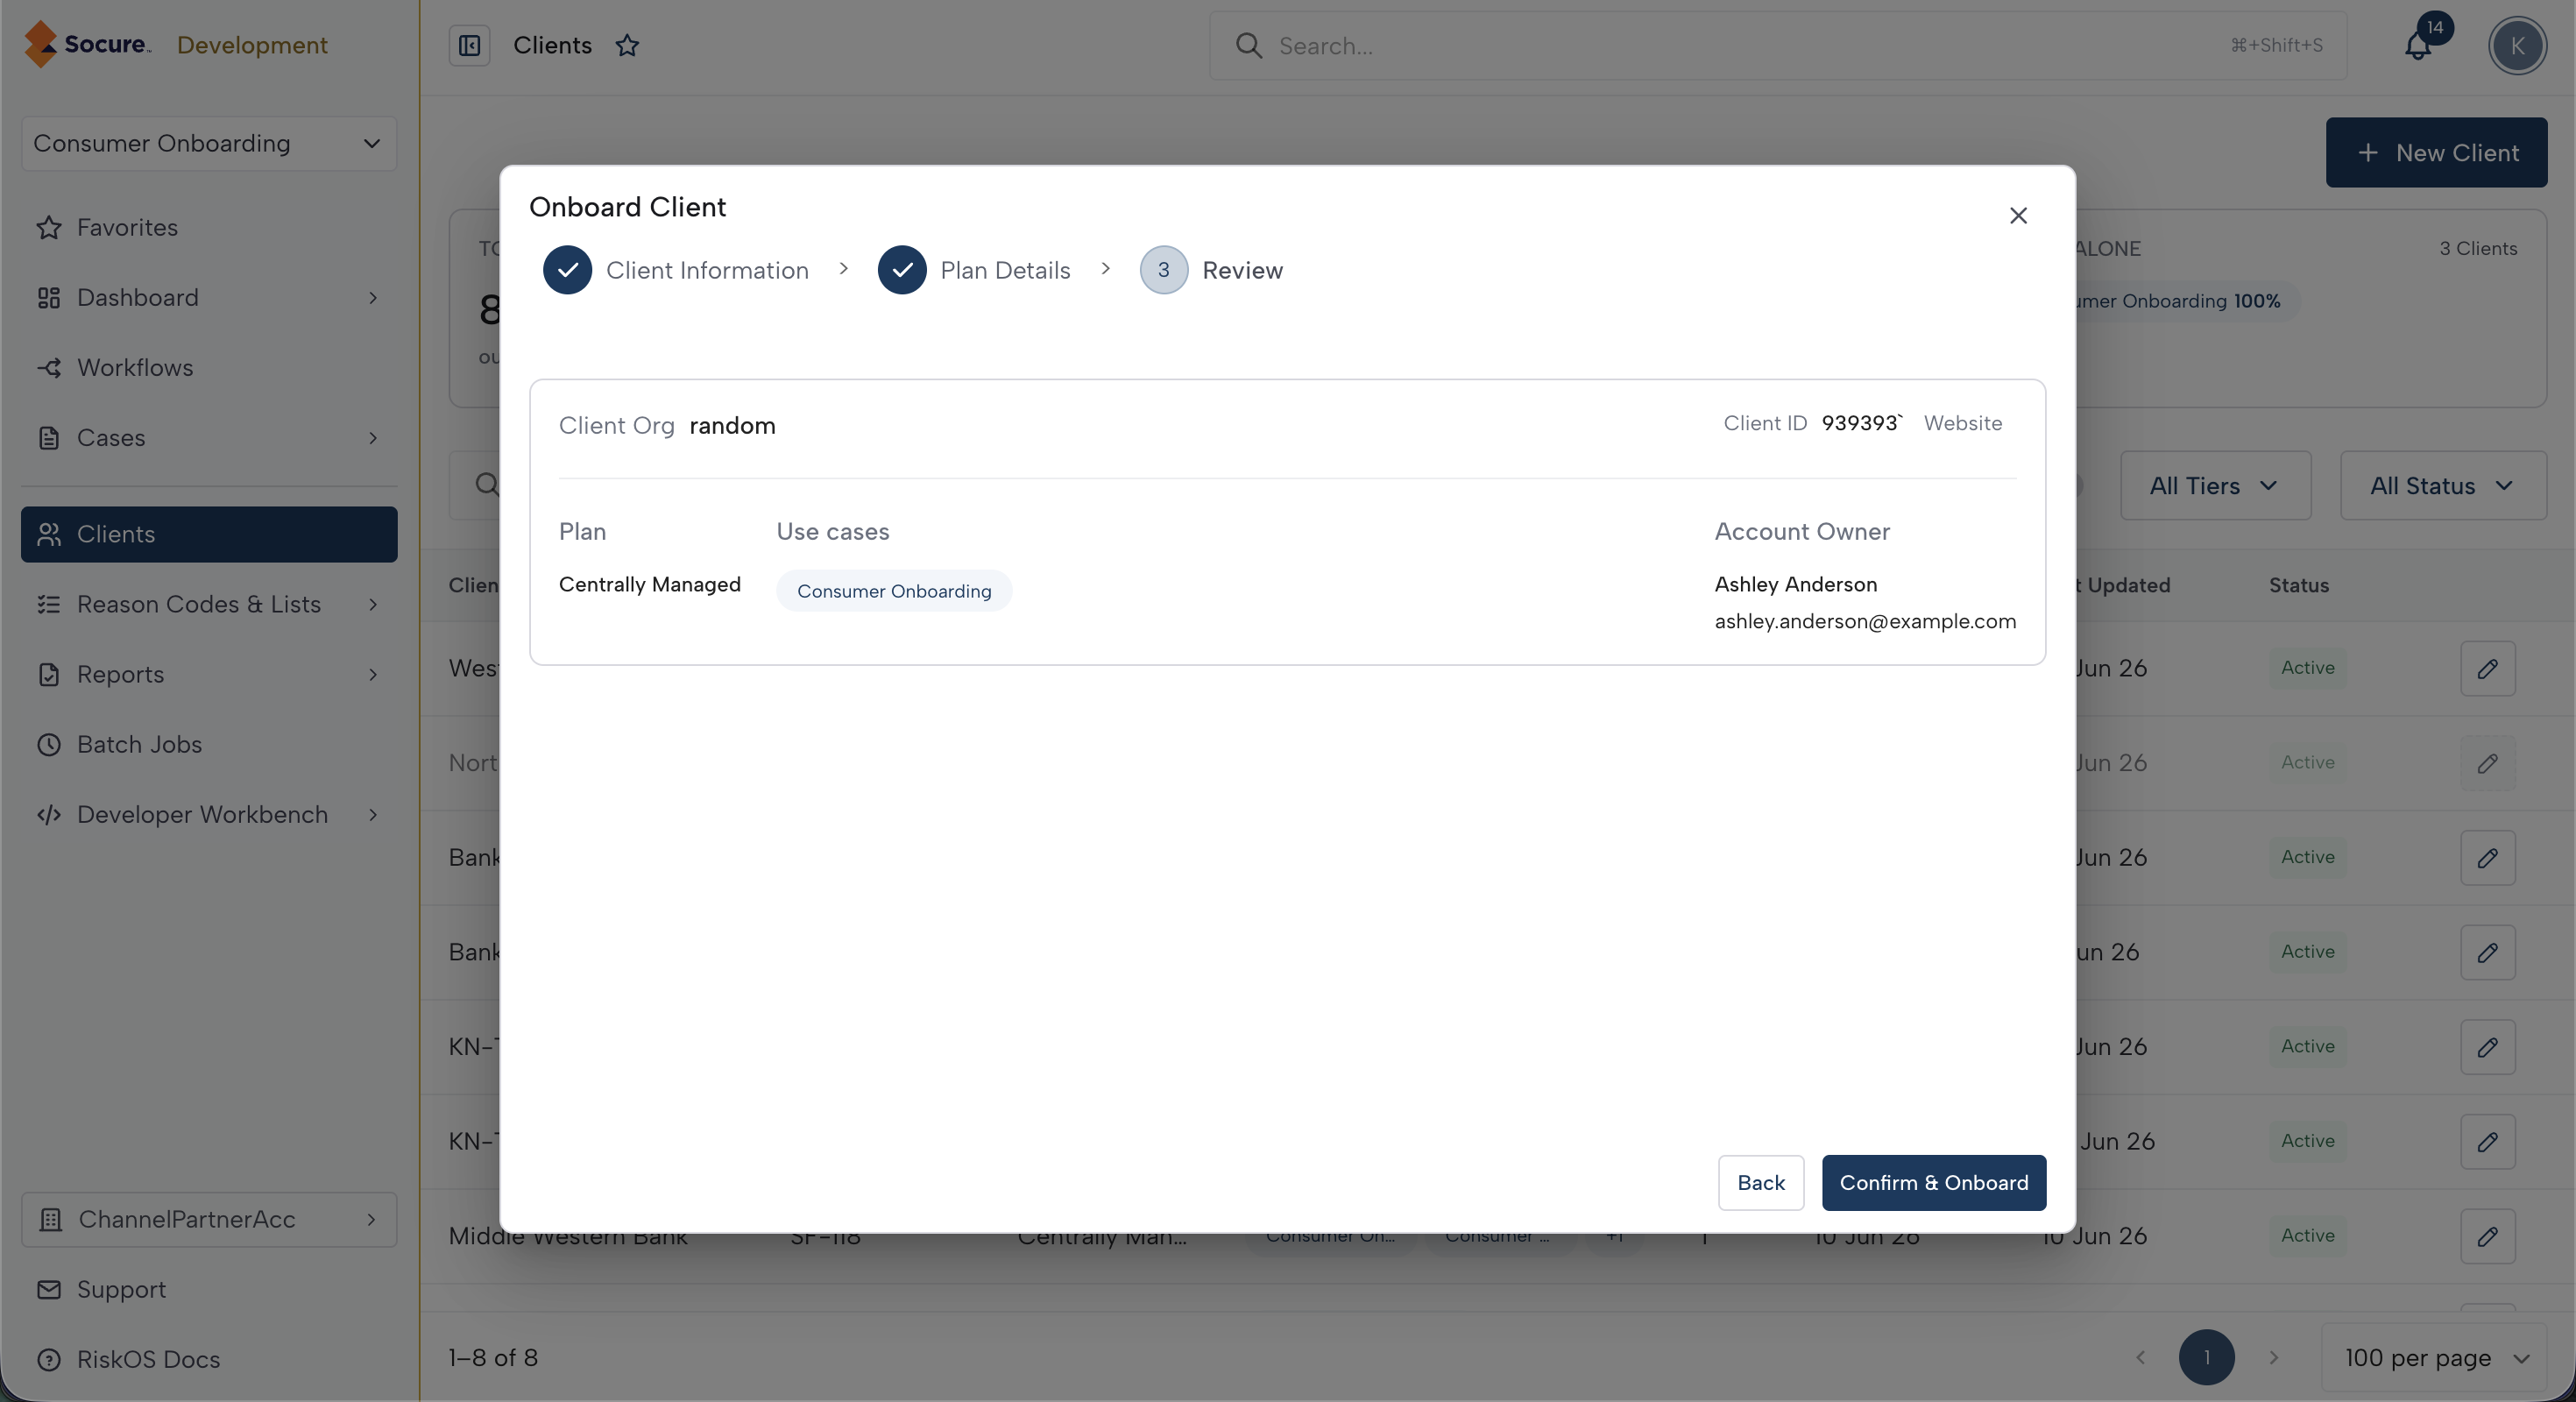
When everything is correct, click Confirm & Onboard to create the client account.
What happens after onboarding
| Effect | Timing |
|---|---|
| A success notification appears confirming the client was created. | Immediate |
| The new client appears in the Clients table with an Active status. | Immediate |
| The metrics bar updates to reflect the new client count. | Immediate |
| The client's namespace is linked to your Channel Partner namespace. | Immediate (automatic) |
| The client account is ready for configuration. | Immediate |
Recommended next steps
- Switch to the client's account to begin setup.
- Configure product settings for the use cases you provisioned. Each use case runs enrichment steps — such as Document Verification, Email Risk, or Digital Intelligence. If you're unsure which enrichments a use case needs, contact your Socure account representative.
- Create users for the client's team and assign roles with appropriate permissions.
- Help the client start using their account:
- Standalone client — confirm their team can reach the features they need, then let them build and manage their own workflows.
- Centrally Managed client — the client has view-only access and relies on you to set up their workflows. Switch into the client's account and create the workflows there on their behalf.
Troubleshooting
| Issue | Cause | Resolution |
|---|---|---|
| "Client Org already exists" error | Another client under your Channel Partner uses the same organization name (matched case-insensitively). | Enter a unique organization name. The error message shows the conflicting account for reference. |
| Invalid Client Org format error | The name has fewer than 5 or more than 255 characters, or contains a character outside letters, digits, spaces, and . - _ &. | Use a name of 5–255 allowed characters. See Field validation rules. |
| "Client ID already exists" error | The client ID is already assigned to another client under your Channel Partner (matched case-insensitively). | Enter a different, unique client ID. |
| Account Owner email rejected | The email does not belong to a user within your organization. | Enter an email address that belongs to a user in your organization. |
| "Select at least one use case" error | No use cases are checked in Step 2. | Select at least one use case before proceeding. |
| No tiers or use cases available in dropdowns | Your organization has not been configured with tiers or use cases. | Contact your Socure account representative to provision tiers and use cases for your Channel Partner account. |
| Next button is disabled | One or more required fields are empty or contain validation errors. | Review each field for error messages and fill in all required fields. |
| Website URL validation error | The URL format is invalid. | Enter a full URL including the protocol (for example, https://examplecorp.com). |
| Onboard button is not visible | Your role doesn't grant the Accounts permission at the Can Edit level. | Ask your administrator to assign a role with Accounts set to Can Edit. See Roles & Permissions. |
Related articles
| Task | Guide |
|---|---|
| View and manage your clients | Clients Hub |
| Set up users for the new client | Manage Users |
| Define roles for the client's team | Roles & Permissions |
| Configure product settings | Product Configuration |
| Understand what the client can and can't do | Account Models and Tiers |
| Review access governance guidelines | Access Governance Best Practices |
Updated 4 months ago