Set up One-Time Passcode (OTP)
Learn how to set up Socure One-Time Passcode in the RiskOS™ Dashboard to add strong possession-based authentication to your workflows.
Before you start
Make sure you have the following:
- Your account owner or administrator can enable this for you. If you're unsure who to contact, reach out to support for assistance.
- If this is your first time working with workflows, review the Workflow overview to understand inputs, enrichments, routing logic, and decisions.
How it works
Socure OTP is an enrichment available in RiskOS™. It generates a one-time passcode, delivers it via SMS, voice, or email, and validates the user’s input against the generated code. The module then returns a decision (ACCEPT, REJECT, or REVIEW) to drive workflow routing.
Note:
ACCEPT,REVIEW, andREJECTare the default decision values. Customers can customize the response to added or to delete default values based on specific workflow needs.
Choose your configuration
Select a simple single-channel OTP setup or a more advanced configuration with multiple delivery options and fallback logic.
Ideal for simple OTP delivery using one primary method. Choose a single channel and configure straightforward verification logic.
Best for:
- Simple authentication flows
- Single contact method verification
- Quick implementation
Channels: SMS, Email, or Voice
Enables fallback options across multiple delivery channels. Improves success rates by offering an alternative method when the primary channel fails.
Best for:
- Enhanced user experience
- Higher delivery success rates
- Mission-critical authentication
Channels: SMS + Email fallback
Channel setup
You can configure OTP delivery using a single channel to send the code through one primary method without any fallback logic.
The sample workflow below demonstrates how to support a single delivery channel.
Step 1 - Add OTP Verification enrichment step to a workflow
- In the RiskOS™ Dashboard, go to Workflows and create a new workflow or open an existing one.
- On the Workflow Canvas, click the plus (+) icon and add an OTP Verification step.
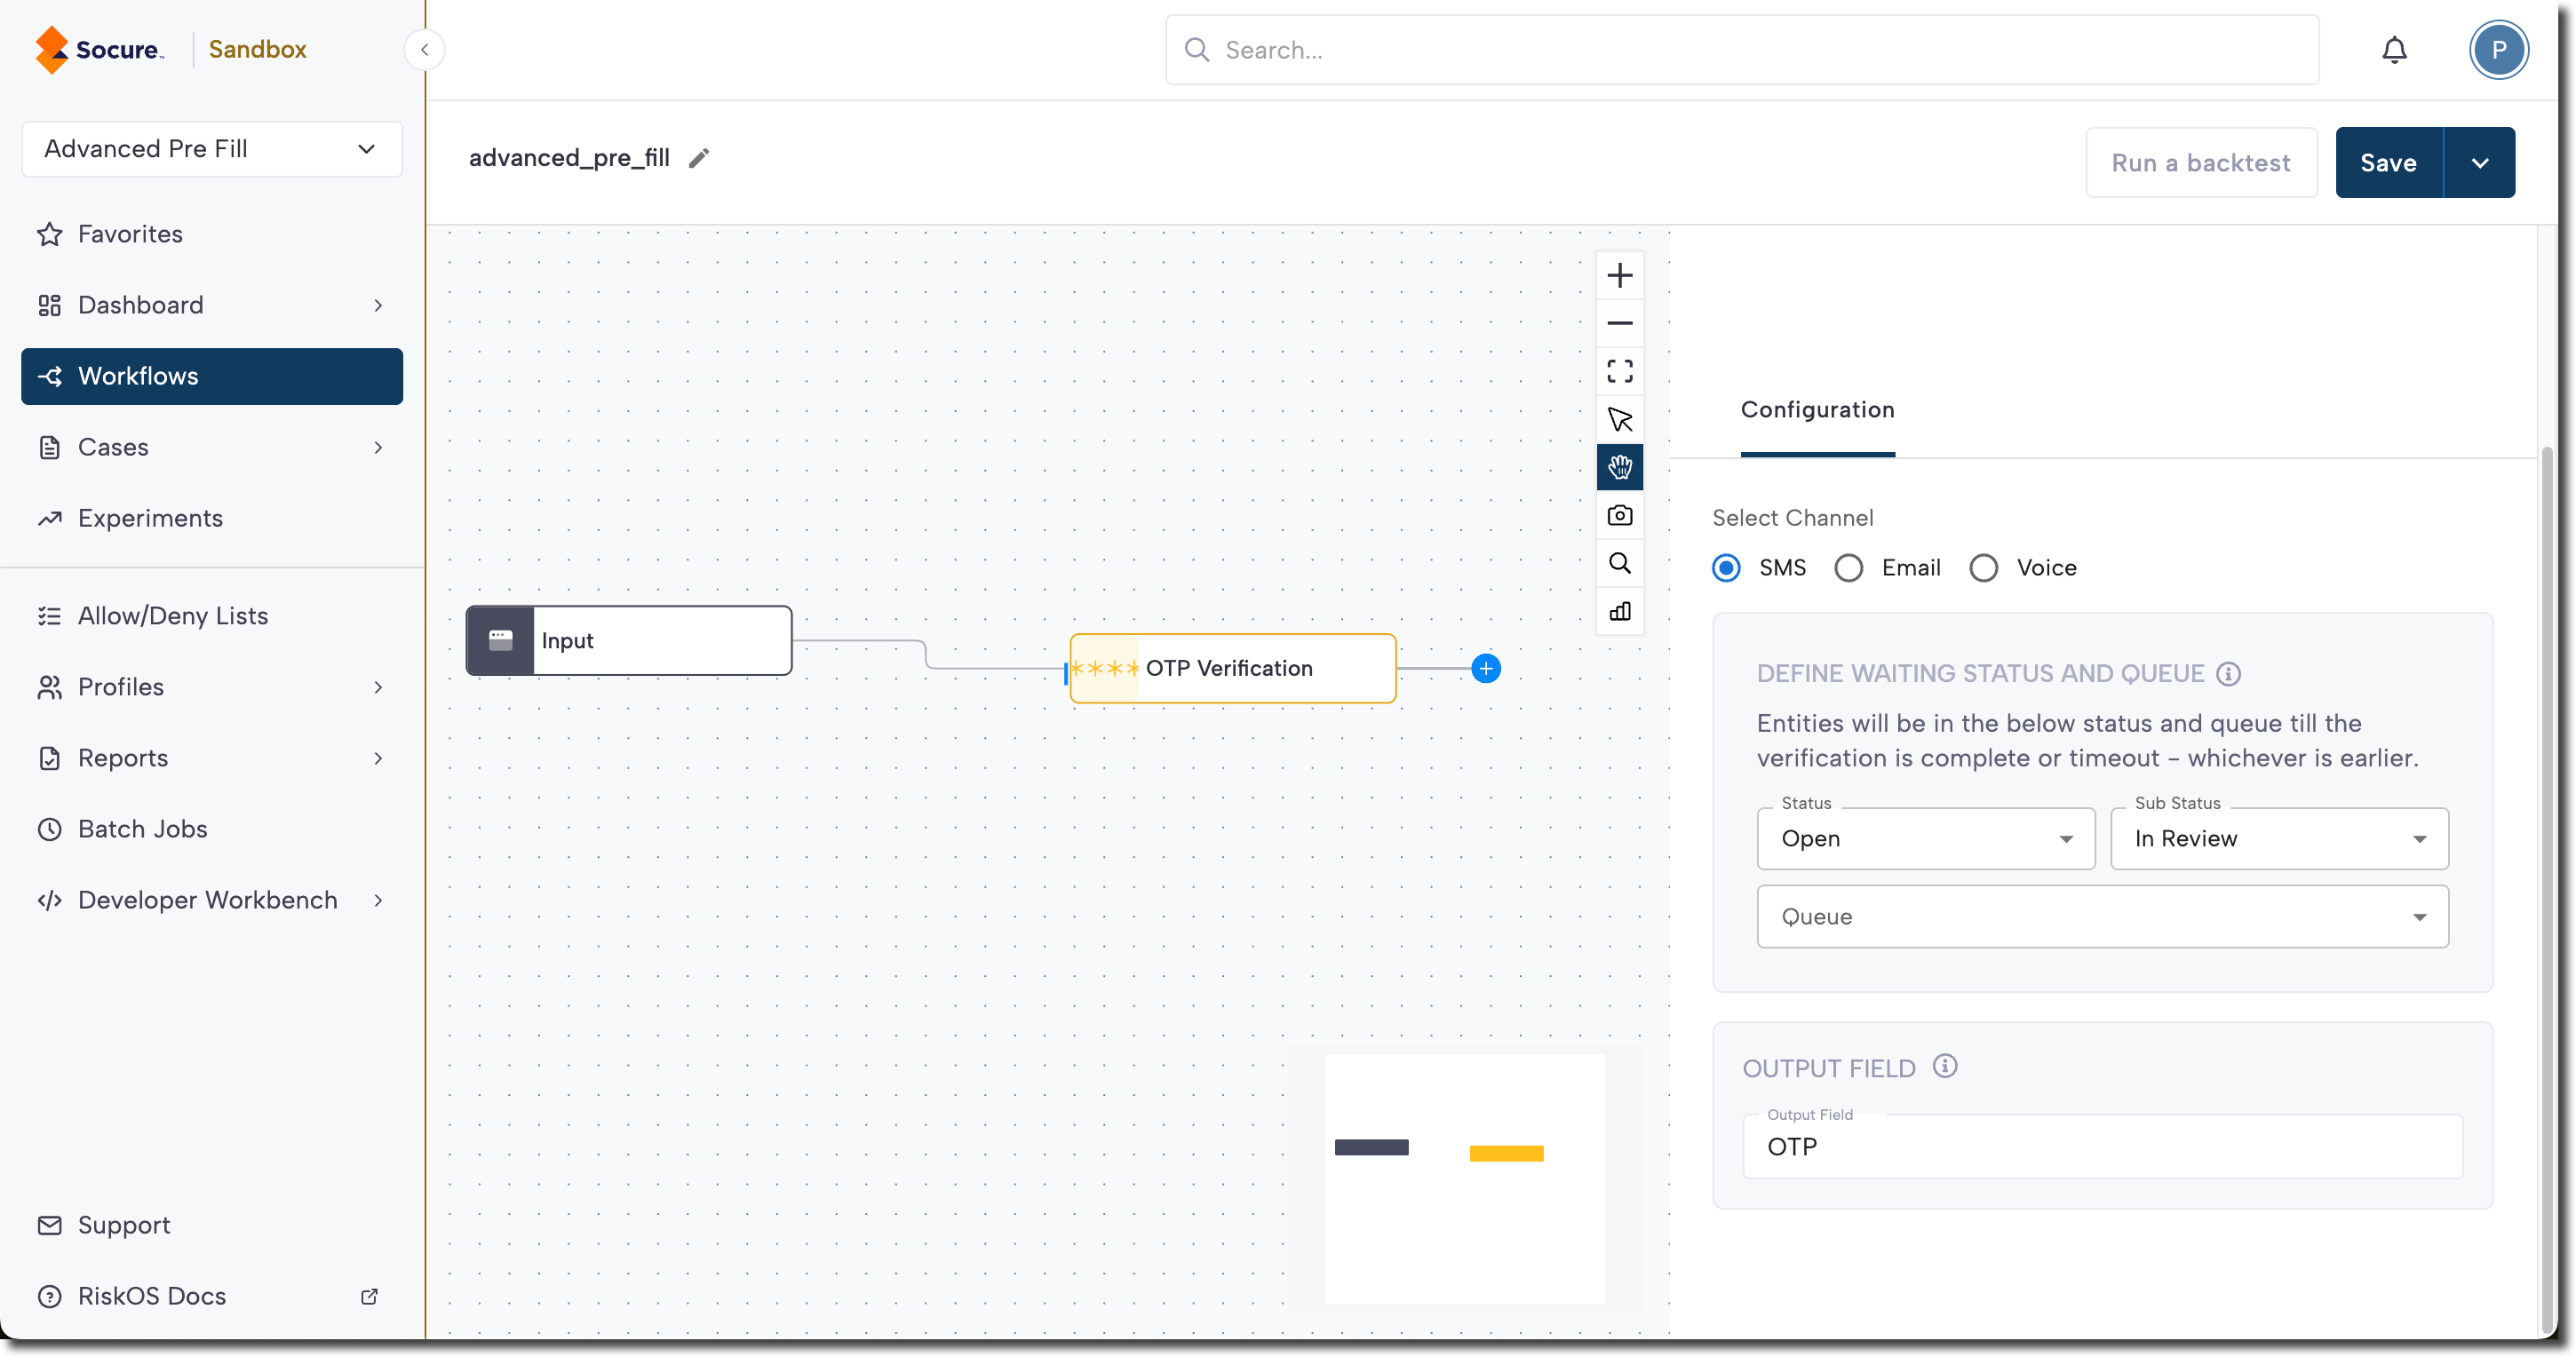
- In the Configuration panel on the right, set up the OTP Verification step:
- Select Channel: Choose how to deliver the code:
- SMS: Send the code via SMS text message to a consumer's phone number.
- Email: Send the code to the consumer's email address.
- Voice: Deliver the code through an automated phone call.
Note:
- Phone numbers must be in E.164 format.
- Email addresses must be in RFC 5322 format.
- Define Waiting Status and Queue: Configure how the workflow waits for verification (the entity stays in this state until the OTP is verified or times out):
- Status: Controls whether the workflow pauses (On Hold, recommended) or continues (Open).
- Sub-status: Optional, adds a more specific tracking state.
- Queue: Determines where the entity is routed while waiting.
- Define Output Field: Enter the field name where the OTP result will be stored. You can reference this field later in the workflow or in your API response.
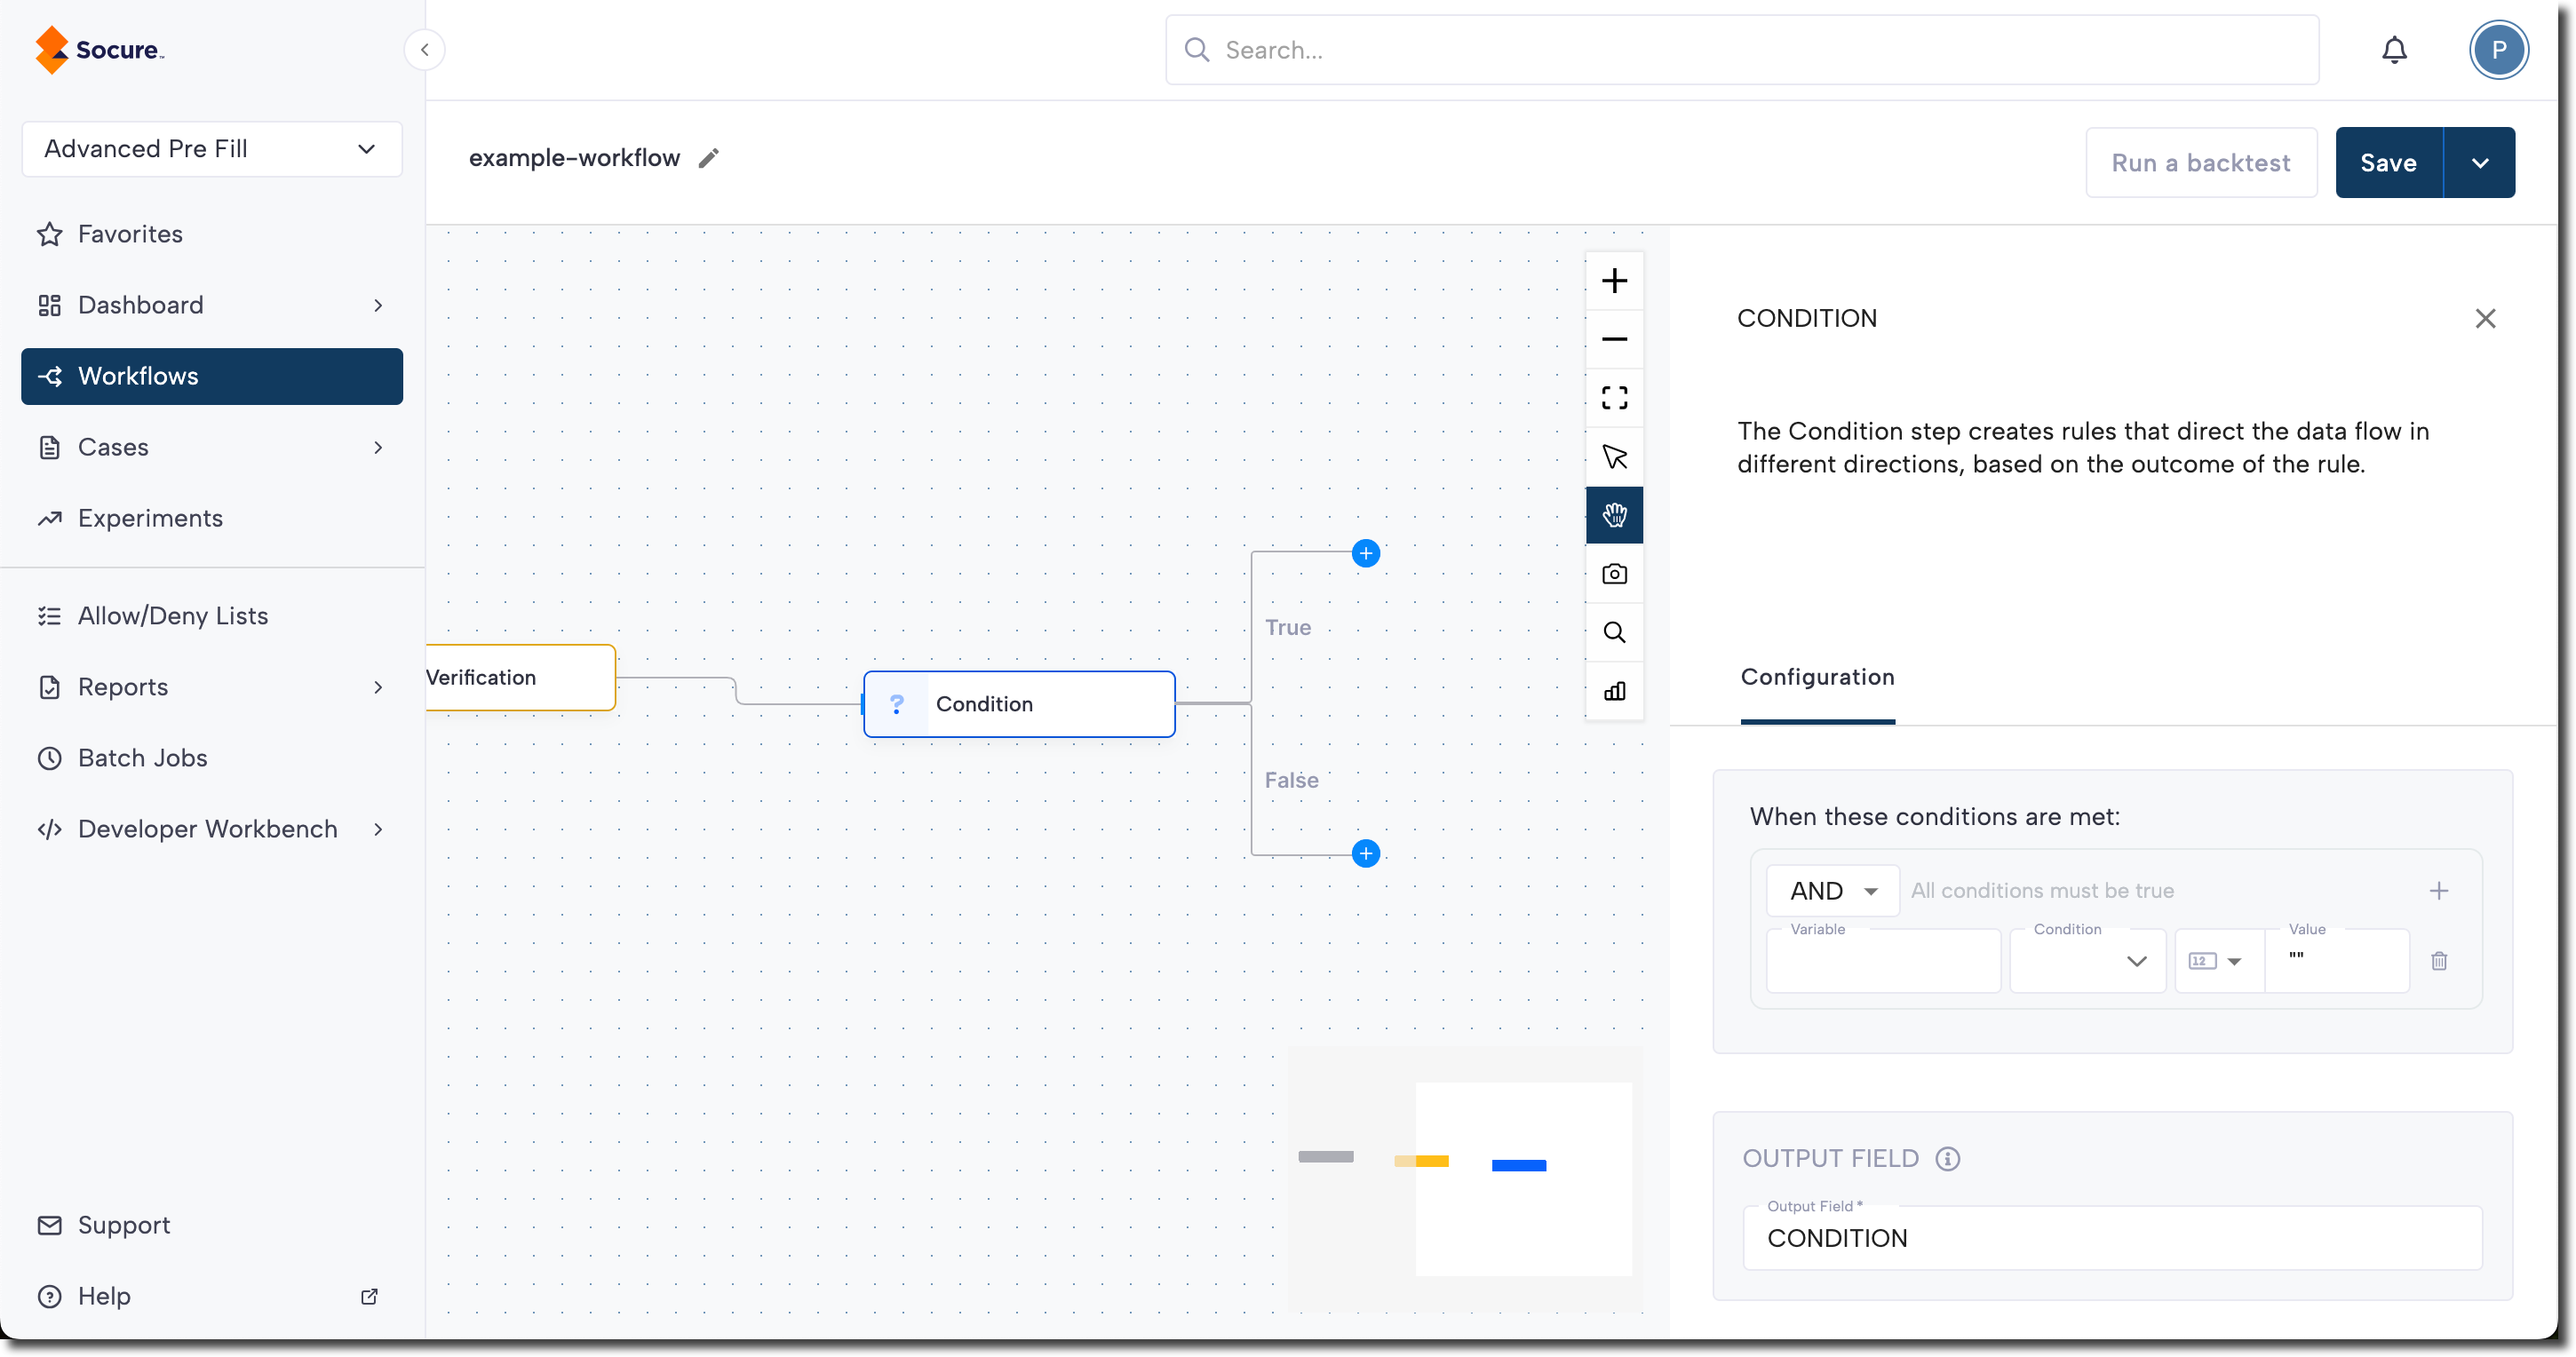
Step 2 - Add a Condition step
On the Workflow Canvas, click the plus (+) icon and add a Condition step. In the Configuration panel, create corresponding outcomes for both true and false cases.
Example status values used for One-Time Passcode condition logic
| Status | Description |
|---|---|
| Pending | OTP sent but not yet verified (still within 10-minute expiration). |
| Approved | OTP successfully verified. |
| Reject | OTP exceeded 5 attempts or expired (after 10 minutes). |
For more information on configuring conditions, see Create and Edit a Workflow.
Step 3 - Add Decision steps
On the Workflow Canvas, click the plus (+) icon and add a Decision steps to your True and False conditions to route the decision accordingly:
| Decision | Description |
|---|---|
| ACCEPT | OTP was successfully verified. The consumer is authenticated and can continue. |
| REJECT | OTP verification failed (expired, exceeded attempts, or invalid). The consumer cannot proceed. |
Step 4 - Save and publish
Once your workflow is configured, publish it to go live.
To improve delivery success rates, you can configure fallback channels so the OTP is sent through another method if the initial attempt fails.
The sample workflow below demonstrates how to support multiple channels.
Step 1 - Add SMS OTP Verification enrichment step to a workflow
- In the RiskOS™ Dashboard, go to Workflows and create a new workflow or open an existing one.
- On the Workflow Canvas click the plus (+) icon and add an OTP Verification step.
- In the Configuration panel on the right, set up the OTP Verification step:
- Select Channel: Select SMS to send the code via SMS text message to a consumer's phone number.
Note:
Phone numbers must be in E.164 format.
- Define Waiting Status and Queue: Configure how the workflow waits for verification (the entity stays in this state until the OTP is verified or times out):
- Status: Controls whether the workflow pauses (On Hold, recommended) or continues (Open).
- Sub-status: Optional, adds a more specific tracking state.
- Queue: Determines where the entity is routed while waiting.
- Define Output Field: Enter the field name where the OTP result will be stored. You can reference this field later in the workflow or in your API response.
Step 2 - Add Conditions to define channel logic
To support multiple delivery channels, you’ll create separate conditions that evaluate the outcome of each OTP attempt.
Example status values used for One-Time Passcode condition logic
| Status | Description |
|---|---|
| Pending | OTP sent but not yet verified (still within 10-minute expiration). |
| Approved | OTP successfully verified. |
| Reject | OTP exceeded 5 attempts or expired (after 10 minutes). |
For more information on configuring conditions, see Create and Edit a Workflow.
Condition 1: Approve when the SMS OTP is verified
If the SMS OTP is successfully validated, route the workflow to the approved path:
- On the Workflow Canvas, click the plus (+) icon and add a Condition step.
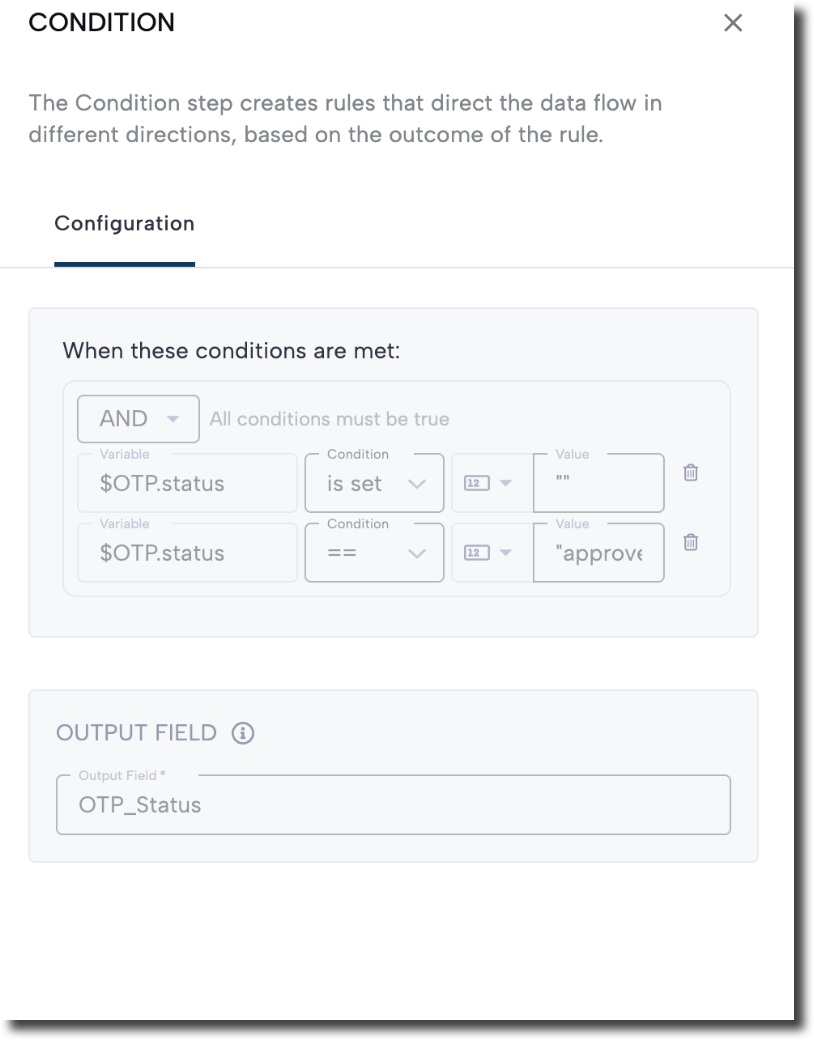
- In the Configuration panel, set the rules to check the OTP Verification result.
- For example:
- Set Variable to your OTP output field (for example,
$OTP.status). - Add a condition to ensure the field is set.
- Add a second condition where
$OTP.statusequals"approved".
- Set Variable to your OTP output field (for example,
- The condition should evaluate to true only when the SMS OTP has been successfully verified.
Condition 2: Provide a fallback channel
If the SMS OTP fails or remains pending, route the workflow to allow the user to resend the code or switch the delivery channel to email:
- On the Workflow Canvas, click the plus (+) icon and add a Condition step.
- In the Configuration panel, define rules that identify when the SMS OTP cannot be used.
- For example:
- Set Variable to your OTP output field (e.g.,
$OTP.status). - Add a condition to ensure the field is set.
- Add a second condition where
$OTP.statusequals"rejected".
- Set Variable to your OTP output field (e.g.,
- When both conditions are true, route the workflow to a fallback path where the user can resend the code or switch to another delivery channel (such as Email).
- In the Output Field section, enter a name such as
CONDITIONor another label you want to store the result under.
Step 3 - Add validation logic for the Email fallback channel
When SMS OTP delivery or validation fails, route the workflow to a second OTP step configured to send the OTP via Email.
Set up the Email OTP step
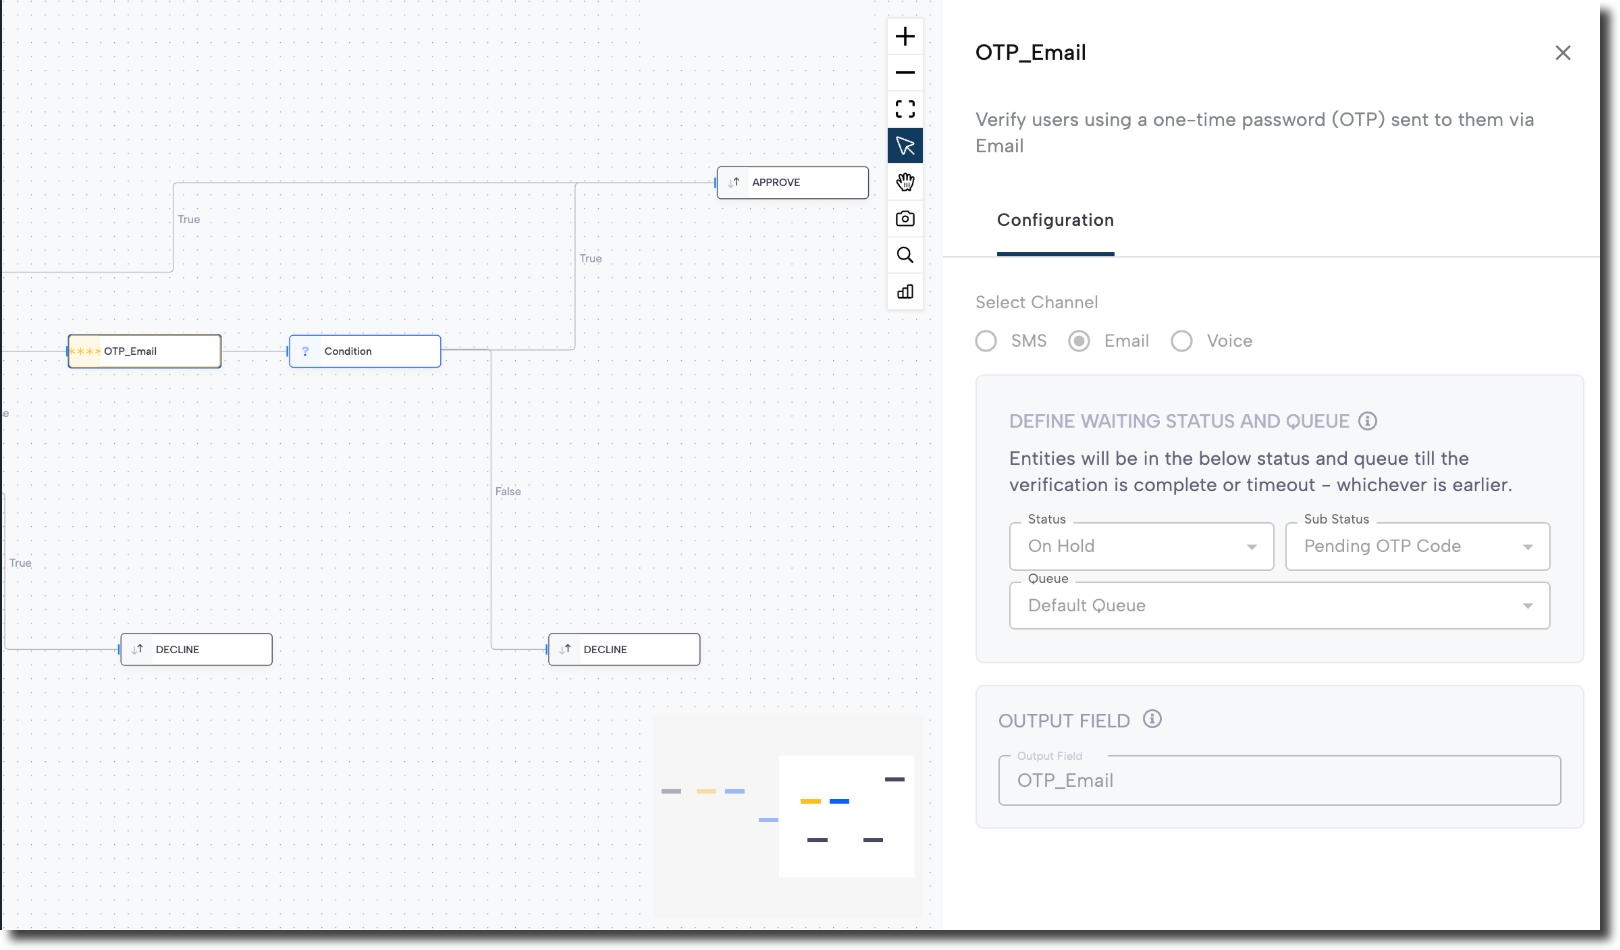
- On the Workflow Canvas, click the plus (+) icon and add an OTP Verification step.
- In the configuration panel:
- Select Email as the delivery channel.
- Set the Status, Sub-status, and Queue for the waiting state.
- Enter an output field name (for example,
OTP_Email).
Note:
Email addresses must be in RFC 5322 format.
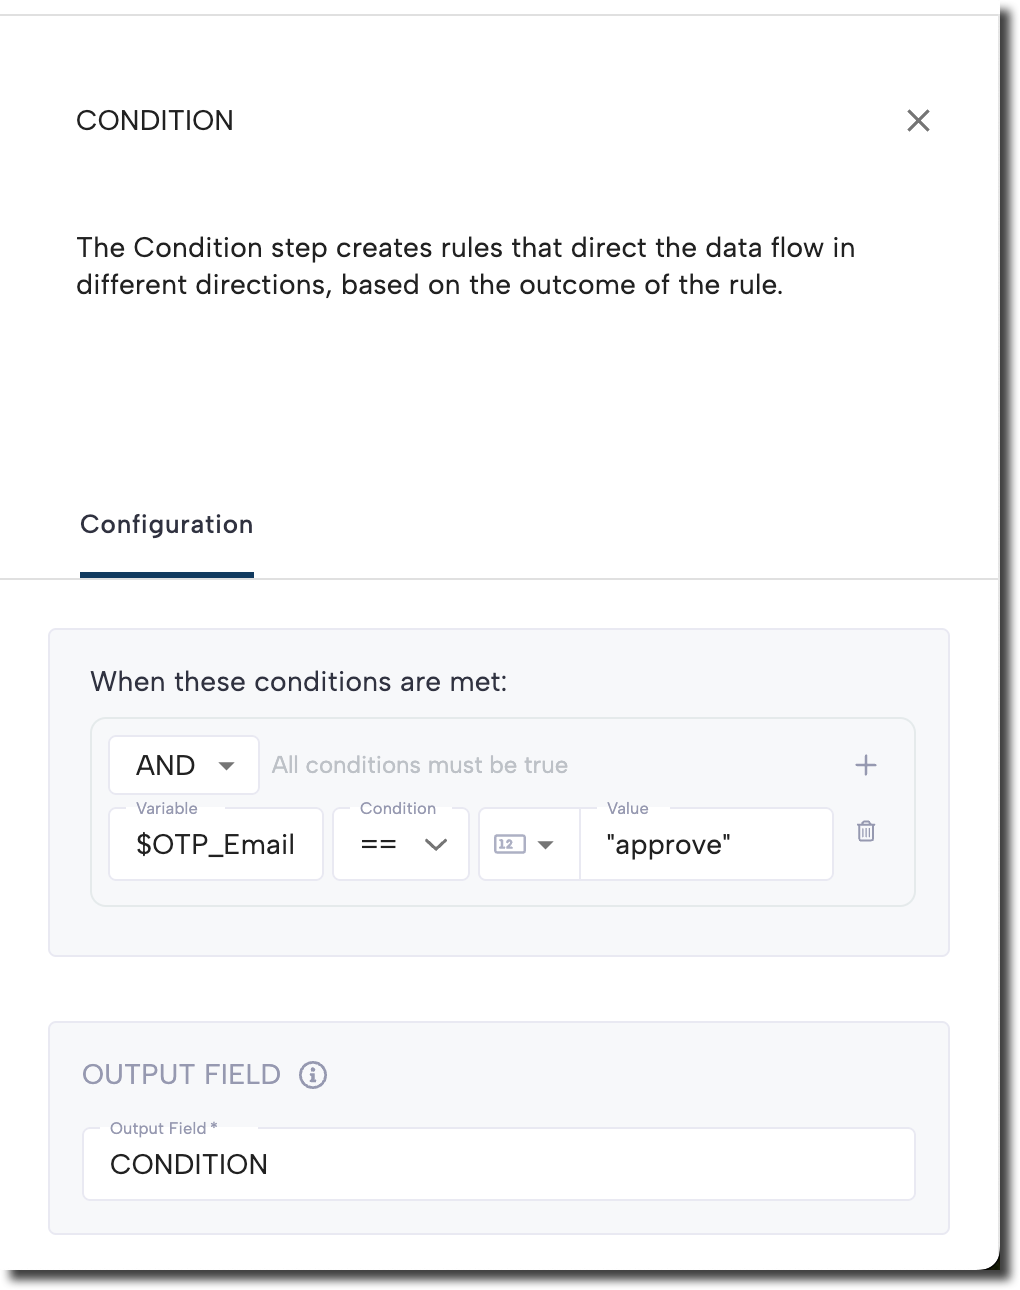
Add validation logic for the Email OTP
After the Email OTP step, add a Condition to evaluate whether the user successfully verified the code.
- On the Workflow Canvas, click the plus (+) icon and add a Condition step after the Email OTP step.
- In the Configuration panel, route the true outcome to the Approve step and route the false outcome to Decline or any additional fallback logic.
- For example:
- Set Variable to the Email OTP output field (for example,
$OTP_Email.status). - Add a condition to ensure the field is set.
- Add another condition where the status equals
"approved".
- Set Variable to the Email OTP output field (for example,
Step 4 - Add Workflow Decision steps
On the Workflow Canvas, click the plus (+) icon and add Decision steps to your True and False conditions to route the decision accordingly:
| Decision | Description |
|---|---|
| ACCEPT | OTP was successfully verified. The consumer is authenticated and can continue. |
| REJECT | OTP verification failed (expired, exceeded attempts, or invalid). The consumer cannot proceed. |
Step 5 - Save and publish
Once your workflow is configured, publish it to go live.
Workflow testing checklist
Use this checklist to confirm accuracy, resilience, and completeness before going live.
Updated 24 days ago