Watchlist Screening Dashboard Setup
Learn how to set up Watchlist Screening in the RiskOS™ Dashboard to screen individuals and businesses against global watchlists and route evaluations based on match results.
Before you start
Make sure you have the following:
- Your account owner or administrator can enable this for you. If you're unsure who to contact, reach out to support for assistance.
- If this is your first time working with workflows, review the Workflow overview to understand inputs, enrichments, routing logic, and decisions.
How it works
Watchlist Screening evaluates individuals or businesses against relevant sanctions, PEP, and adverse media watchlists and returns match data that can be used for compliance and risk decisioning.
Use Watchlist Screening to verify that an individual entity is not listed on any relevant watchlist before gaining access to your platform.
Workflow enrichments:
- Fraud checks — phone risk, email risk, Sigma Identity, Sigma Synthetic, First-Party Fraud, Graph Intelligence, and Device Risk
- Identity verification — use Verify to check core identity details against government sources (name, date of birth, national ID number, SSN, address)
- Document & biometric verification — for higher-risk cases, add document verification or biometrics (name, DOB, national ID)
- Watchlist screening — send at least the name; include additional identifiers (DOB, national ID, phone, email, IP address, address) when available for higher accuracy
Use Watchlist Screening to verify that a business entity is not listed on any relevant watchlist before engaging in a financial or contractual relationship.
Workflow enrichments:
- Global KYB — confirm the primary business entity exists
- Ultimate beneficial owners (UBOs) — gather a list of all individuals or businesses with 25% or more ownership
- Individual screening — run KYC on individual UBOs and screen them against watchlists
- Business entity screening — run watchlist checks on the business name itself; if entity type is unclear, pass the name without type classification
How Watchlist Screening fits into a workflow
In RiskOS™, workflows are built by connecting reusable components. Watchlist Screening is added as an Enrichment step.
Once the enrichment runs, its outputs are available to downstream workflow components, such as:
- Conditions
- Decision rules
- Rule score cards
- Manual review steps
- Final decisions
For more detail on these components, see Workflow Steps.
Execution flow in RiskOS™
Watchlist Screening runs synchronously as part of a RiskOS™ workflow.
flowchart LR
    A[Input]
    B[Watchlist Screening]
    C[Routing logic]
    D[Decision]

    A --> B --> C --> D
At a high level, the execution flow looks like this:
-
Input
You call the Evaluation API with individual or business entity data. -
Watchlist Screening enrichment
RiskOS™ evaluates the entity against applicable watchlists and returns match data and reason codes. -
Routing logic
The workflow evaluates match presence, categories, and reason codes. -
Decision
The workflow returns a final outcome (for example, Accept, Review, or Reject).
Create a workflow for Watchlist Screening
Input step
The input step represents the data you send when you create an evaluation.
- No configuration is required for the input step.
- When you send an evaluation request, follow the guidance for required input fields for the Watchlist enrichment step.
Workflow components used by Watchlist Screening
Watchlist Screening uses a subset of standard RiskOS™ workflow components.
| Component | Purpose | Typical input | Output / What to use next |
|---|---|---|---|
| Input | Start an evaluation | Individual or business entity data | Workflow execution begins |
| Enrichment | Screen against watchlists | — | Matches, categories, reason codes |
| Condition | Branch based on matches or reason codes | Watchlist outputs | Route to appropriate path |
| Decision Rule / Score Card | Apply policy logic | Watchlist signals | Pass/fail or cumulative risk classification |
| Manual Review | Human review of flagged cases | Watchlist match data | Reviewer decision |
| Decision | Emit final outcome | Routed value | Accept / Review / Reject |
Configure Watchlist Screening
Add Watchlist Screening to a workflow
- In the RiskOS™ Dashboard, go to Workflows and create a new workflow or open an existing one.
- On the workflow canvas, select the plus (+) icon.
- Add an Enrichment step and choose one of the following:
- Socure Watchlist Standard
- Socure Watchlist Plus
- Socure Watchlist Premier
Each tier provides different screening depth and capabilities.
Configure routing logic
Use Condition steps to route evaluations based on Watchlist outputs.
Common routing strategies include:
- Routing any match to Manual Review
- Routing specific categories (Sanctions, PEP, Adverse Media) to different queues
- Combining Watchlist signals with other fraud or identity signals
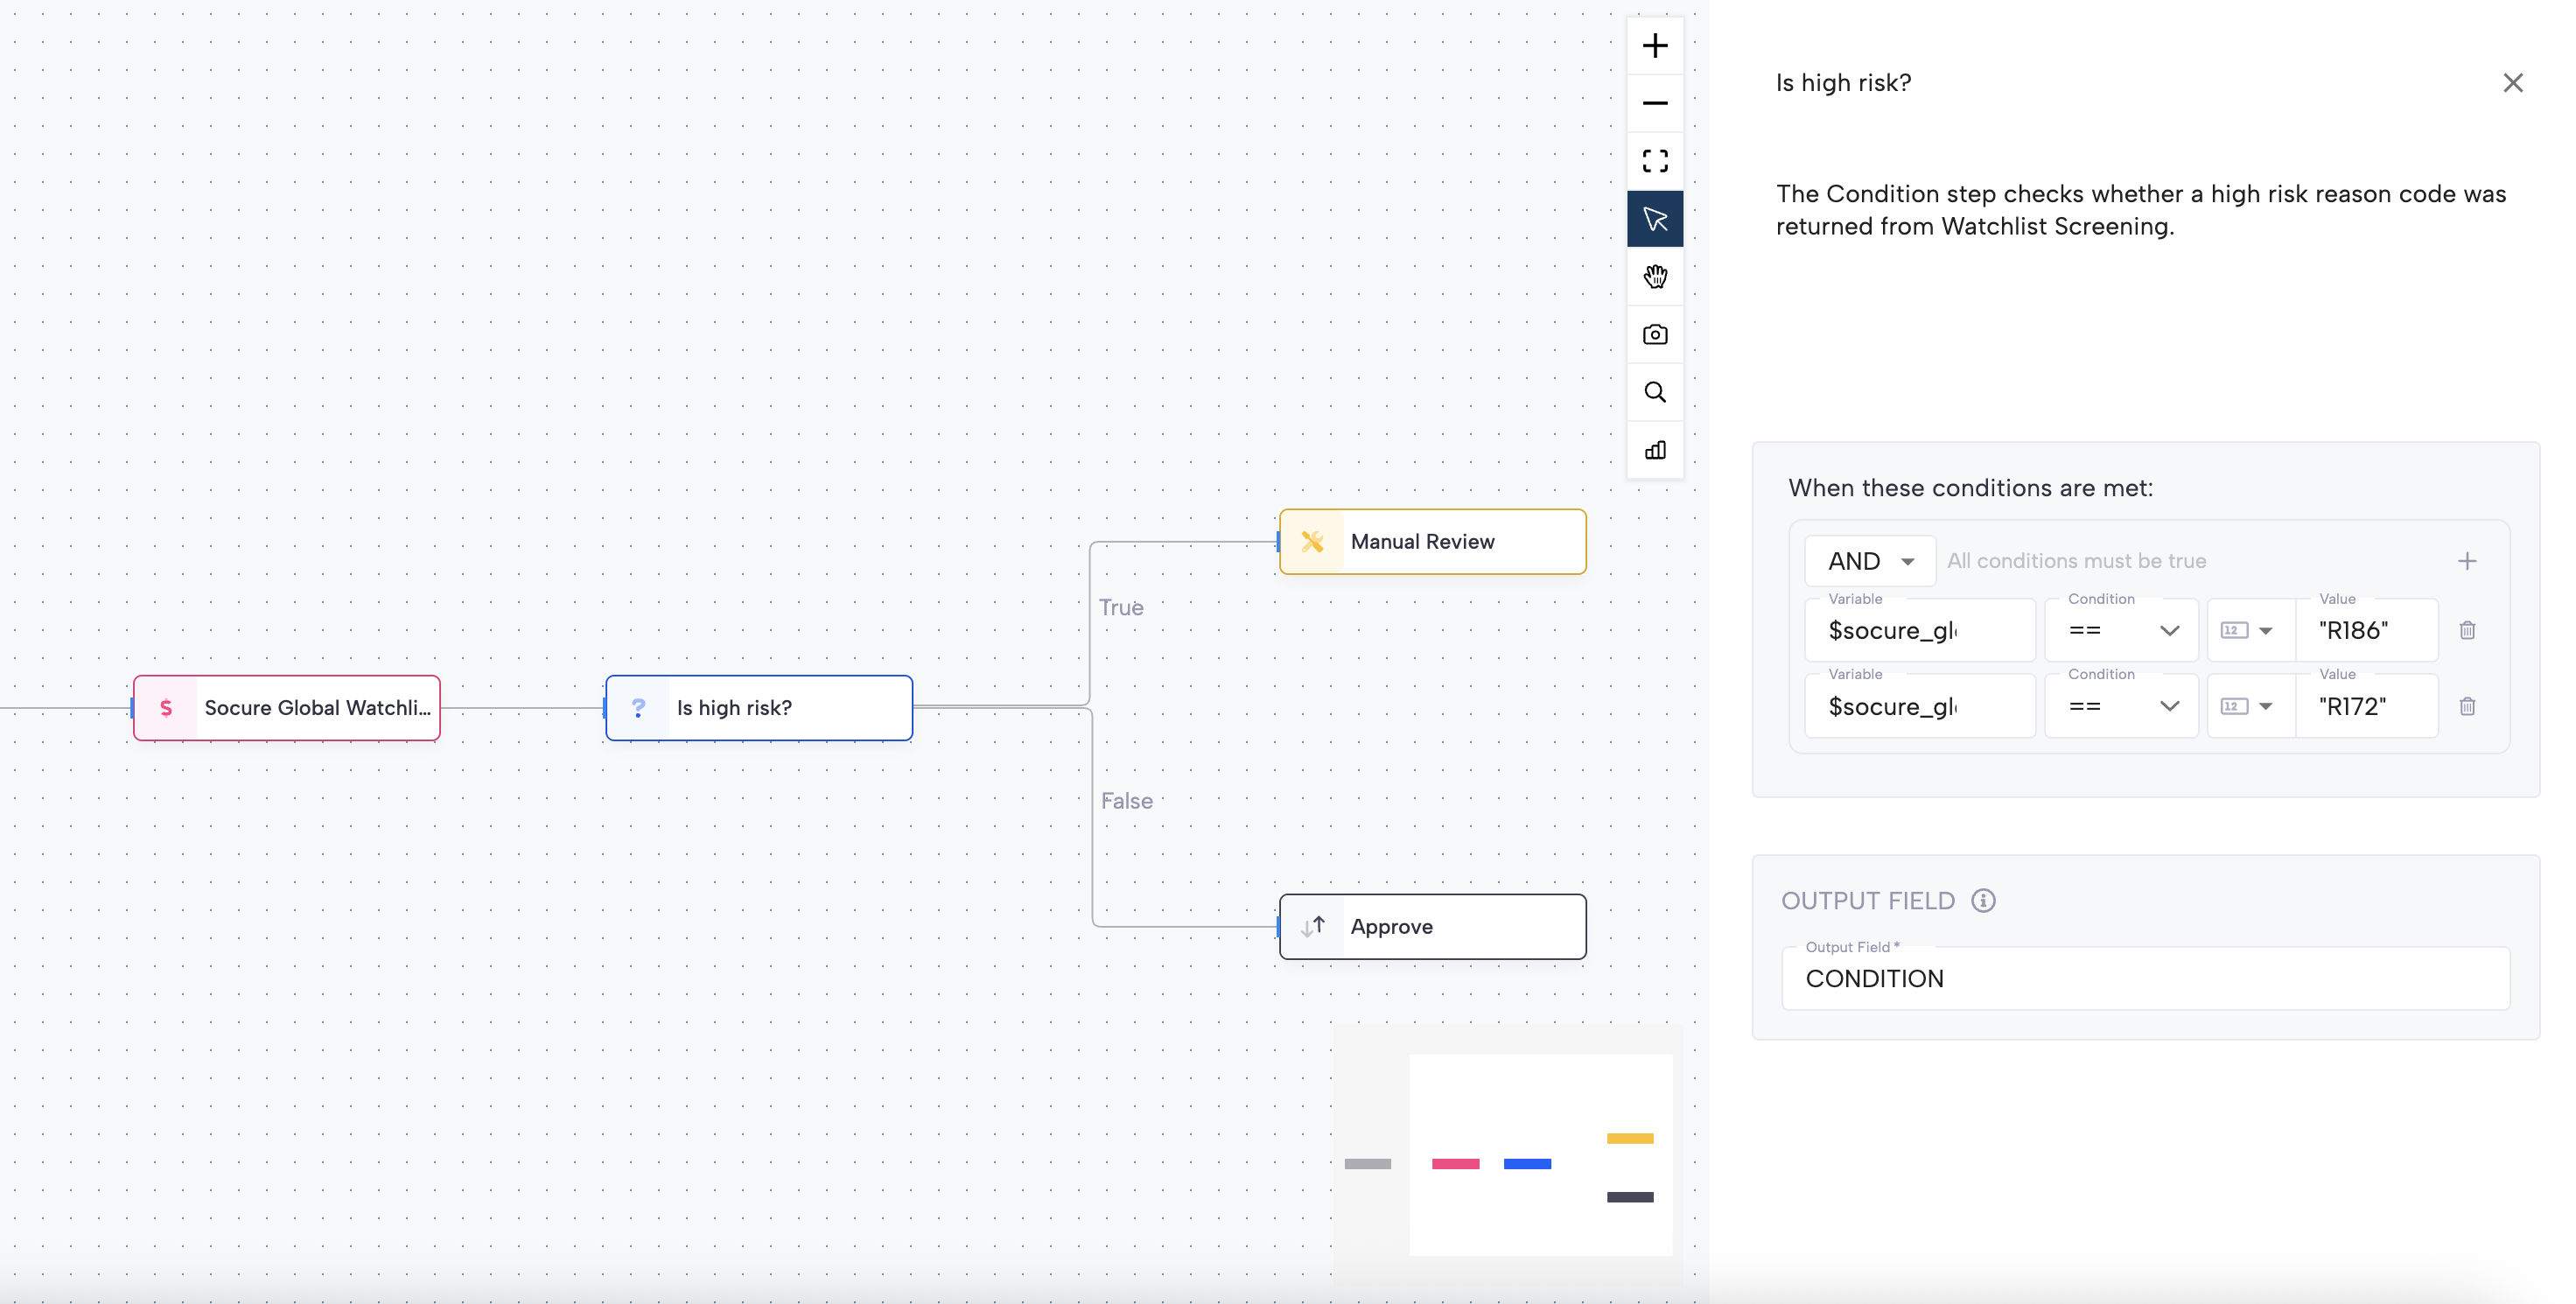
Routing using reason code lists
You can manage reason code lists centrally and reference them in workflows.
- Go to Settings > Configurations > Reason Codes List.
- Create a new list and add the relevant Watchlist reason codes.
- In the workflow, add a Condition step and select:
- in Reason Code List all (all codes must be present), or
- in Reason Code List any (at least one code present).
- Select the reason code list as the condition value.
The workflow will fork into two paths based on whether the condition is met.
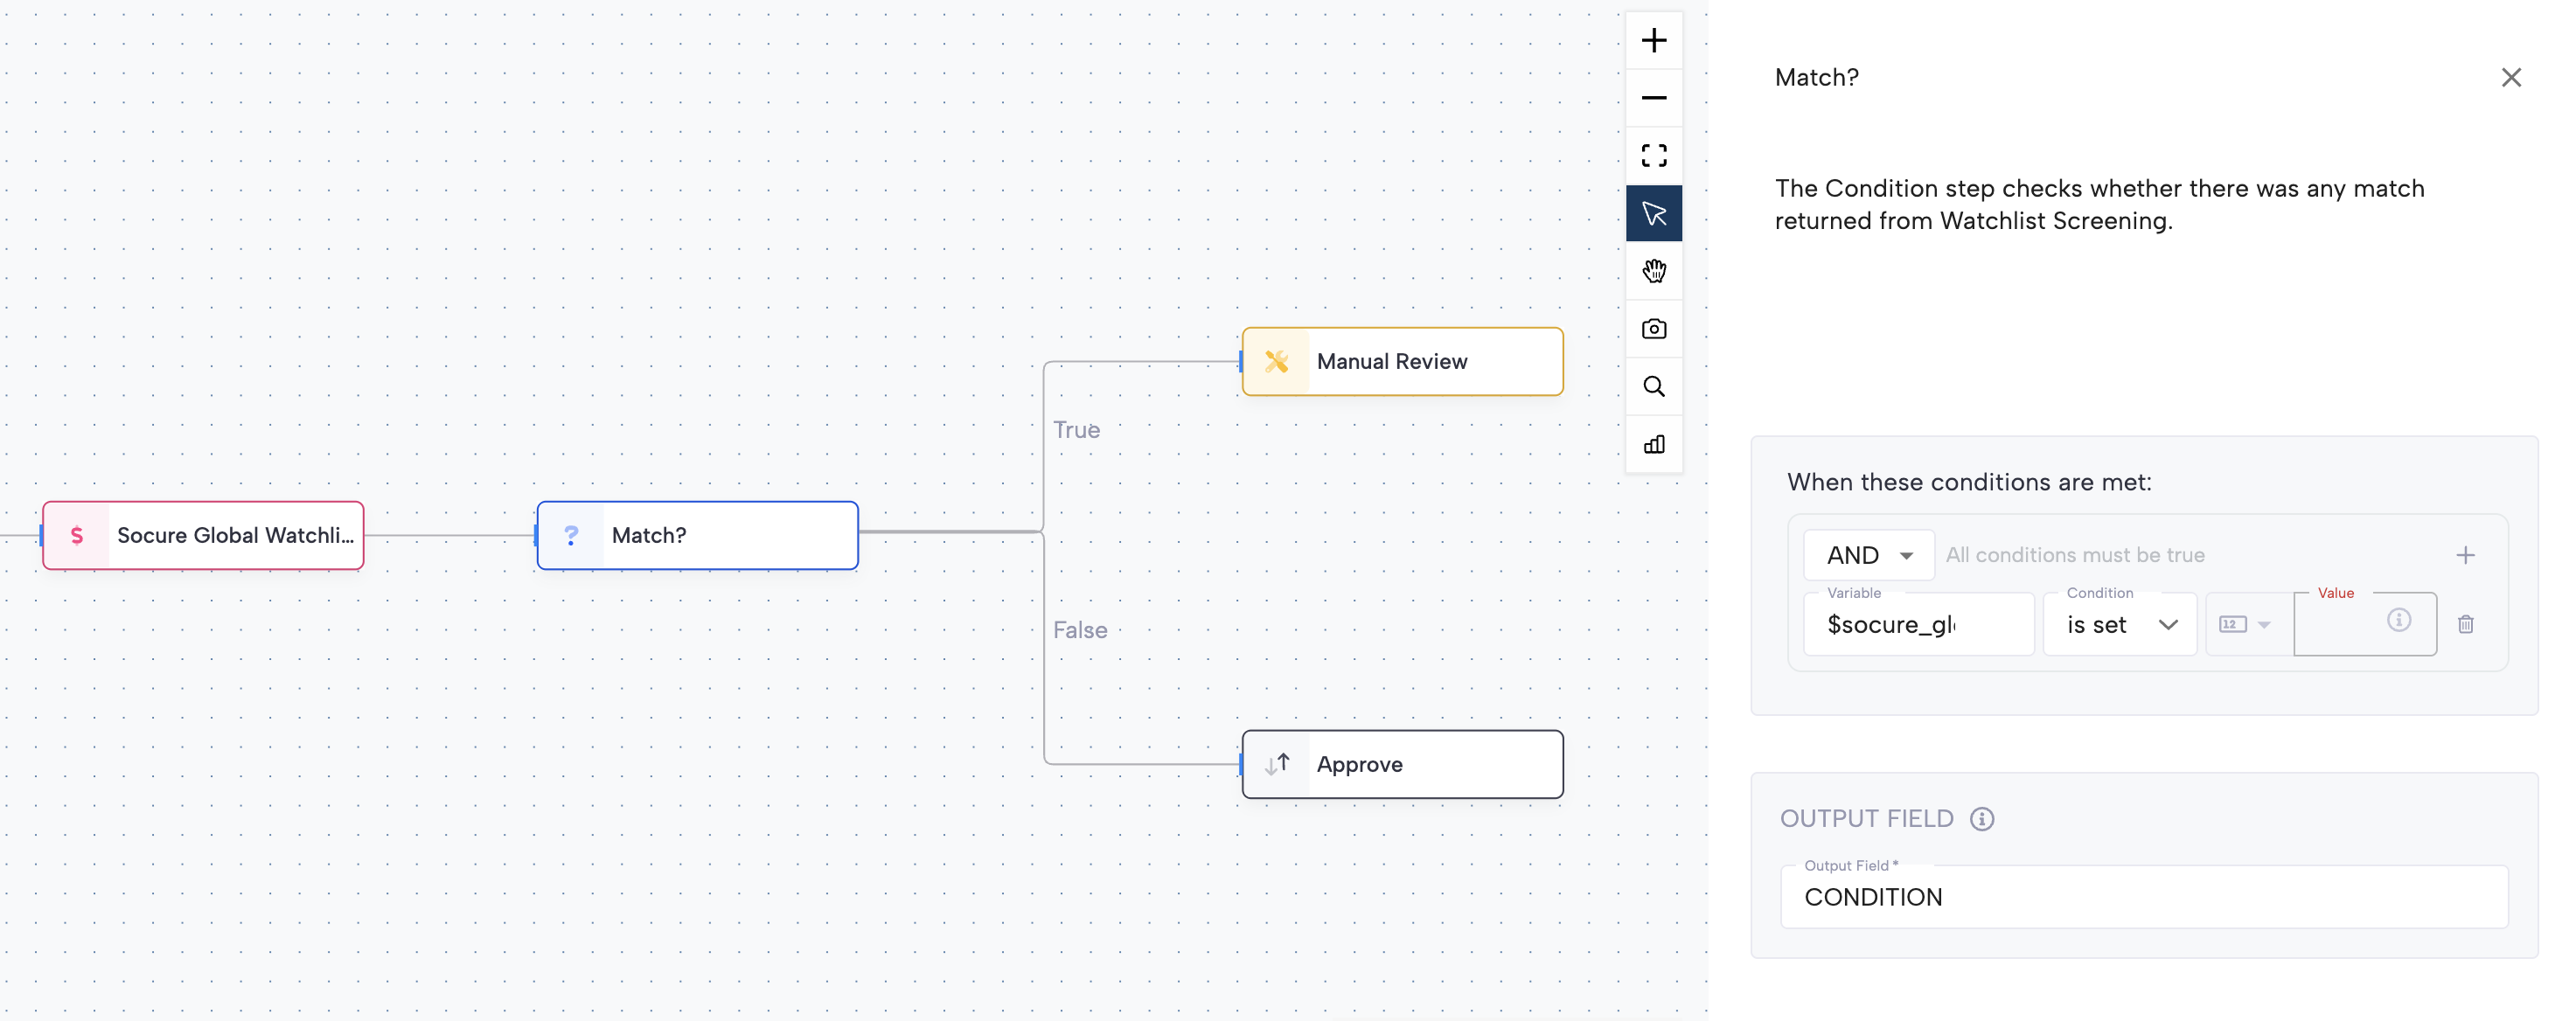
Routing based on match presence
You can also route evaluations based on whether Watchlist matches are returned.
- Use the matches object (for example,
globalWatchlist.matches) - Check whether the matches object is set
- Route evaluations with matches differently from those without
This approach is commonly used for fast-path approvals and review escalation.
Manual Review steps
You can add Manual Review steps as terminal workflow steps.
Manual Review steps:
- Route cases to queues in the RiskOS™ Dashboard
- Support multiple queues using decision codes (for example, separate queues for Sanctions, PEP, and Adverse Media)
Note:
You cannot currently approve a case and then send it to Manual Review in the same workflow path.
However, you can use tags to label cases and apply additional review or approval logic in your own case management system.
Save and publish
Once your workflow is configured, publish it to go live.
Workflow testing checklist
Use this checklist to confirm accuracy, resilience, and completeness before going live.
Updated 3 months ago