
Account Management V2
Configure an Okta SAML app integration for RiskOS™ SSO with the new account architecture.
This guide walks through setting up an Okta SAML app integration for RiskOS™ Single Sign-On (SSO) using the new account architecture. You configure the Okta application, map the required SAML attributes, assign users, and retrieve the metadata URL that Socure uses to register your identity provider.
Before You Start:
Request your Socure Support for your public account ID. The public account ID would be in the following format: acc-XXXXXXXXXX e.g. acc-gU5p9W5wFj
URLs and attributes
Attributes
Map the following SAML attributes in your Okta application. Set the Name format to Unspecified for every attribute except https://dashboard.socure.com/attributes/role, which uses URI Reference:
| SAML attribute | Application attribute | Description |
|---|---|---|
accountContext | identityProvider | Account context identifier. Enter it in double quotes. See accountContext format below. |
urn:oid:2.5.4.42 | user.firstName or user.profile.firstName | First name |
urn:oid:2.5.4.4 | user.lastName or user.profile.lastName | Last name |
urn:oid:2.5.4.20 | user.phoneNumber or user.profile.mobilePhone | Phone number |
urn:oasis:names:tc:SAML:1.1:nameid-format:emailAddress | user.email or user.profile.email | Email address |
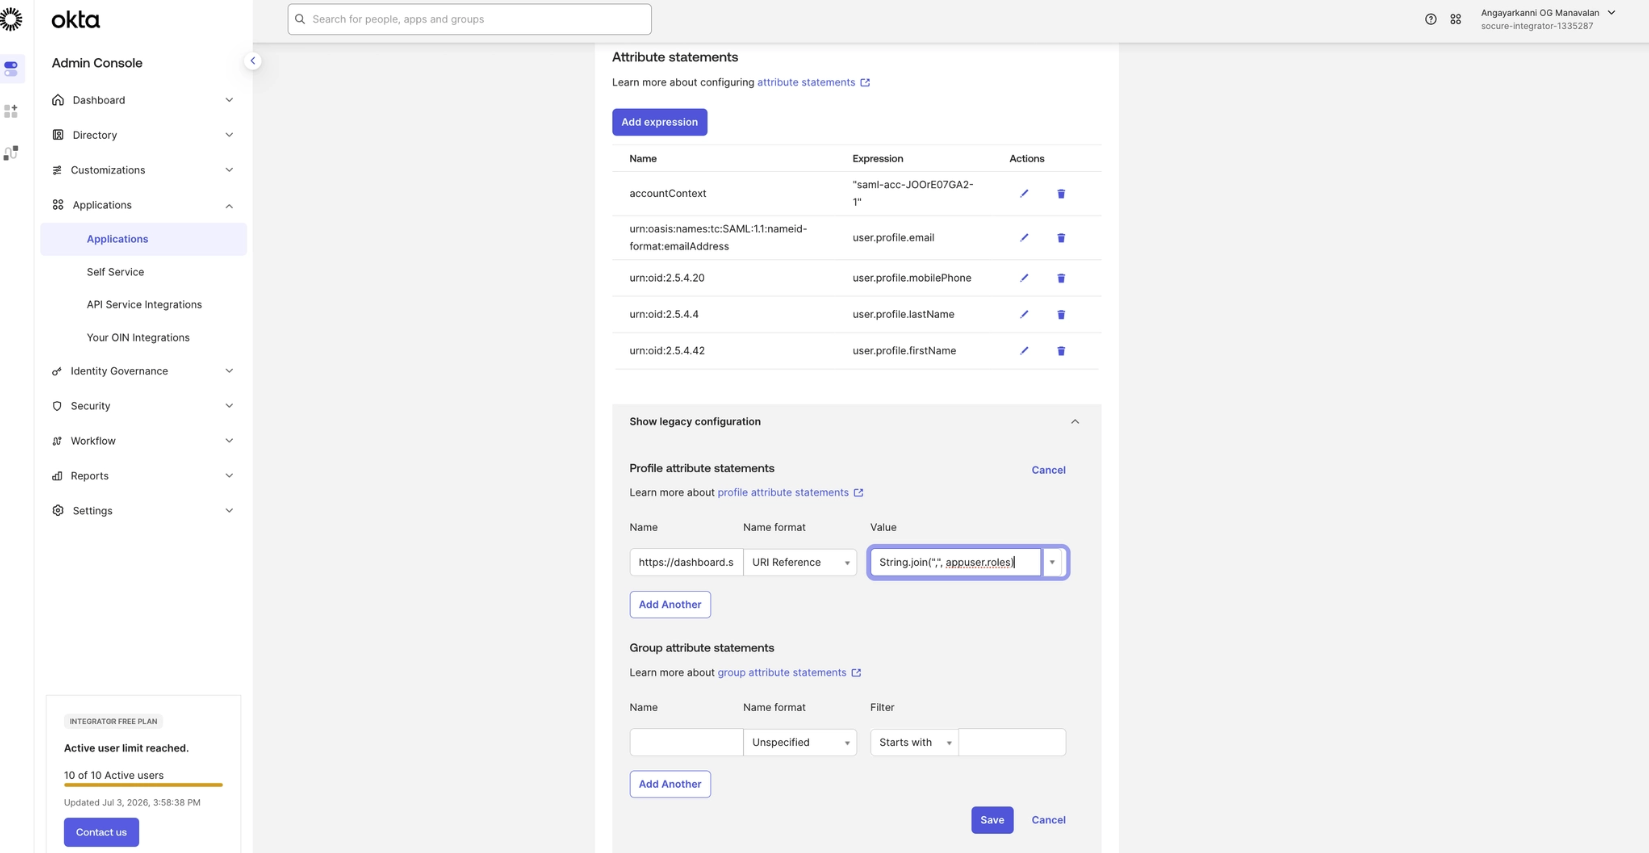
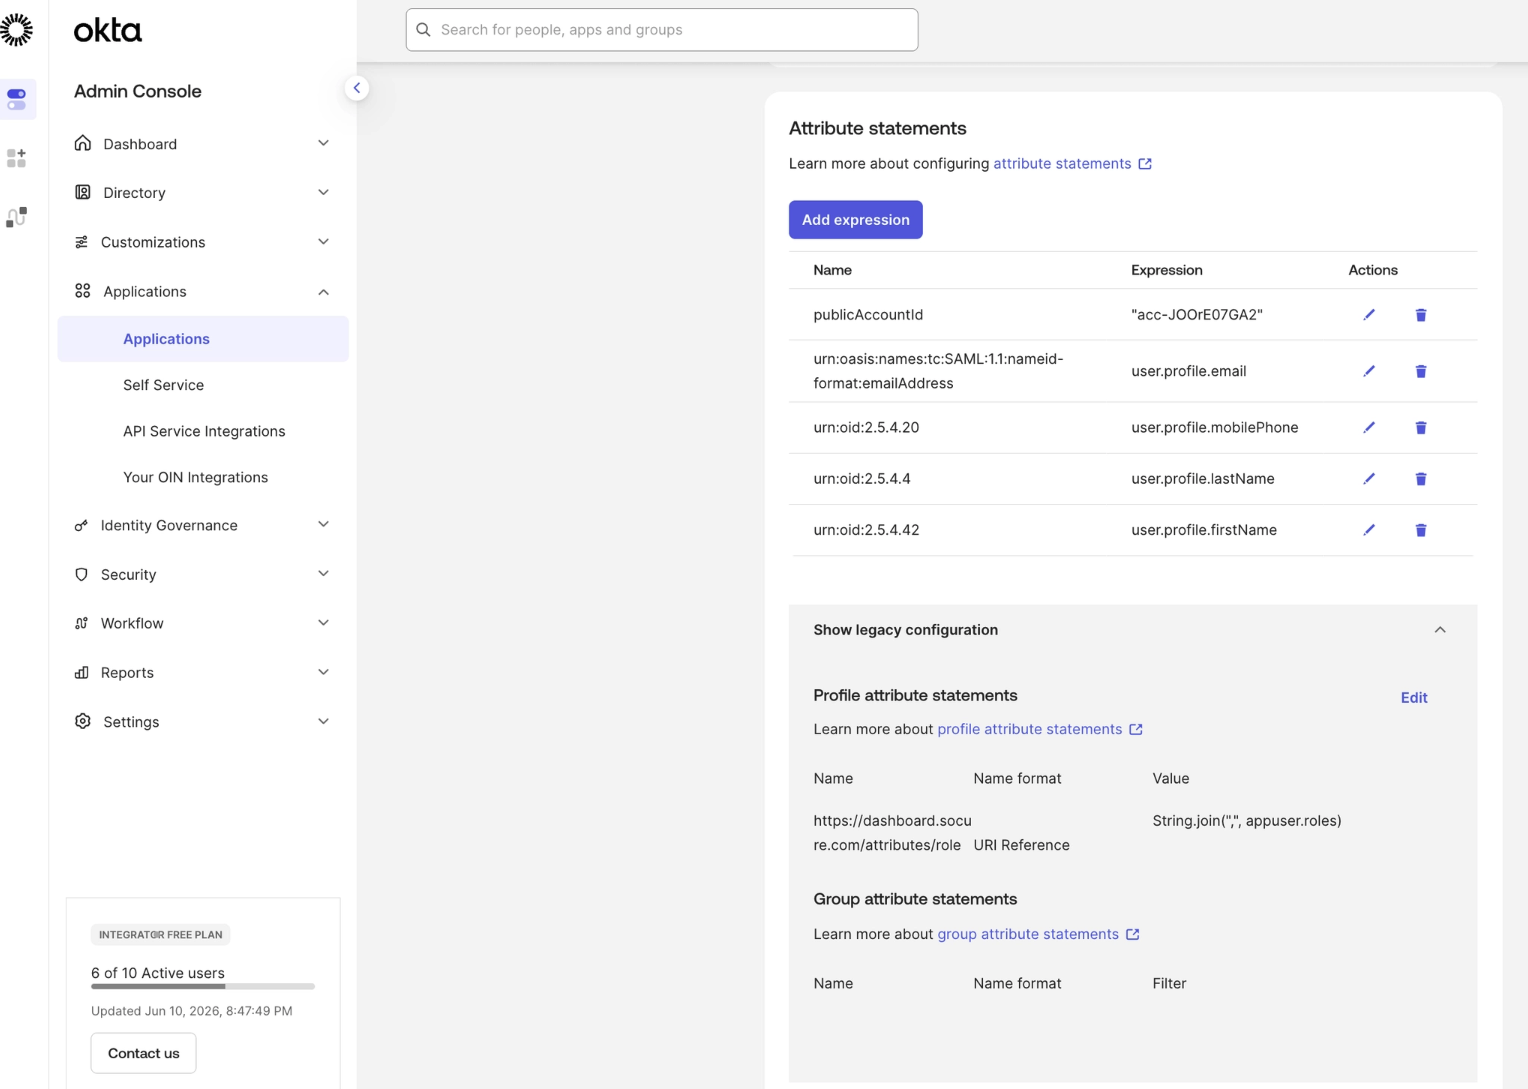
https://dashboard.socure.com/attributes/role | String.join(",", appUser.RoleName) | User roles |
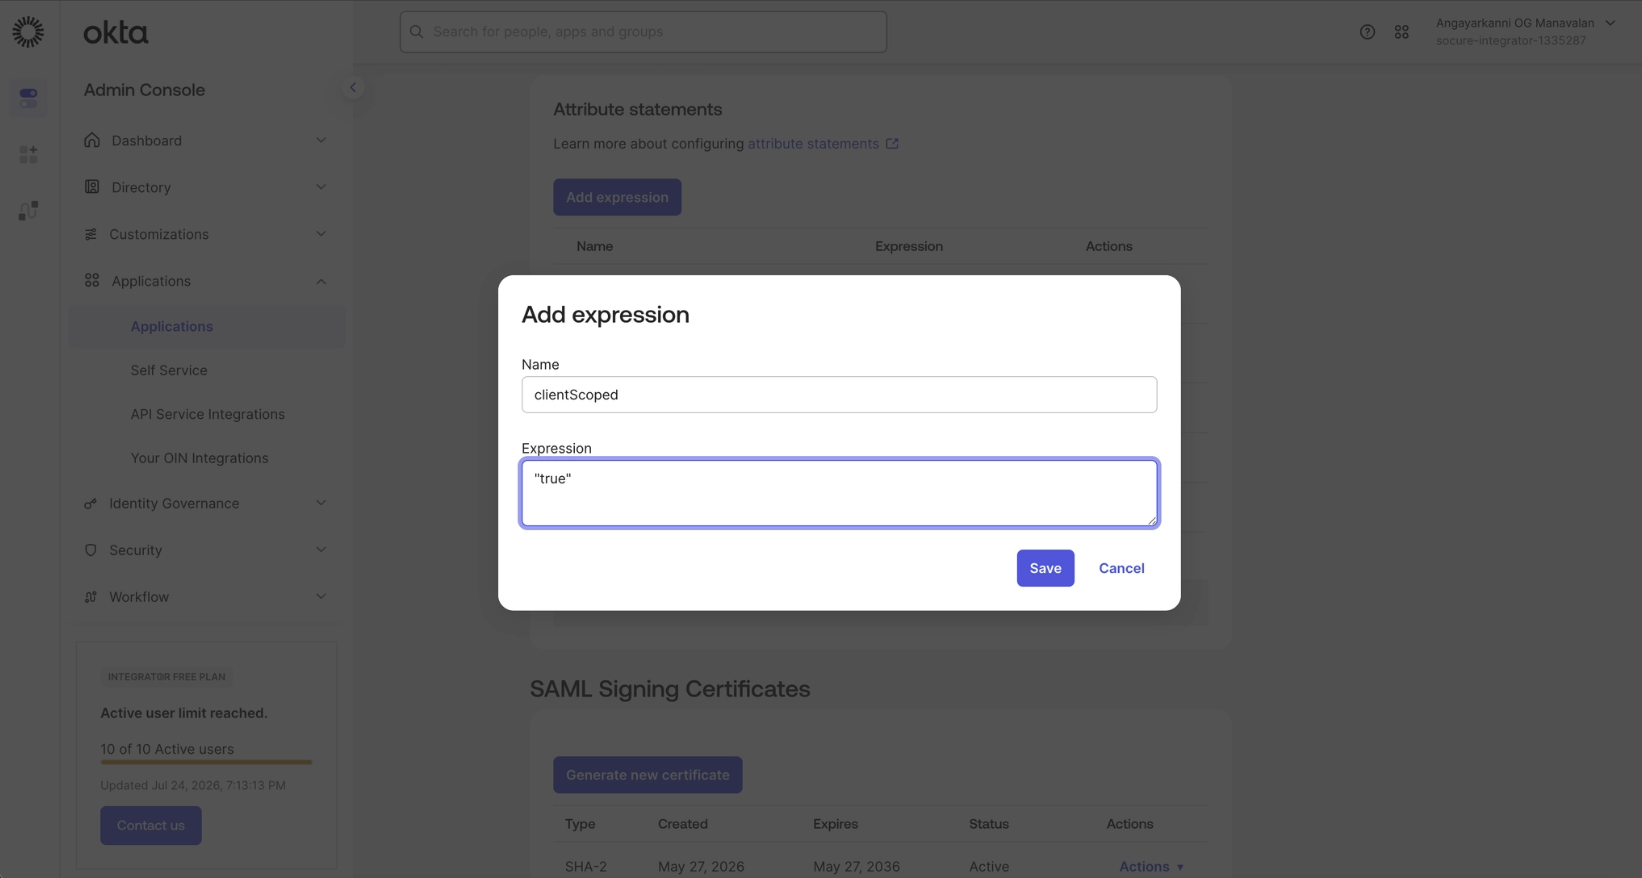
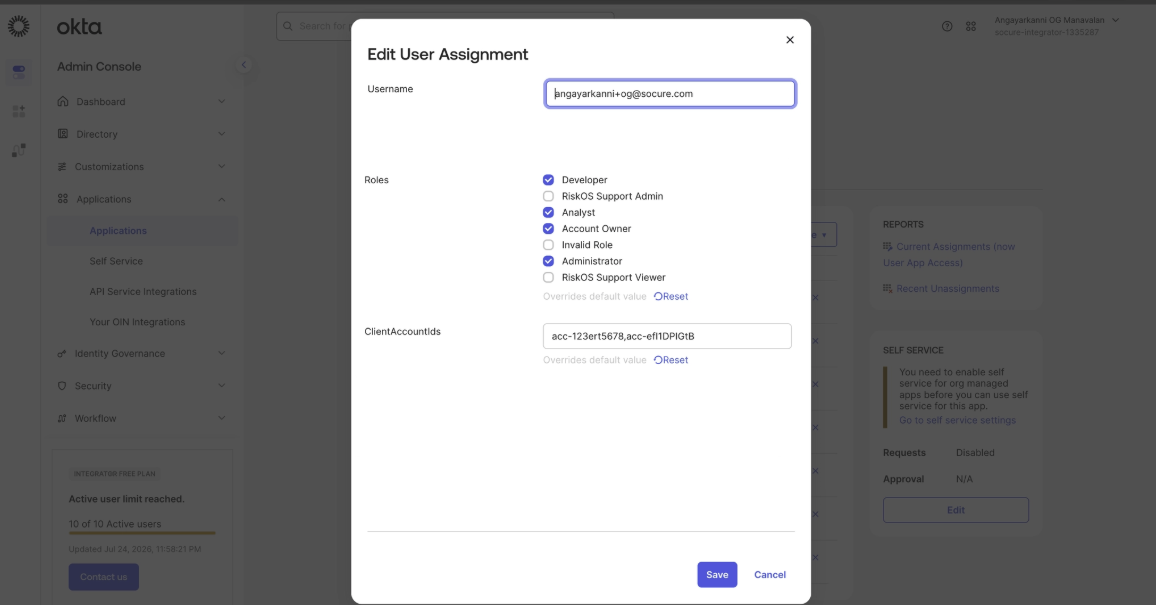
clientScoped | clientScoped | "true" or "false". Must be enclosed in double quotes. Assigns users to specific client accounts. Channel partners only; use with clientAccountIds. |
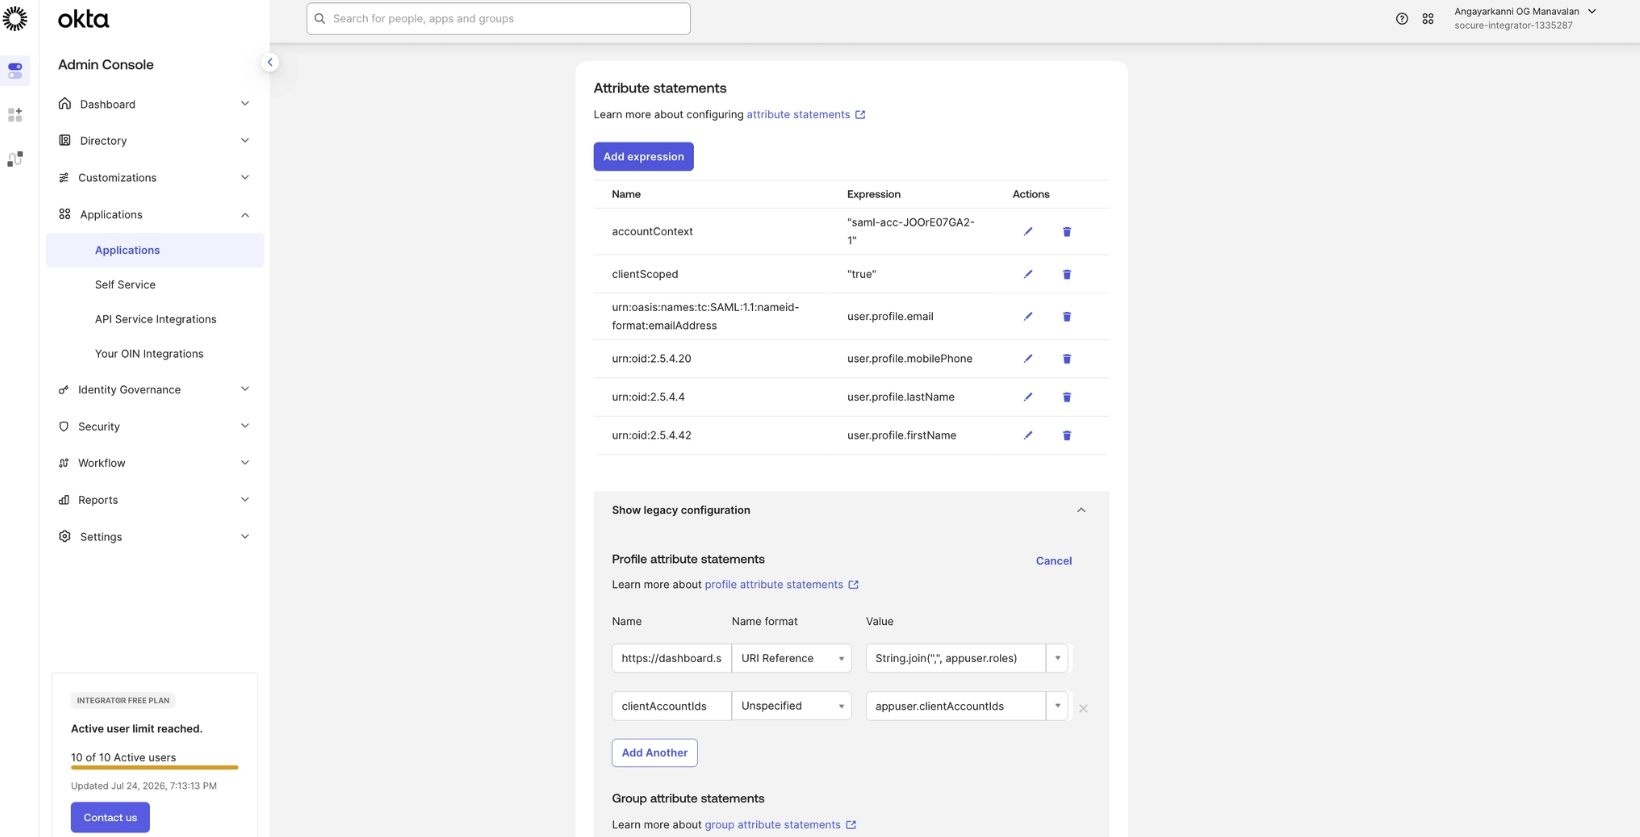
clientAccountIds | clientAccountIds | Comma-separated list of one or more public account IDs (for example, acc-xgd5Fgdtdy or acc-fg5FGgdgrrx,acc-xfs67fgrhd). Channel partners only. |
accountContext format
Enter the accountContext as the identityProvider value, enclosed in double quotes:
- Single SAML app:
"saml-<publicAccountId>-<envId>"— for example,"saml-acc-gU5p9W5wFj-1" - Multiple SAML apps for the same account: append an alias name,
"saml-<publicAccountId>-<envId>-<alias-name>"— for example,"saml-acc-gU5p9W5wFj-1-external"
Required and Optional Attributes
- Required:
accountContextfirstNamelastNamephoneNumber- Optional:
roleclientScopedandclientAccountIds(pass together)
roleConfigure the
roleattribute to control role assignment through SAML:
- If specified — Socure assigns the role named in the SAML assertion.
- If not specified — Socure defaults to the Fraud Analyst role during Just-In-Time (JIT) creation, the first time the user accesses RiskOS™.
clientScopedandclientAccountIdsThese optional attributes must be passed together and are relevant for channel partners.
Channel partners can set up two SAML apps to control access for internal versus external (client) users:
- Internal users — need access to all client accounts. Configure the first SAML app without
clientScopedandclientAccountIds.- External users — need access to specific client accounts. Configure the second SAML app with
clientScopedandclientAccountIds.
SAML endpoints
| Field | Purpose | Example value |
|---|---|---|
| ACS URL | Endpoint where the IdP posts the SAML response. | https://user-access-manager-prod.auth.us-east-1.amazoncognito.com/saml2/idpresponse |
| Audience Restriction (SP Entity ID) | Identifies the Cognito User Pool acting as the SP (must match the SAML audience). | urn:amazon:cognito:sp:us-east-1_fXpfelaxM |
| Default Relay State | Tells Cognito which IdP to use and where to redirect after authentication. | identity_provider=saml-<publicAccountId>-<envId>&client_id=hh218b94fhq1f15k0qgtp9quc&redirect_uri=https://api-dashboardv2.socure.com/saml/SSO&response_type=code&scope=openidFor example, identity_provider=saml-acc-gU5p9W5wFj-1&client_id=hh218b94fhq1f15k0qgtp9quc&redirect_uri=https://api-dashboardv2.socure.com/saml/SSO&response_type=code&scope=openid |
Default Relay State — parameter breakdown
| Parameter | Description |
|---|---|
identity_provider | SAML identity provider name (saml-<publicAccountId>-<envId>)For example saml-acc-gU5p9W5wFj-11 is for RiskOS™ Production 3 is for RiskOS™ Sandbox |
client_id | Cognito app client ID. Needs to be the following specific value:hh218b94fhq1f15k0qgtp9quc |
redirect_uri | Dashboard SSO callback endpoint. Needs to be the following specific value:https://api-dashboardv2.socure.com/saml/SSO |
response_type | OAuth response type. Needs to be the following specific value: code |
scope | Requested OAuth scope. Needs to be the following specific value: openid |
Environment ID:
Use the suffix that matches your environment in the
identity_providervalue:
1— Production3— Sandbox
Multi-IdP: Multiple Identity Providers per Account
A single account can have multiple SAML Identity Providers (for example, separate Okta apps for different teams, regions, or IdP vendors).
Each IdP is distinguished by an alias — 1–6 character lowercase alphanumeric suffix appended to the provider name.
Provider Naming
| Scenario | Provider Name Format | Example |
|---|---|---|
| Single IdP (default) | saml-<publicAccountId>-<envId> | saml-acc-JOOrE07GA2-1 |
| Multi-IdP (with alias) | saml-<publicAccountId>-<envId>-<alias> | saml-acc-JOOrE07GA2-1-okta1 |
Alias rules:
- 1–6 characters
- Lowercase alphanumeric only (
a-z,0-9) - Must be unique per account + envId combination
- Examples:
okta1,emea,ping,clnt1
Setup
- First IdP — create without alias (backward compatible):
{
  "publicAccountId": "acc-JOOrE07GA2",
  "metadataUrl": "<https://idp-1.example.com/sso/saml/metadata>",
  "envId": 1
}
→ Provider name: saml-acc-JOOrE07GA2-1
- Additional IdPs — create with alias:
{
  "publicAccountId": "acc-JOOrE07GA2",
  "metadataUrl": "<https://idp-2.example.com/sso/saml/metadata>",
  "envId": 1,
  "alias": "clnt1"
}
→ Provider name: saml-acc-JOOrE07GA2-1-clnt1
Default Relay State for Multi-IdP
Each IdP needs its own relay state with the correct identity_provider value:
| IdP | identity_provider |
|---|---|
| Primary (no alias) | saml-acc-JOOrE07GA2-1 |
Secondary (alias: clnt1) | saml-acc-JOOrE07GA2-1-clnt1 |
Role Behavior with Multiple IdPs
| Scenario | Behavior |
|---|---|
User logs in via IdP-1 with role-1 | role-1 is assigned |
Same user logs in via IdP-2 with role-2 | role-1 is removed, role-2 is assigned (replace strategy) |
| IdP sends no roles / invalid roles | Existing roles are retained (no change) |
| User is Account Owner and IdP omits Account Owner role | Login is blocked (Account Owner demotion protection) |
Create an Okta app integration
Step 1 — Create the app integration
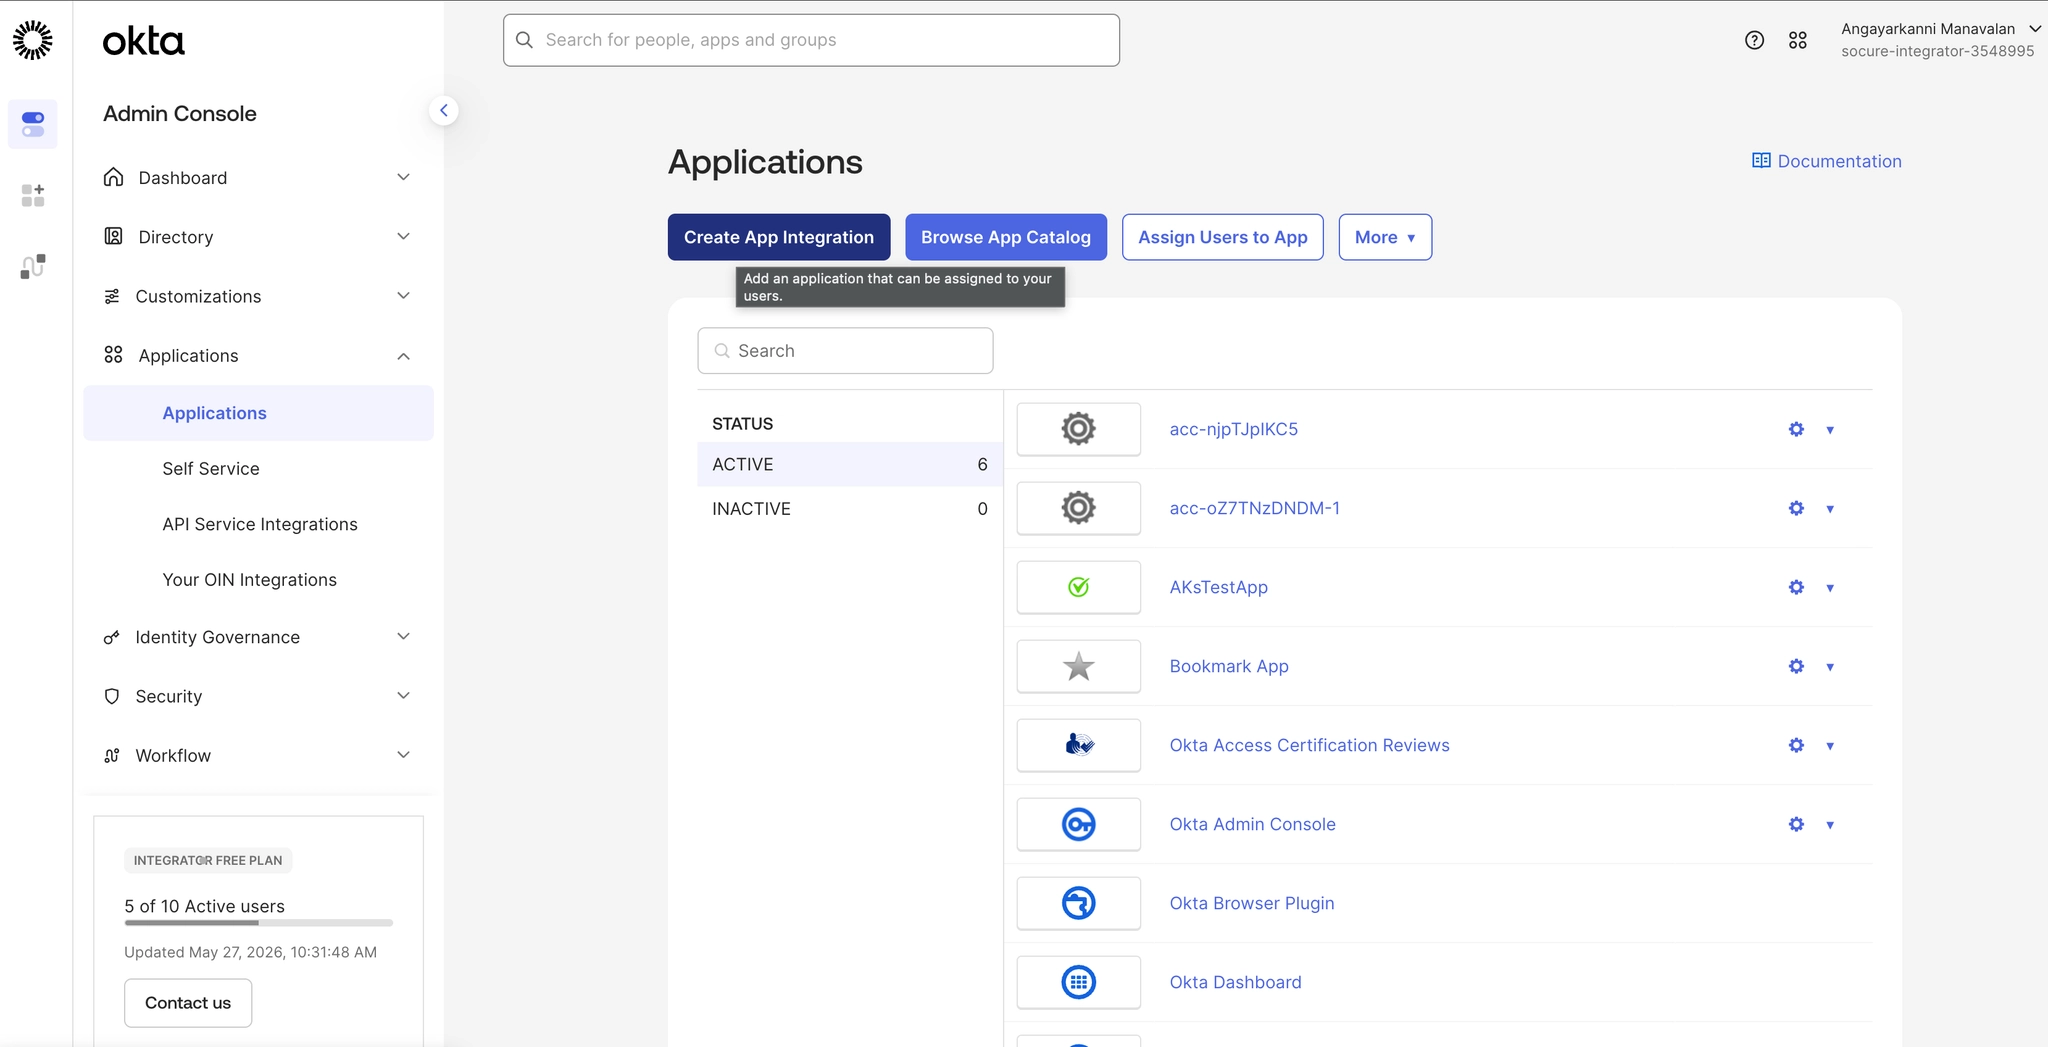
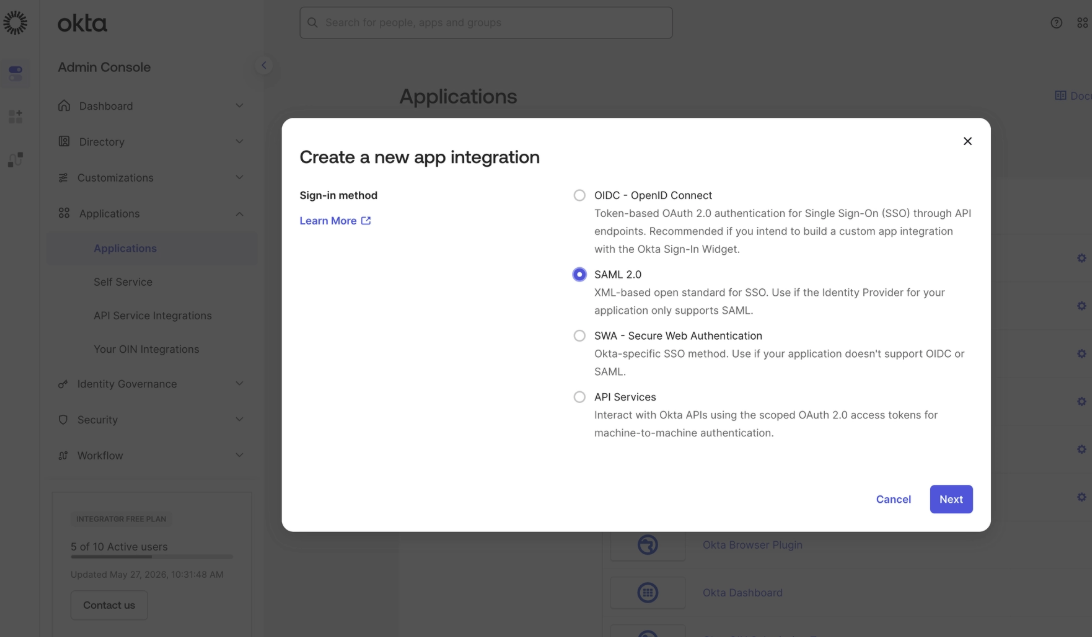
In the Okta Admin Console, go to Applications > Applications, click Create App Integration, select SAML 2.0, and click Next.
Configure the SAML integration
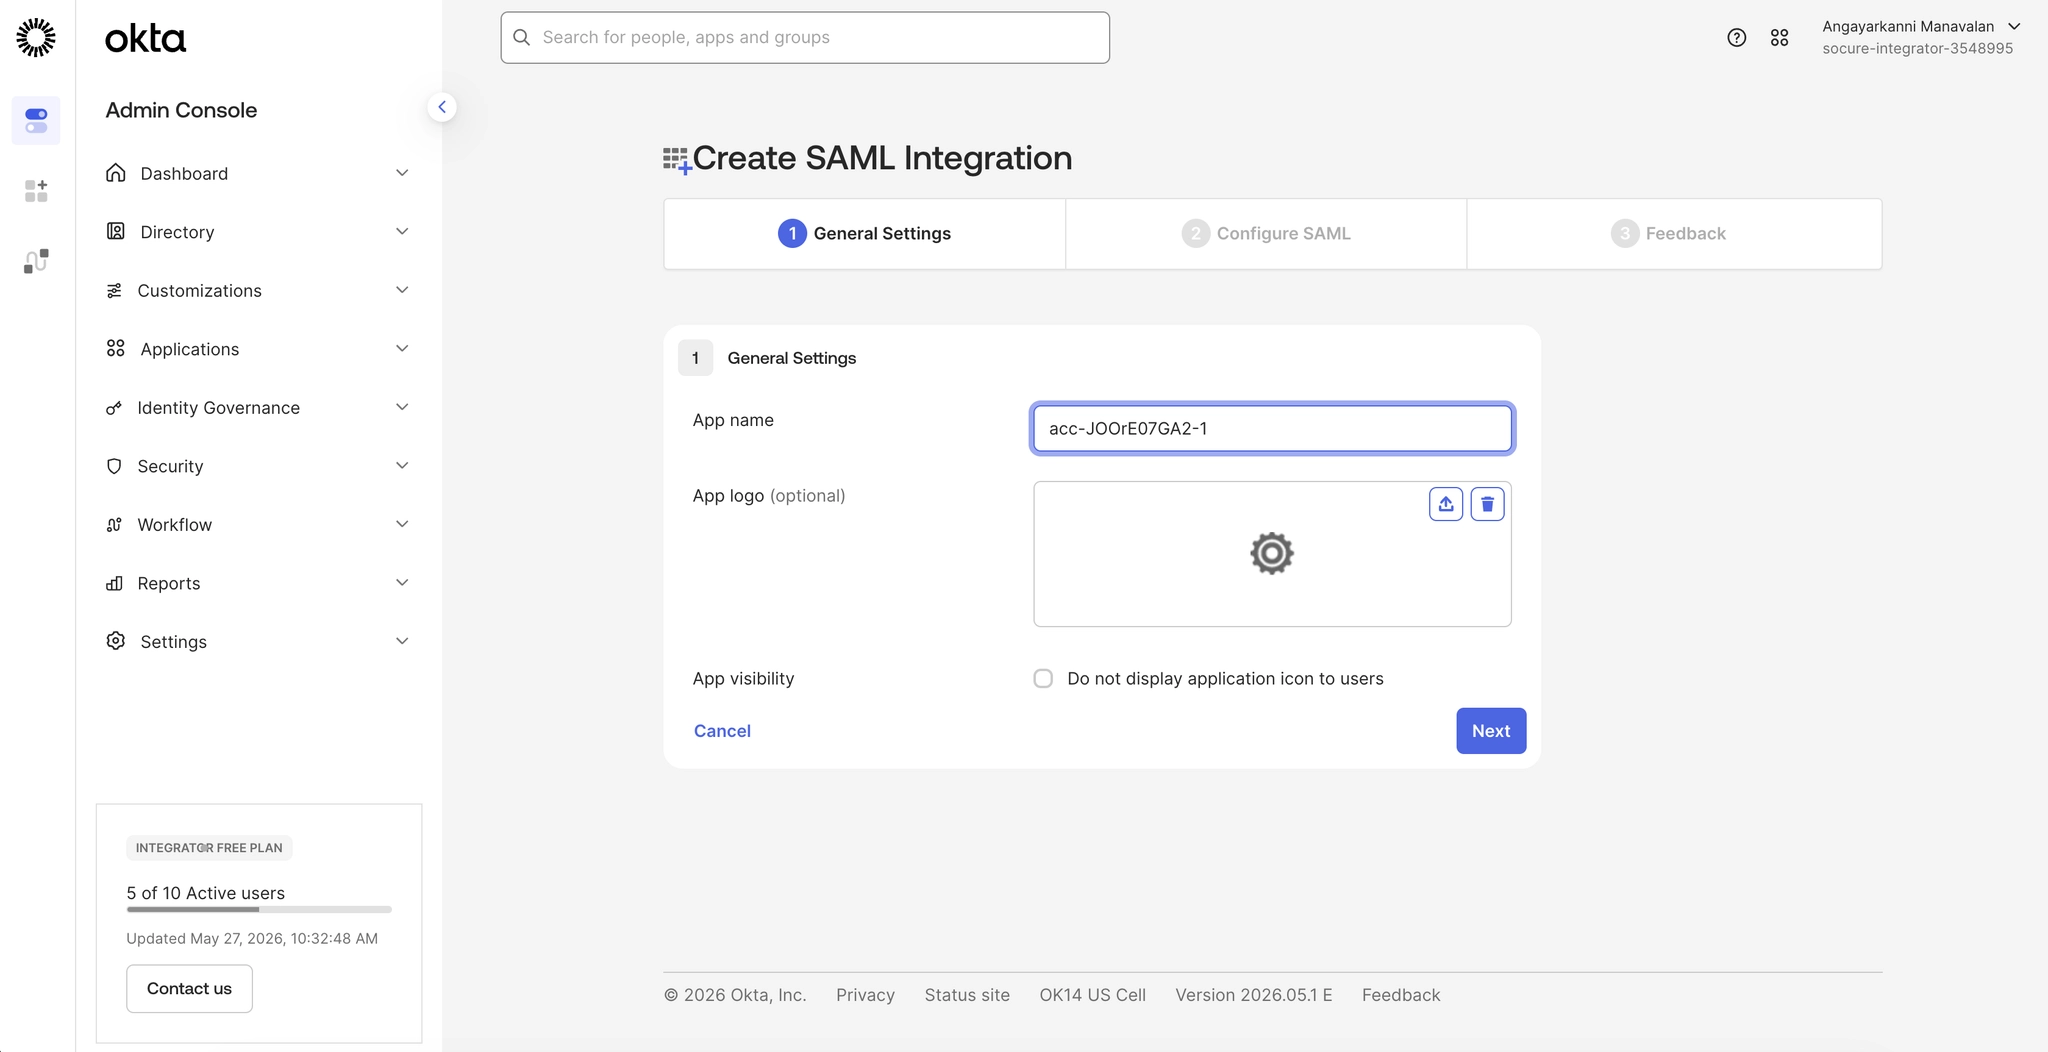
Step 1 — General settings
Confirm the App name under General Settings, then continue to the SAML configuration.
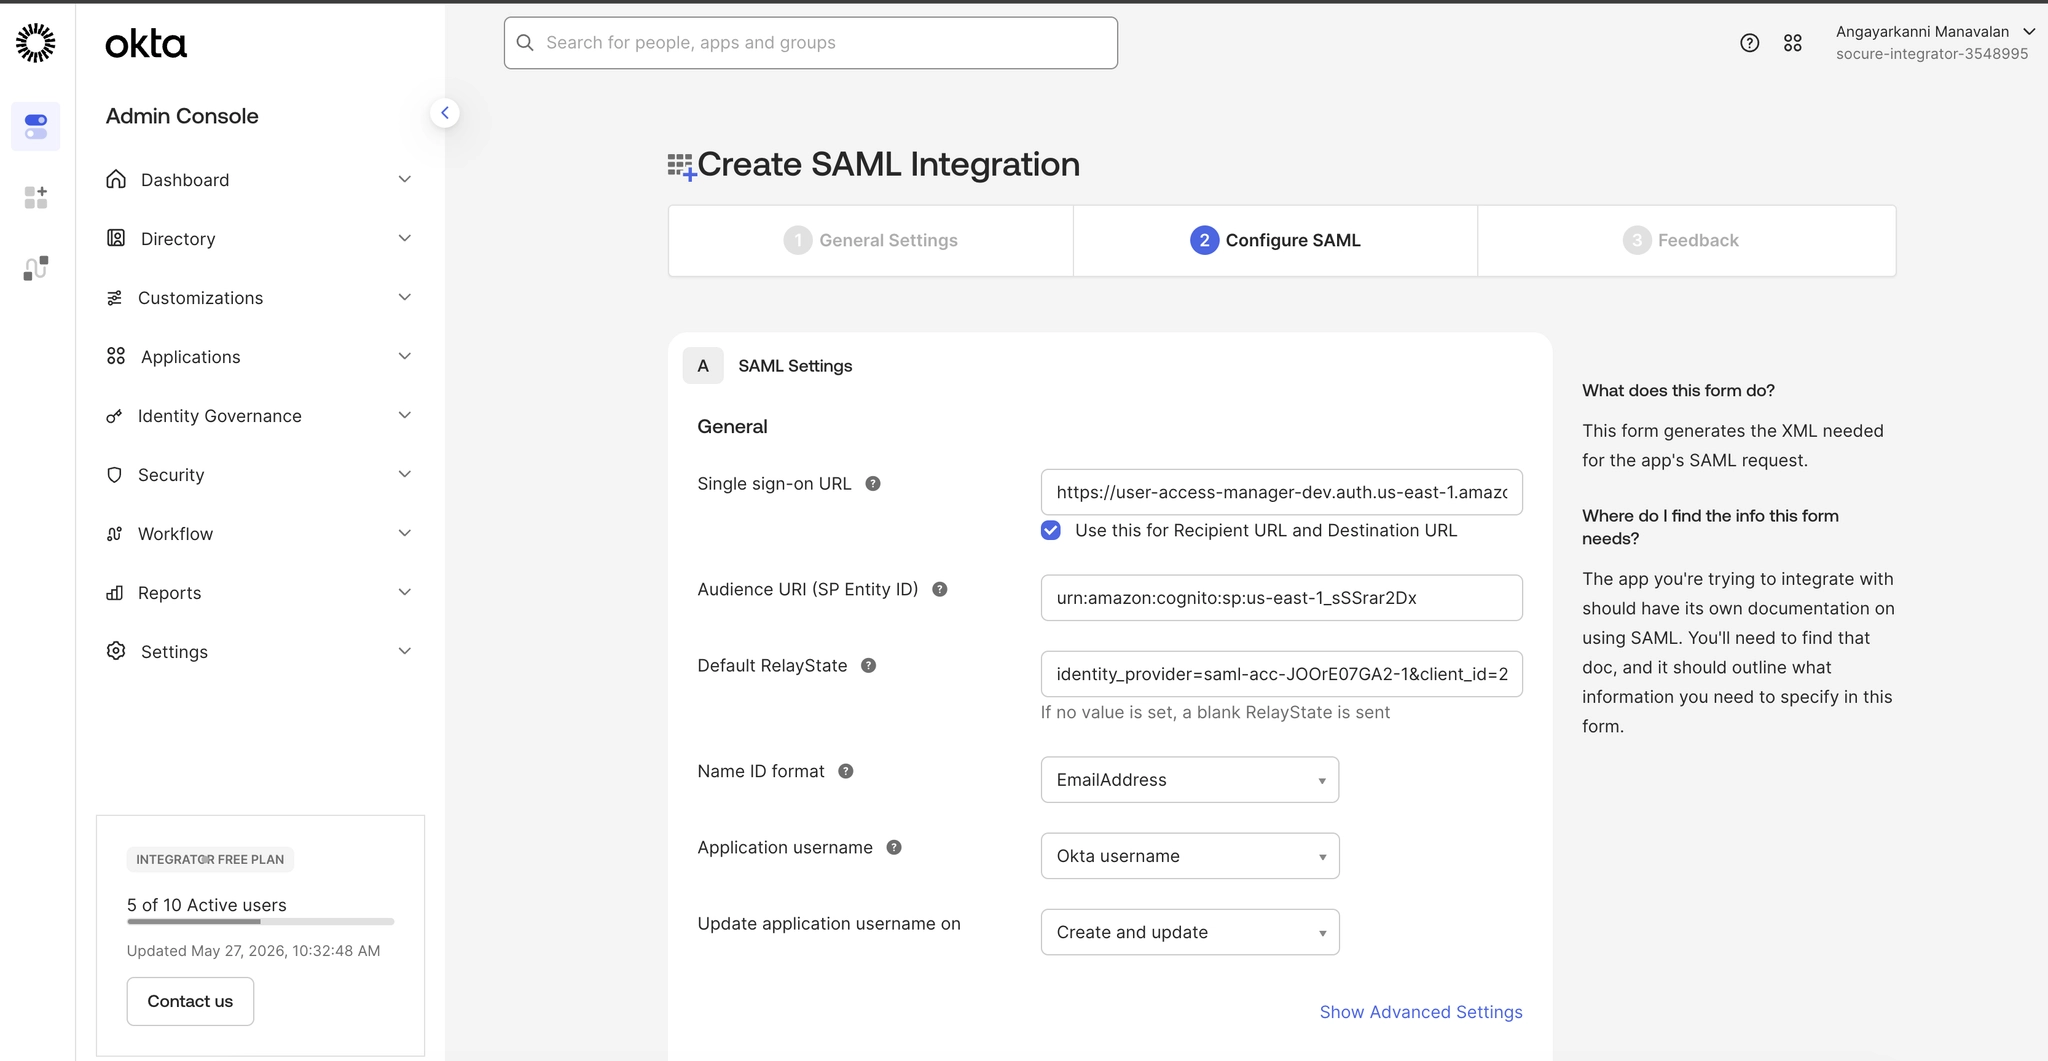
Step 2 — Configure SAML settings
Enter the values Socure provides for your environment:
- Single sign-on URL — the ACS URL. Keep Use this for Recipient URL and Destination URL selected.
- Audience URI (SP Entity ID) — the SP entity ID.
- Default RelayState — the relay state string for your account and environment.
- Name ID format — SelectEmailAddress.
Step 3 — Finish
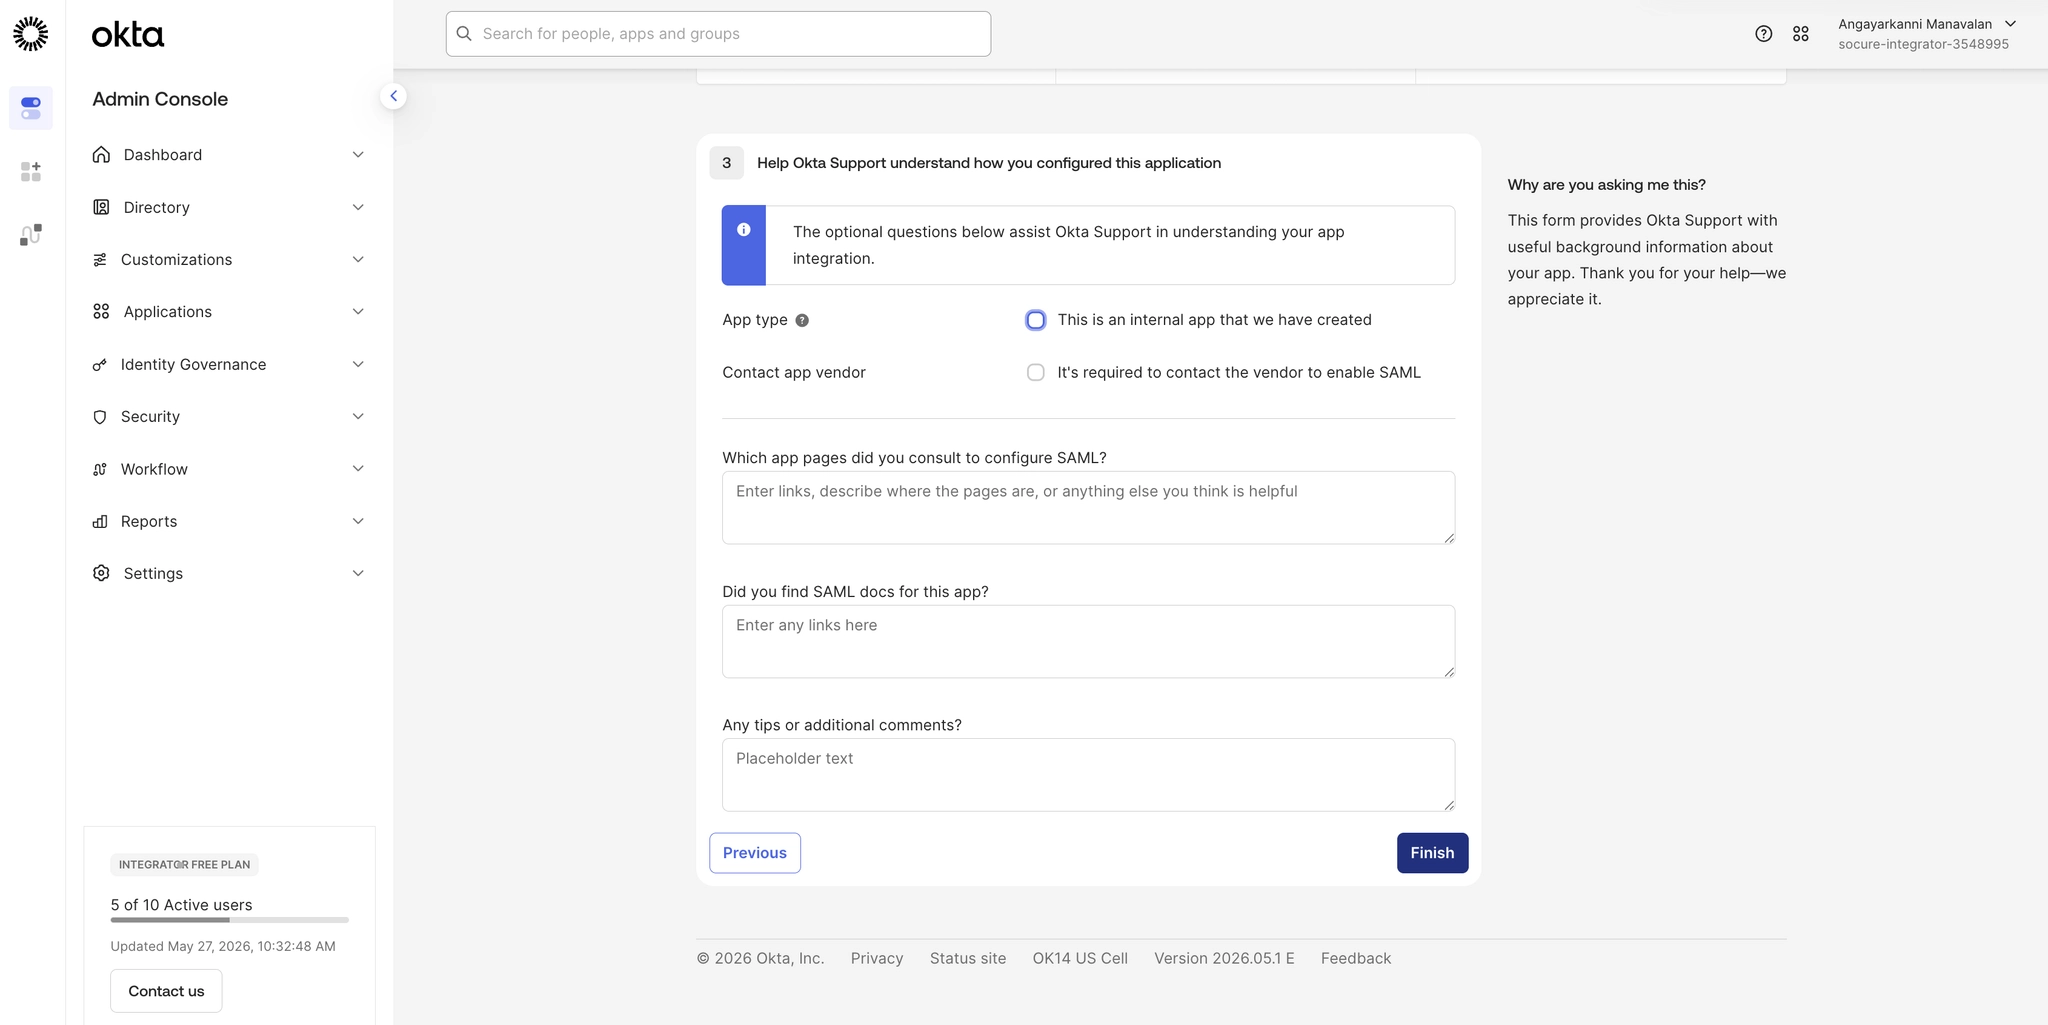
Complete the feedback step and click Finish.
Add attribute statements
On the application's Sign On settings, add the attribute statements listed in Attributes. Map each SAML attribute name to the corresponding Okta user profile attribute.
How to configure role attribute
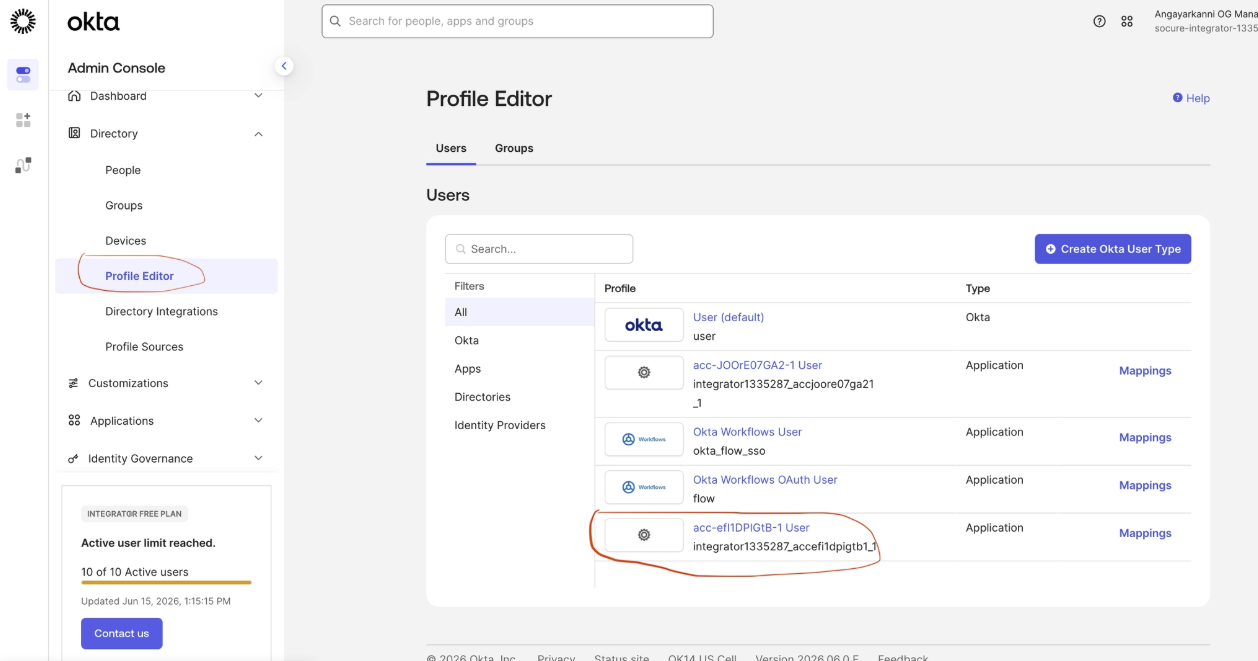
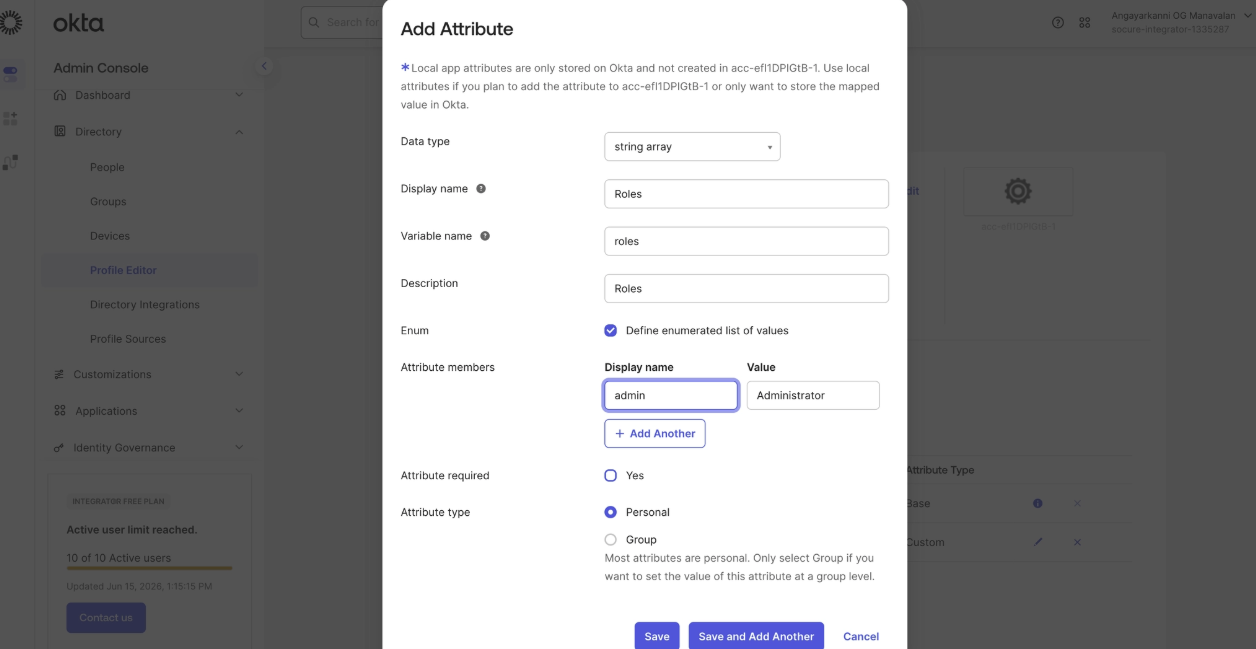
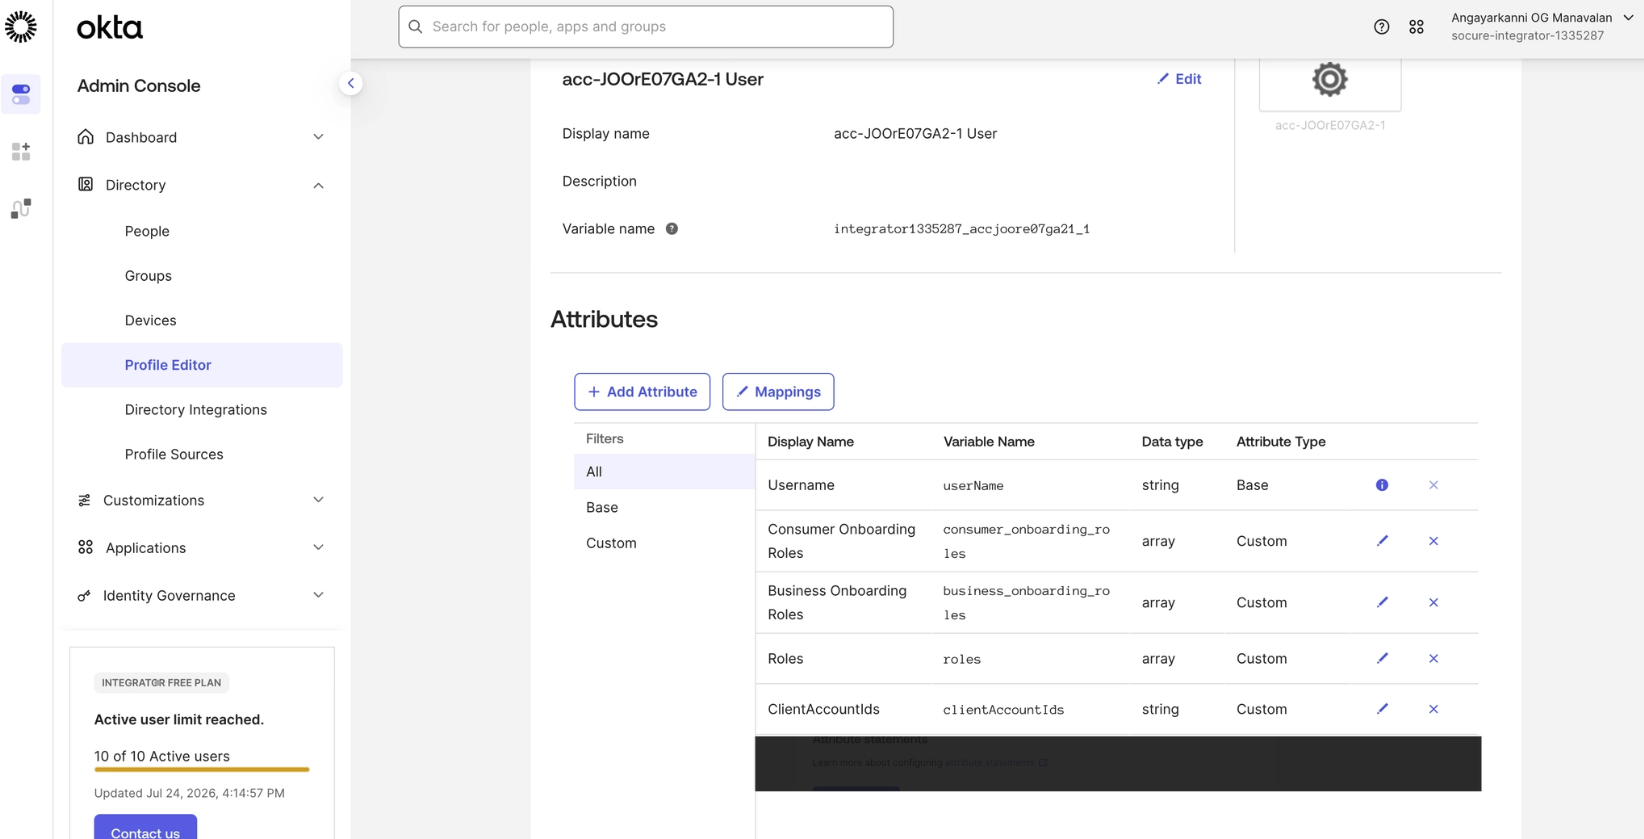
To manage RiskOS™ roles through SAML, create a custom RoleName attribute on the application profile before you add the role attribute statement:
- Go to Directory > Profile Editor and select your application.
- Click Add Attribute, then configure the attribute:
- Data type — String array
- Display name —
https://dashboard.socure.com/attributes/role - Variable name —
RoleName - Enum — Selected
- Attribute members — Add one member for each role you assign. The value must match a valid RiskOS™ role name (see Roles and permissions); the display name is your choice.
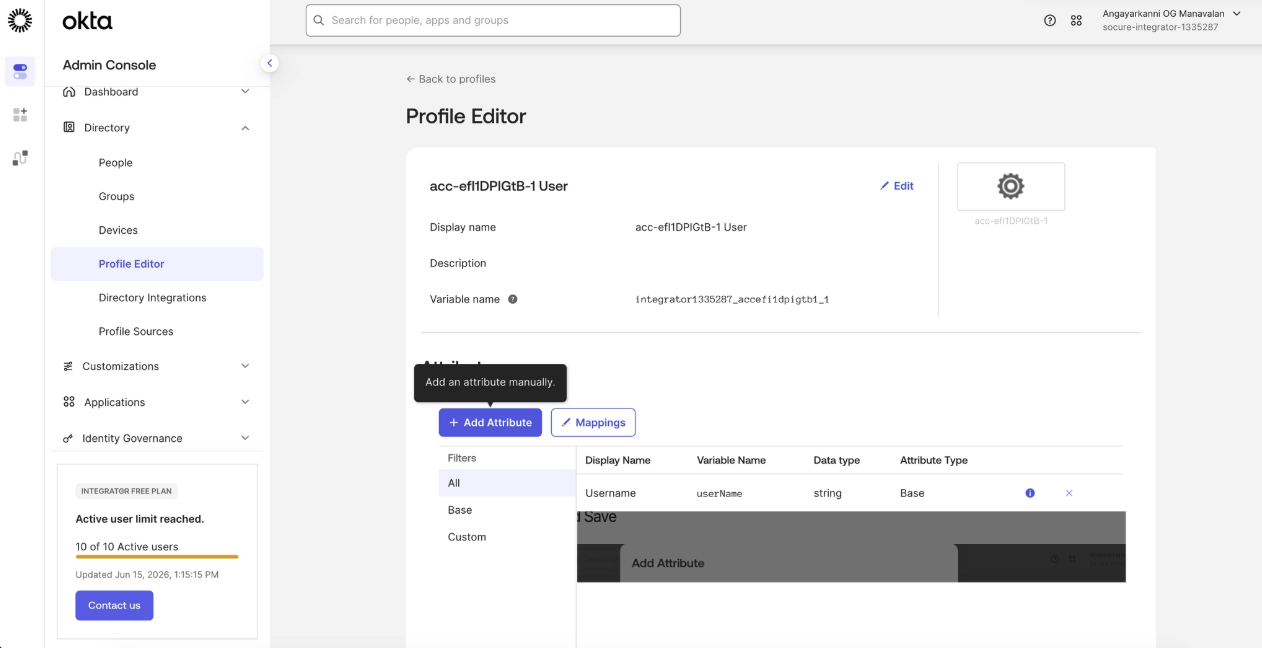
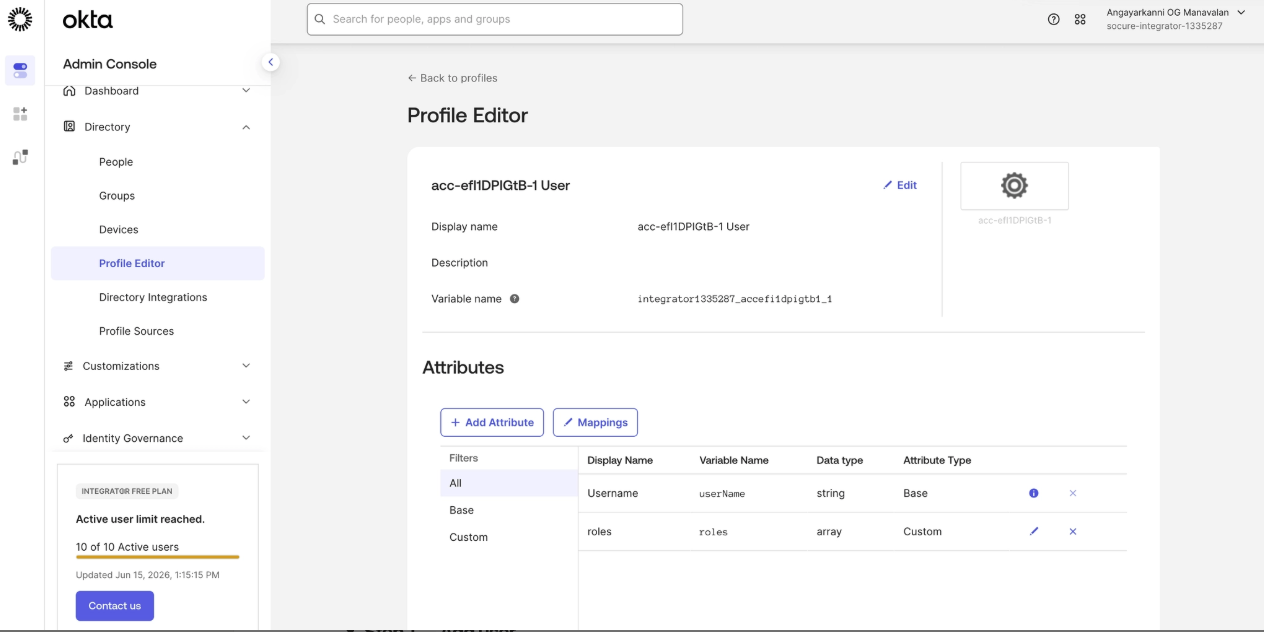
- Save the attribute. The new RoleName attribute appears in the application's Attributes list.
- Ensure Attribute list shows the role attribute after you save it, as shown in the following screenshot.
-
Add roleName as an expression (Okta Legacy Configuration)
How to configure accountContext attribute
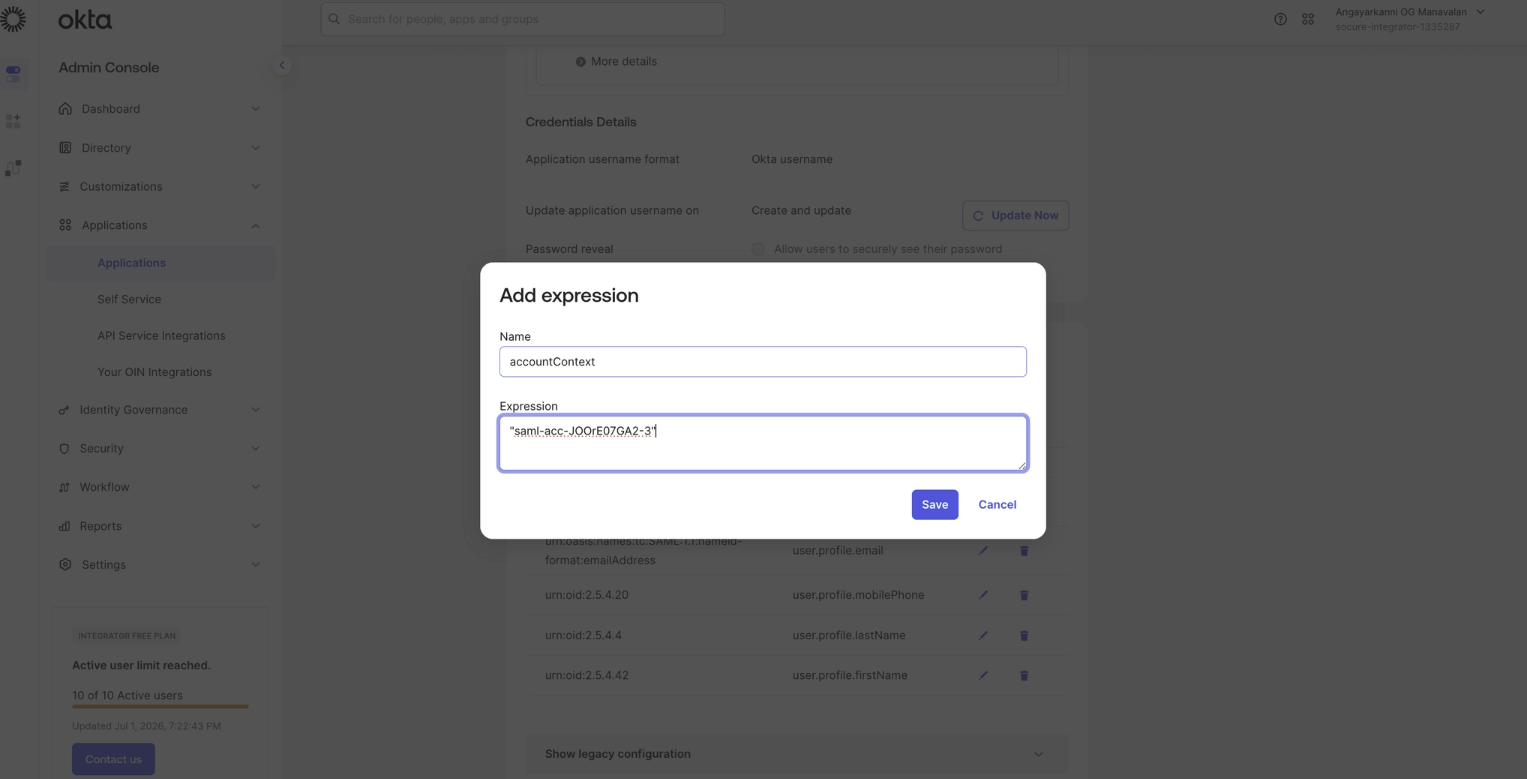
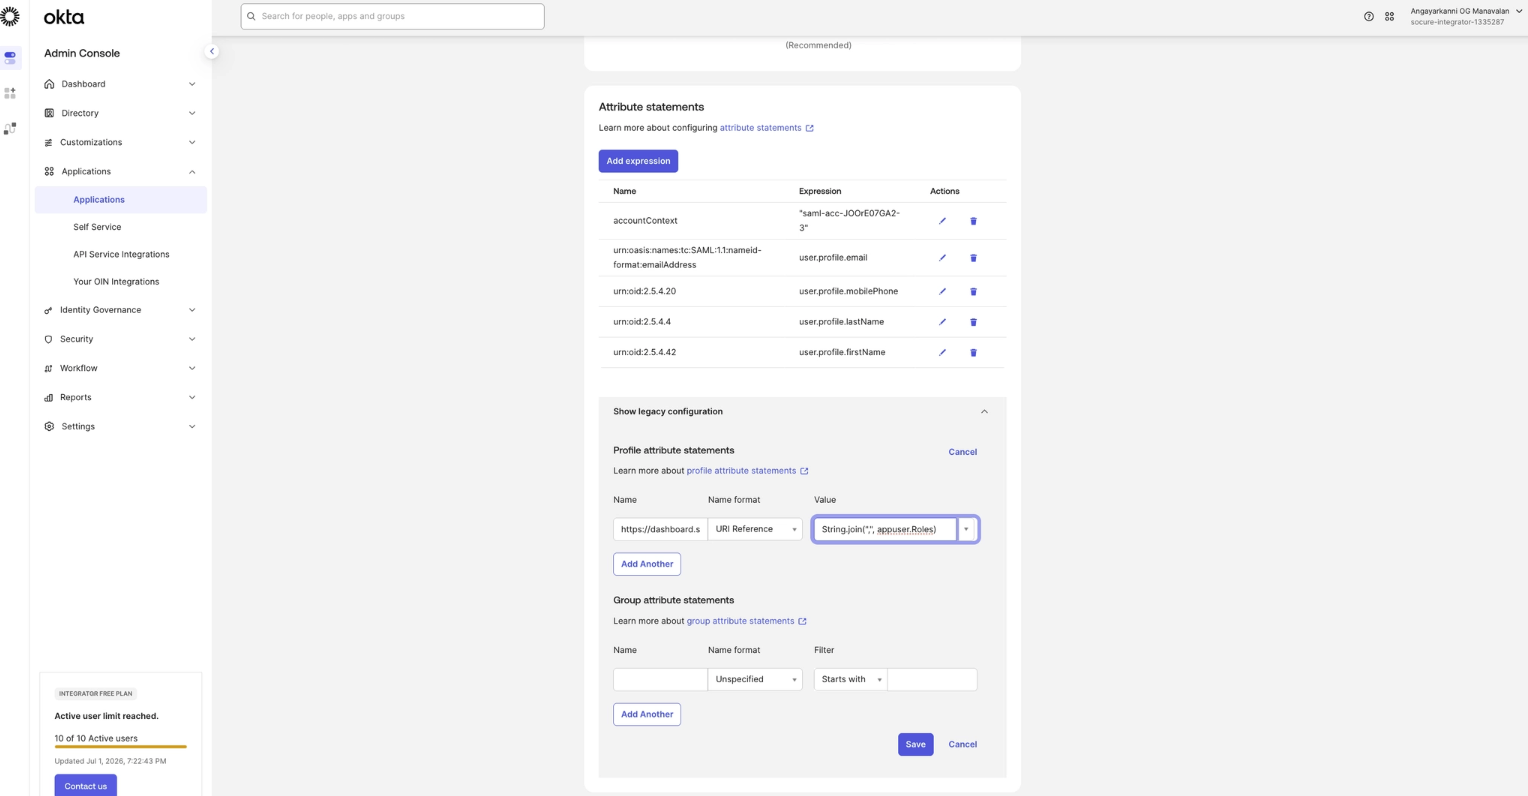
How to configure clientScoped and clientAccountIds attributes
Add expression for clientScoped
Add expression for clientAccountIds
Sample Decoded SAML Assertion (as received by Socure)
<?xml version="1.0" encoding="UTF-8"?>
<saml2p:Response Destination="https://user-access-manager-dev.auth.us-east-1.amazoncognito.com/saml2/idpresponse" ID="id-60329139073102282801583932823" IssueInstant="2026-07-01T11:27:37.545Z" Version="2.0"
	xmlns:saml2p="urn:oasis:names:tc:SAML:2.0:protocol"
	xmlns:xs="http://www.w3.org/2001/XMLSchema">
	<saml2:Issuer Format="urn:oasis:names:tc:SAML:2.0:nameid-format:entity"
		xmlns:saml2="urn:oasis:names:tc:SAML:2.0:assertion">http://www.okta.com/exk14qkxh9z8VaWWV698
	</saml2:Issuer>
	<ds:Signature
		xmlns:ds="http://www.w3.org/2000/09/xmldsig#">
		<ds:SignedInfo>
			<ds:CanonicalizationMethod Algorithm="http://www.w3.org/2001/10/xml-exc-c14n#"/>
			<ds:SignatureMethod Algorithm="http://www.w3.org/2001/04/xmldsig-more#rsa-sha256"/>
			<ds:Reference URI="#id-60329139073102282801583932823">
				<ds:Transforms>
					<ds:Transform Algorithm="http://www.w3.org/2000/09/xmldsig#enveloped-signature"/>
					<ds:Transform Algorithm="http://www.w3.org/2001/10/xml-exc-c14n#">
						<ec:InclusiveNamespaces PrefixList="xs"
							xmlns:ec="http://www.w3.org/2001/10/xml-exc-c14n#"/>
					</ds:Transform>
				</ds:Transforms>
				<ds:DigestMethod Algorithm="http://www.w3.org/2001/04/xmlenc#sha256"/>
				<ds:DigestValue>3udT9hC/arsz7afkfwPVsAnEqS5KcaLdFGJ4TH7PpfM=</ds:DigestValue>
			</ds:Reference>
		</ds:SignedInfo>
		<ds:SignatureValue>REDACTED_SIGNATURE_VALUE==</ds:SignatureValue>
		<ds:KeyInfo>
			<ds:X509Data>
				<ds:X509Certificate>MIIDxxxxxxxx...REDACTED_CERTIFICATE...xxxxxxxx==</ds:X509Certificate>
			</ds:X509Data>
		</ds:KeyInfo>
	</ds:Signature>
	<saml2p:Status
		xmlns:saml2p="urn:oasis:names:tc:SAML:2.0:protocol">
		<saml2p:StatusCode Value="urn:oasis:names:tc:SAML:2.0:status:Success"/>
	</saml2p:Status>
	<saml2:Assertion ID="id98007094508477714852680778" IssueInstant="2026-07-01T11:27:37.545Z" Version="2.0"
		xmlns:saml2="urn:oasis:names:tc:SAML:2.0:assertion"
		xmlns:xs="http://www.w3.org/2001/XMLSchema">
		<saml2:Issuer Format="urn:oasis:names:tc:SAML:2.0:nameid-format:entity"
			xmlns:saml2="urn:oasis:names:tc:SAML:2.0:assertion">http://www.okta.com/exk14qkxh9z8VaWWV698
		</saml2:Issuer>
		<ds:Signature
			xmlns:ds="http://www.w3.org/2000/09/xmldsig#">
			<ds:SignedInfo>
				<ds:CanonicalizationMethod Algorithm="http://www.w3.org/2001/10/xml-exc-c14n#"/>
				<ds:SignatureMethod Algorithm="http://www.w3.org/2001/04/xmldsig-more#rsa-sha256"/>
				<ds:Reference URI="#id98007094508477714852680778">
					<ds:Transforms>
						<ds:Transform Algorithm="http://www.w3.org/2000/09/xmldsig#enveloped-signature"/>
						<ds:Transform Algorithm="http://www.w3.org/2001/10/xml-exc-c14n#">
							<ec:InclusiveNamespaces PrefixList="xs"
								xmlns:ec="http://www.w3.org/2001/10/xml-exc-c14n#"/>
							</ds:Transform>
						</ds:Transforms>
						<ds:DigestMethod Algorithm="http://www.w3.org/2001/04/xmlenc#sha256"/>
						<ds:DigestValue>kIqZpZBYdSibCBYHq1vbUi6QO4GgY79Q0+nxqZLYGjM=</ds:DigestValue>
					</ds:Reference>
				</ds:SignedInfo>
				<ds:SignatureValue>REDACTED_SIGNATURE_VALUE==</ds:SignatureValue>
				<ds:KeyInfo>
					<ds:X509Data>
						<ds:X509Certificate>MIIDxxxxxxxx...REDACTED_CERTIFICATE...xxxxxxxx==</ds:X509Certificate>
					</ds:X509Data>
				</ds:KeyInfo>
			</ds:Signature>
			<saml2:Subject
				xmlns:saml2="urn:oasis:names:tc:SAML:2.0:assertion">
				<saml2:NameID Format="urn:oasis:names:tc:SAML:1.1:nameid-format:emailAddress">[email protected]</saml2:NameID>
				<saml2:SubjectConfirmation Method="urn:oasis:names:tc:SAML:2.0:cm:bearer">
					<saml2:SubjectConfirmationData NotOnOrAfter="2026-07-01T11:32:37.545Z" Recipient="https://user-access-manager-dev.auth.us-east-1.amazoncognito.com/saml2/idpresponse"/>
				</saml2:SubjectConfirmation>
			</saml2:Subject>
			<saml2:Conditions NotBefore="2026-07-01T11:22:37.545Z" NotOnOrAfter="2026-07-01T11:32:37.545Z"
				xmlns:saml2="urn:oasis:names:tc:SAML:2.0:assertion">
				<saml2:AudienceRestriction>
					<saml2:Audience>urn:amazon:cognito:sp:us-east-1_sSSrar2Dx</saml2:Audience>
				</saml2:AudienceRestriction>
			</saml2:Conditions>
			<saml2:AuthnStatement AuthnInstant="2026-07-01T11:23:59.841Z" SessionIndex="id1782905257374.553763817"
				xmlns:saml2="urn:oasis:names:tc:SAML:2.0:assertion">
				<saml2:AuthnContext>
					<saml2:AuthnContextClassRef>urn:oasis:names:tc:SAML:2.0:ac:classes:PasswordProtectedTransport</saml2:AuthnContextClassRef>
				</saml2:AuthnContext>
			</saml2:AuthnStatement>
			<saml2:AttributeStatement
				xmlns:saml2="urn:oasis:names:tc:SAML:2.0:assertion">
				<saml2:Attribute Name="https://dashboard.socure.com/attributes/role" NameFormat="urn:oasis:names:tc:SAML:2.0:attrname-format:uri">
					<saml2:AttributeValue
						xmlns:xs="http://www.w3.org/2001/XMLSchema"
						xmlns:xsi="http://www.w3.org/2001/XMLSchema-instance" xsi:type="xs:string">Analyst
					</saml2:AttributeValue>
				</saml2:Attribute>
				<saml2:Attribute Name="accountContext" NameFormat="urn:oasis:names:tc:SAML:2.0:attrname-format:unspecified">
					<saml2:AttributeValue
						xmlns:xs="http://www.w3.org/2001/XMLSchema"
						xmlns:xsi="http://www.w3.org/2001/XMLSchema-instance" xsi:type="xs:string">saml-acc-JOOrE07GA2-3
					</saml2:AttributeValue>
				</saml2:Attribute>
				<saml2:Attribute Name="urn:oasis:names:tc:SAML:1.1:nameid-format:emailAddress" NameFormat="urn:oasis:names:tc:SAML:2.0:attrname-format:unspecified">
					<saml2:AttributeValue
						xmlns:xs="http://www.w3.org/2001/XMLSchema"
						xmlns:xsi="http://www.w3.org/2001/XMLSchema-instance" xsi:type="xs:string">[email protected]
					</saml2:AttributeValue>
				</saml2:Attribute>
				<saml2:Attribute Name="urn:oid:2.5.4.42" NameFormat="urn:oasis:names:tc:SAML:2.0:attrname-format:unspecified">
					<saml2:AttributeValue
						xmlns:xs="http://www.w3.org/2001/XMLSchema"
						xmlns:xsi="http://www.w3.org/2001/XMLSchema-instance" xsi:type="xs:string">Jane
					</saml2:AttributeValue>
				</saml2:Attribute>
				<saml2:Attribute Name="urn:oid:2.5.4.4" NameFormat="urn:oasis:names:tc:SAML:2.0:attrname-format:unspecified">
					<saml2:AttributeValue
						xmlns:xs="http://www.w3.org/2001/XMLSchema"
						xmlns:xsi="http://www.w3.org/2001/XMLSchema-instance" xsi:type="xs:string">Doe
					</saml2:AttributeValue>
				</saml2:Attribute>
			</saml2:AttributeStatement>
		</saml2:Assertion>
	</saml2p:Response>
Assign the application to a user
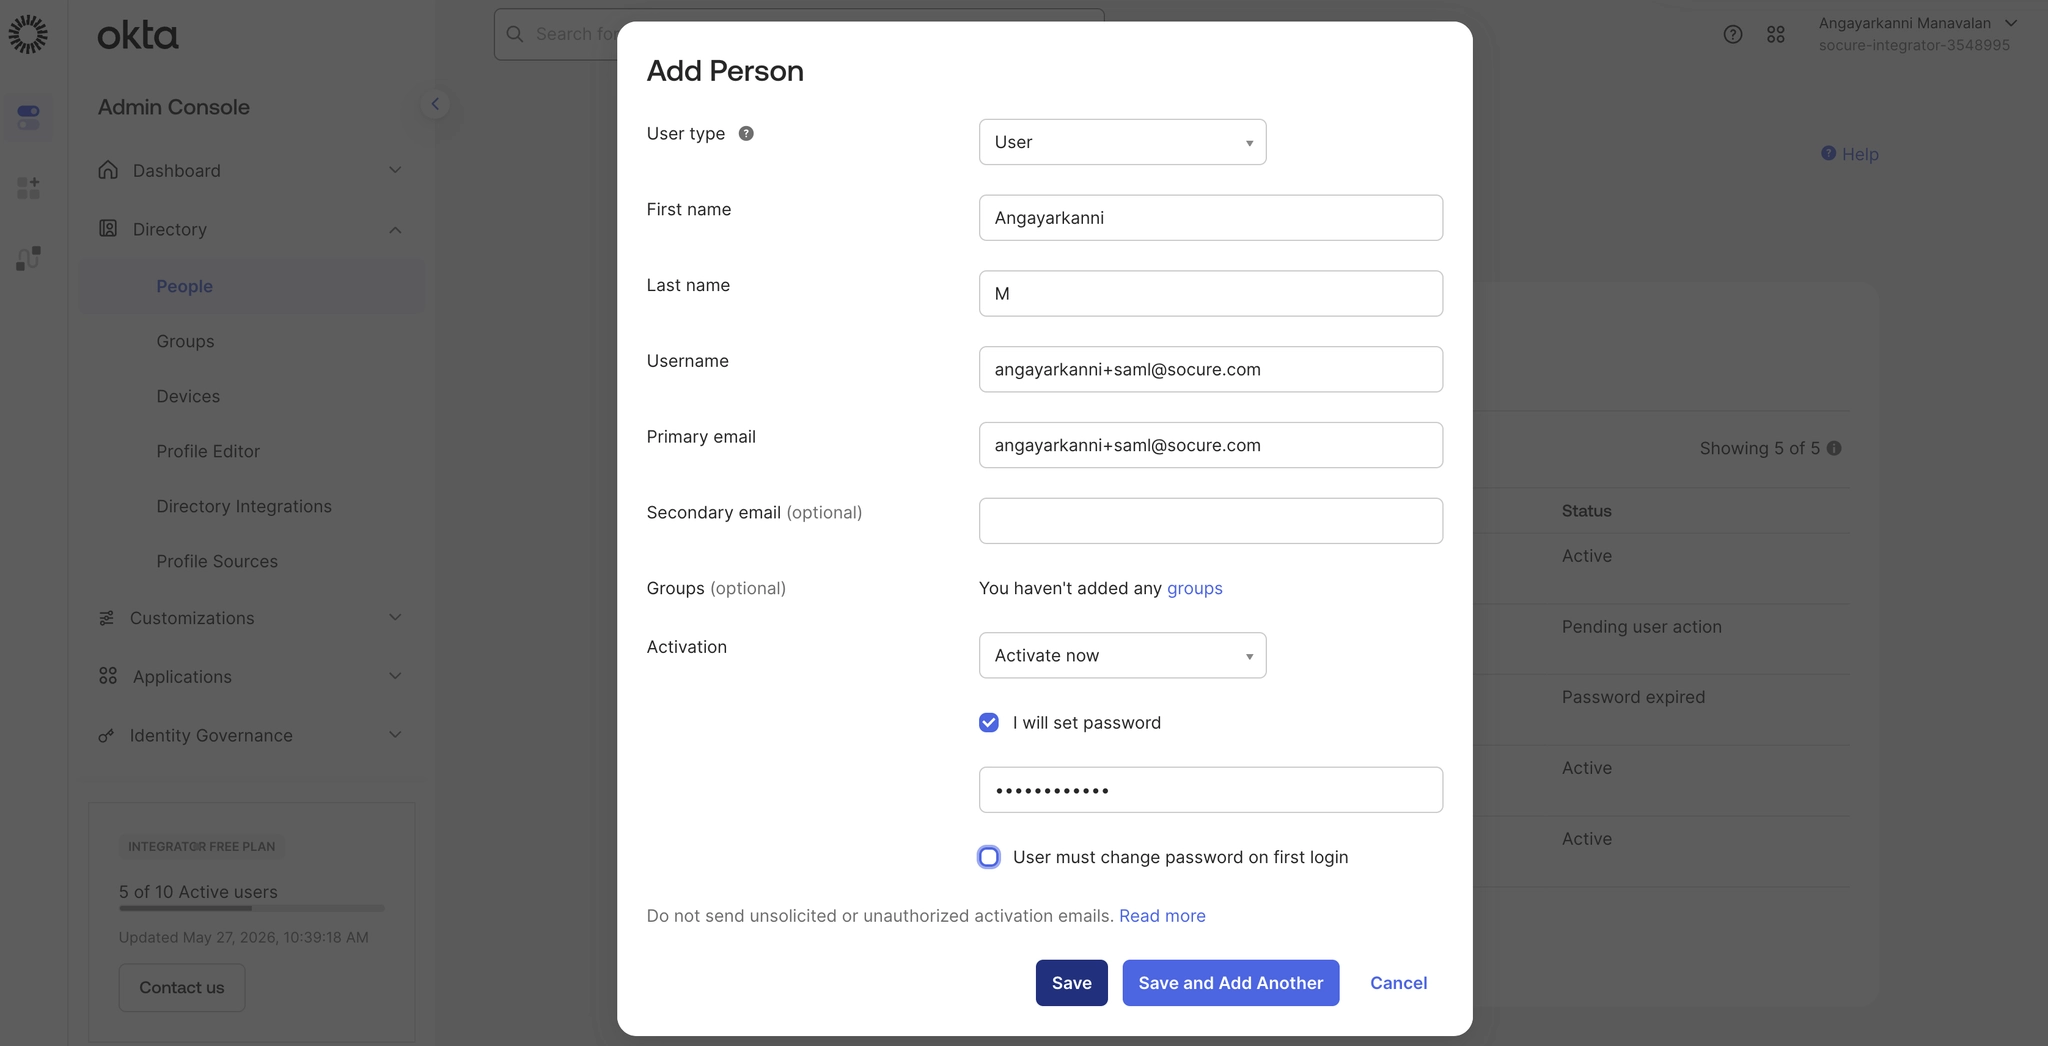
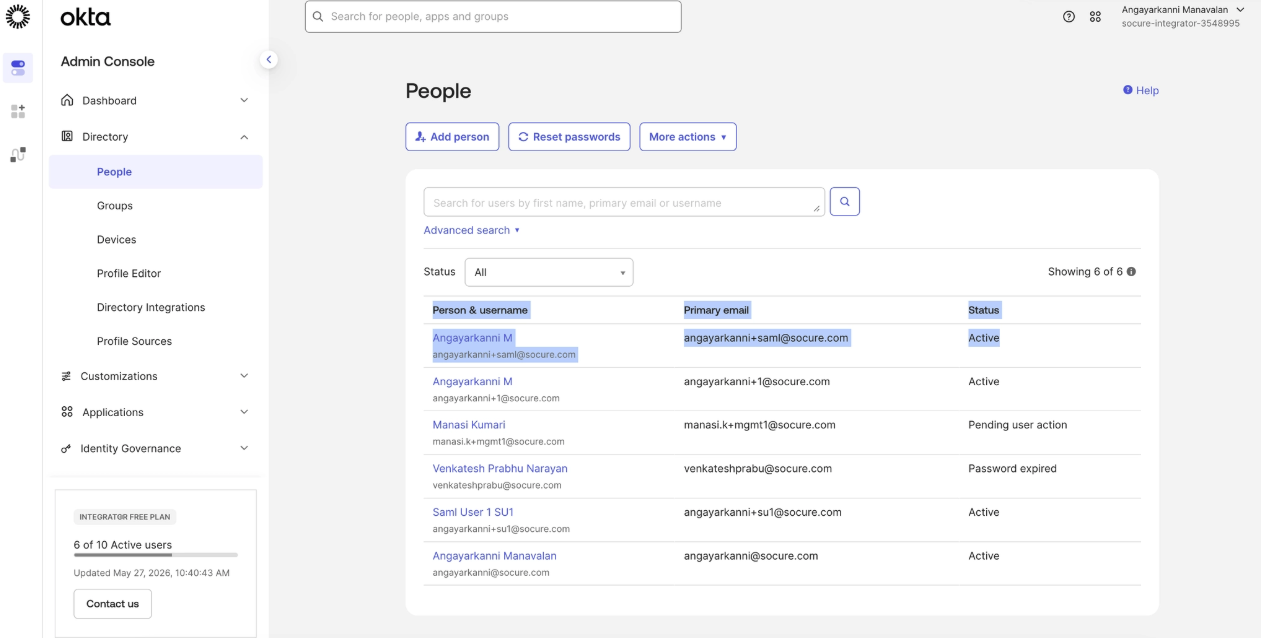
Step 1 — Add a user
In Directory > People, click Add person.
Step 2 — Enter the user details
Enter the user's first name, last name, username, and primary email, then save.
Step 3 — Assign the application to the user
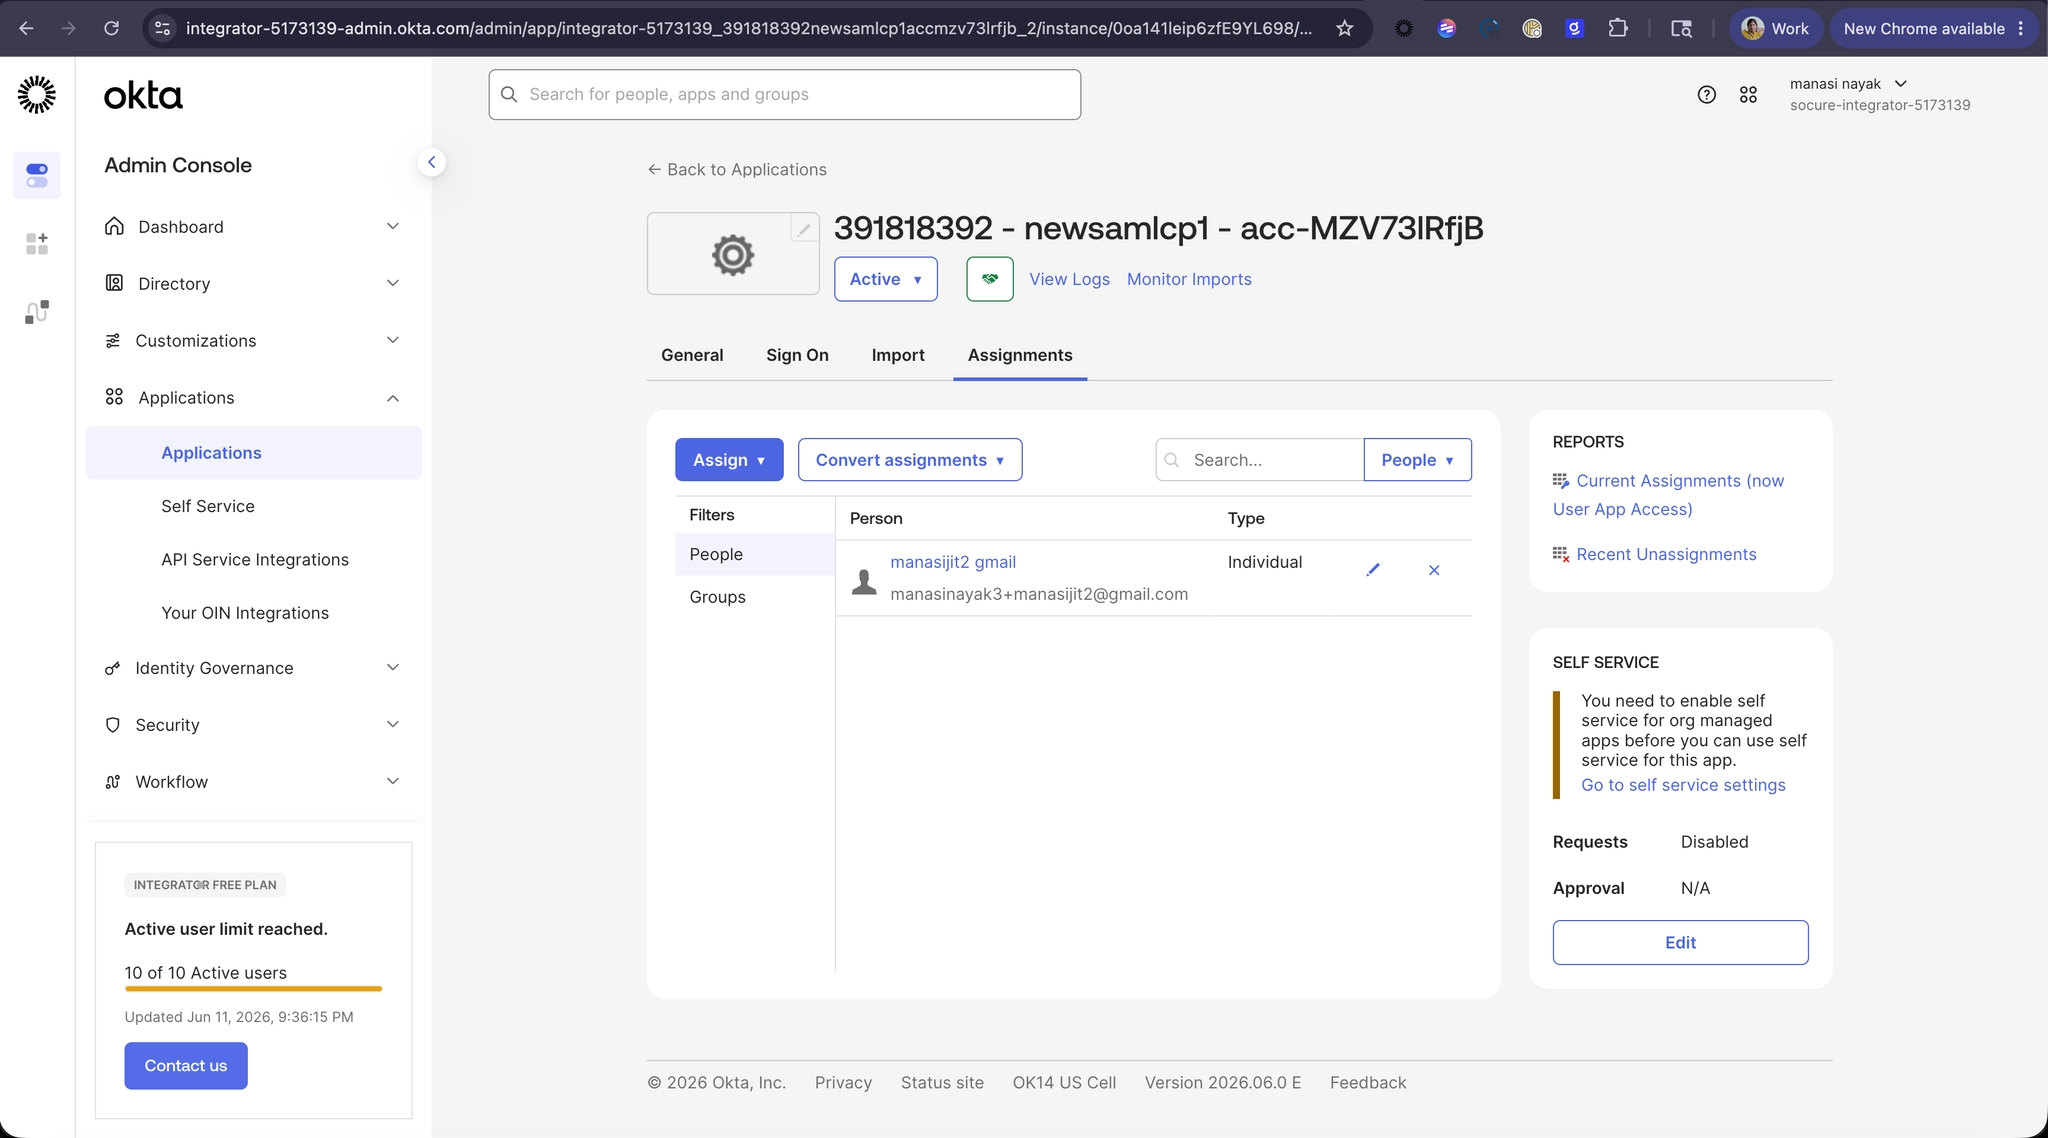
Open the application's Assignments tab, click Assign, and assign the user. Set the RoleName values for the user as needed, then save.
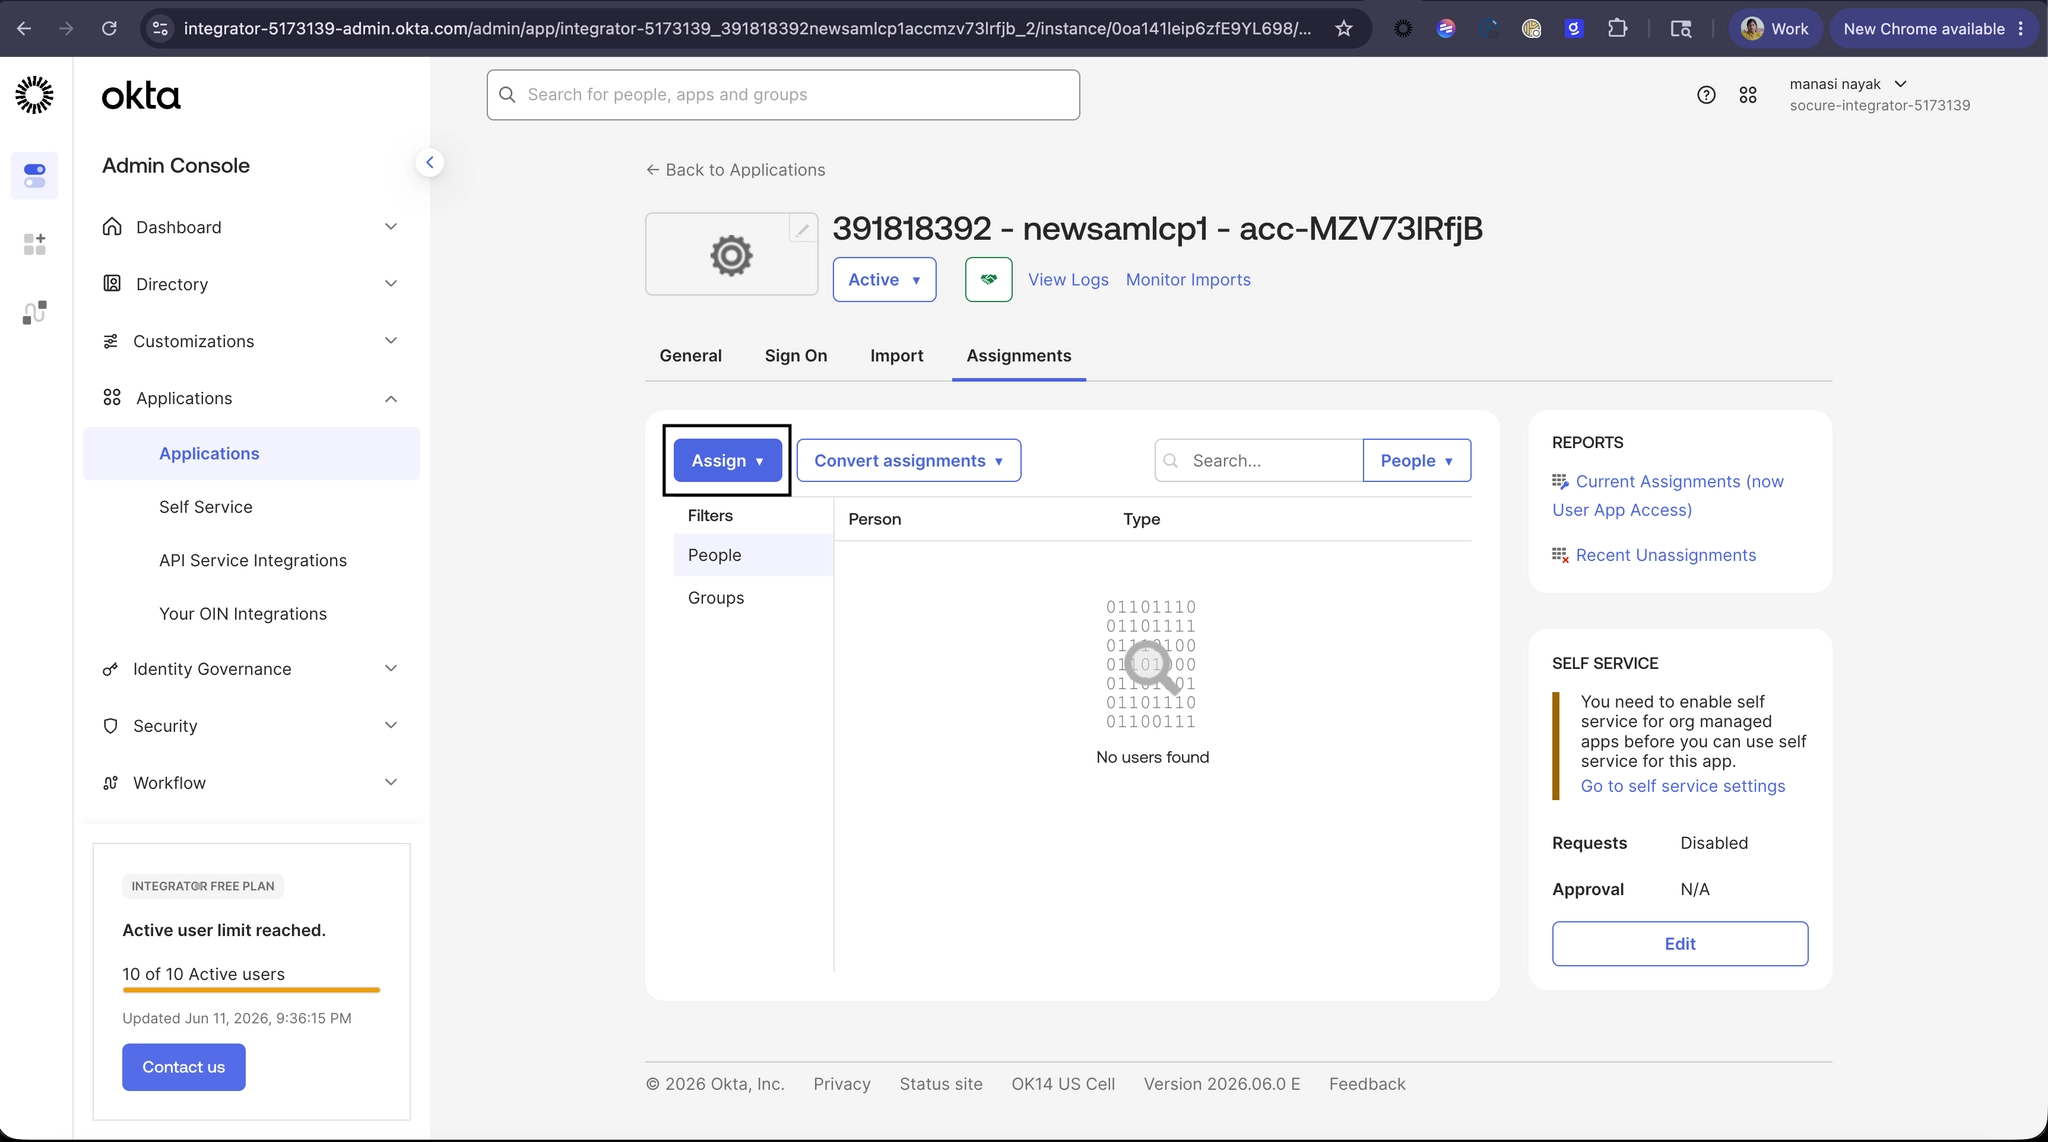
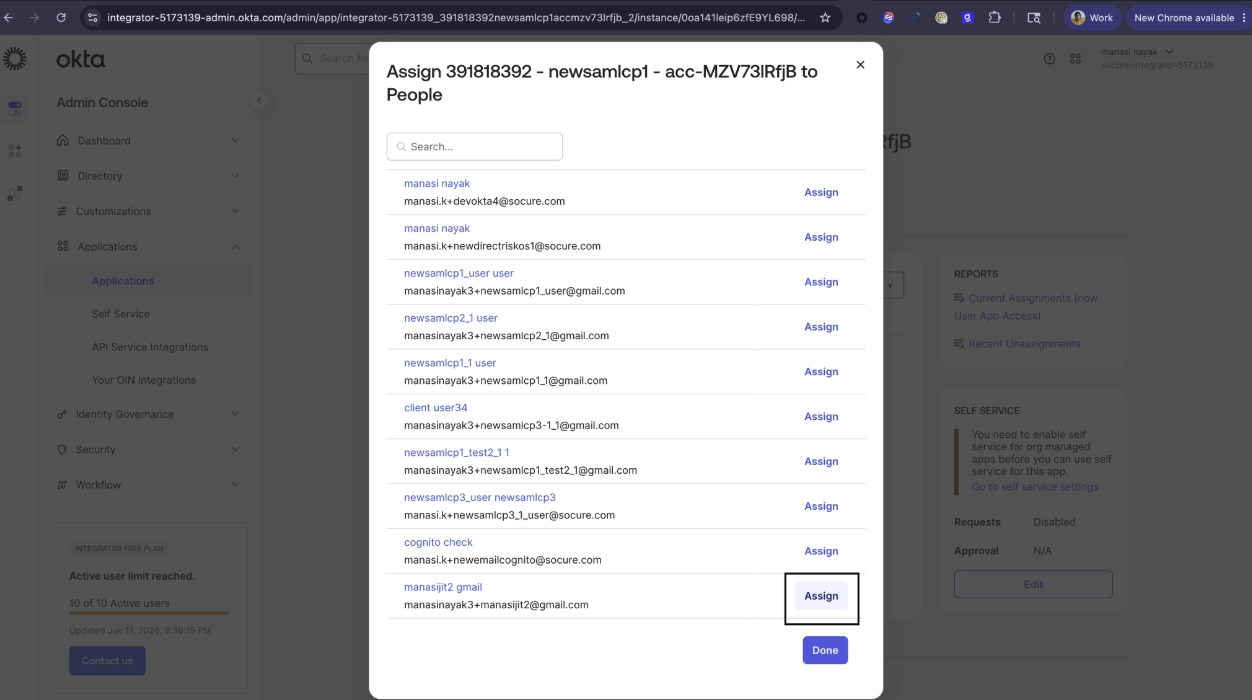
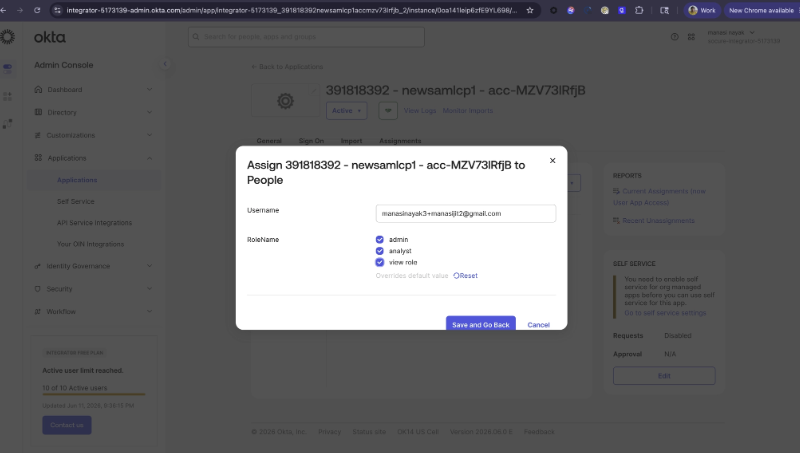
If you are a channel partner and you want to configure a SAML app for external users to have access to their respective client, you can assign users to specific client accounts using clientScoped and clientAccountIds attributes
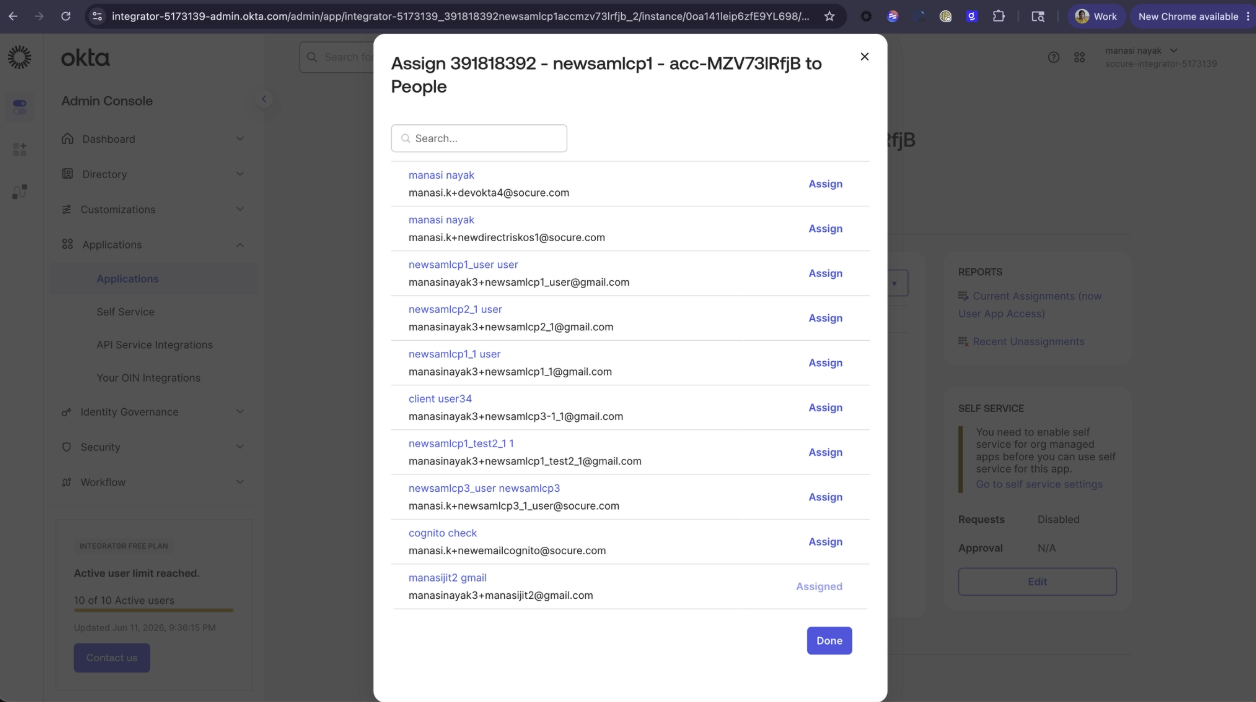
Step 4 — Confirm the assignment
Confirm that the user appears in the application's Assignments list.
Retrieve the metadata URL
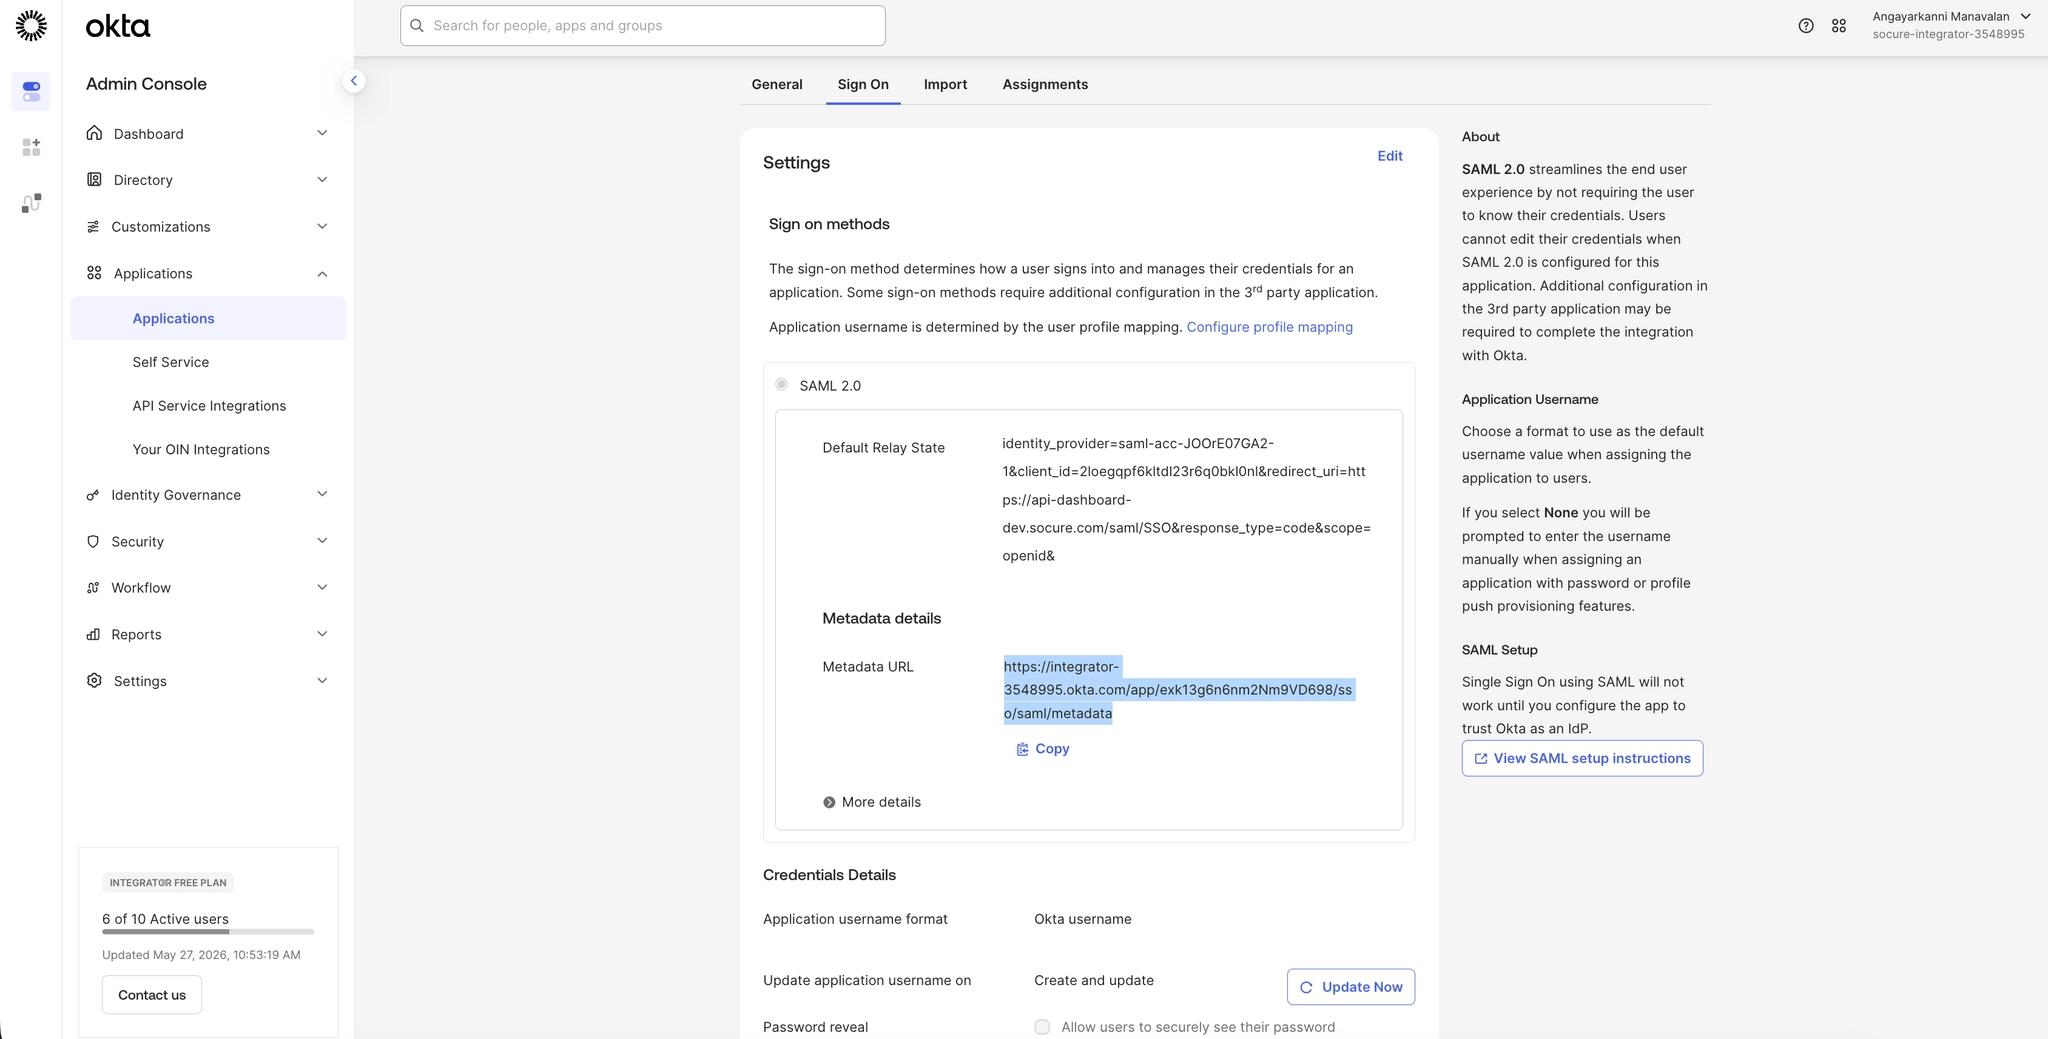
On the application's Sign On tab, copy the Metadata URL from the Metadata details section. Share this URL with Socure to complete the identity provider setup.
SAML Configuration Checklist
Request your public account ID from Socure Support or your Account Manager
This is a pre-requisite step before you start your SAML configuration.
Set up SAML app for RiskOS™ Sandbox
email attribute (urn:oasis:names:tc:SAML:1.1:nameid-format:emailAddress → user.profile.email) — required for JIT
accountContext attribute with correct account context (as specified for identityProvider in Default Relay State) — required for JIT
firstName (urn:oid:2.5.4.42 → user.profile.firstName) — required for JIT
lastName (urn:oid:2.5.4.4 → user.profile.lastName) — required for JIT
Set up SAML app for RiskOS™ Production
email attribute (urn:oasis:names:tc:SAML:1.1:nameid-format:emailAddress → user.profile.email) — required for JIT
accountContext attribute with correct account context (as specified for identityProvider in Default Relay State) — required for JIT
firstName (urn:oid:2.5.4.42 → user.profile.firstName) — required for JIT
lastName (urn:oid:2.5.4.4 → user.profile.lastName) — required for JIT
Additional IdP (if needed)
identity_provider name
alias field
Socure SAML Configuration
After you complete the Okta configuration, share the metadata URL and your public account ID with Socure. Socure registers the identity provider and enables SAML for your account.
Verification
- Test login with a new user — verify JIT creates user with correct name, roles, and use cases
- Test login with an existing user — verify roles and profile sync correctly
Updated about 19 hours ago