Watchlist Webhooks
Listen for Watchlist Monitoring events and Watchlist Case Management updates
Watchlist webhook use cases
The two primary use cases for Watchlist webhook notifications include:
| Use Case | When It's Triggered | Event Name |
|---|---|---|
| Monitoring Events | Triggered when a monitored transaction’s entity is added to or removed from a watchlist. Requires Watchlist Monitoring. | monitored_search_updated |
| Case Management Events | Triggered when a case is approved or closed from the Watchlist Case Management tab in the RiskOS™ Dashboard. | case_closure |
Watchlist webhook configuration
Configure webhooks to receive real-time alerts from Socure for Watchlist Monitoring and Watchlist Case Management events.
You can choose to receive event notifications in one of two ways:
- Via an HTTPS
POSTrequest to a webhook endpoint at a URL you specify. - Via email to a designated address.
To enable watchlist webhooks:
- Build a webhook endpoint.
- Register the endpoint in RiskOS™.
- (for Monitoring) Enable monitoring on one or more evaluations
1. Build a webhook endpoint
A webhook endpoint is a public HTTPS URL that receives POST requests from Socure when an event occurs.
Requirements
At a minimum, your webhook endpoint must:
- Accept
POSTrequests with aContent-Type: application/json. - Respond with a
200 OKstatus code to acknowledge receipt. All status codes outside of this range will result in a redelivery attempt.
Idempotency
Webhook events may be delivered more than once. To prevent duplicate processing, ensure your endpoint is idempotent by tracking each event using its unique identifier:
monitored_search_updated: use theevent_idfieldcase-closure: use theeventReferenceIdfield
Retry logic
Events must be acknowledged (with a 200 OK status code) within 30 seconds, or delivery is aborted and retried with linear backoff. After 5 failures, the webhook is deleted.
When your server receives a webhook, it must acknowledge it within 30 seconds (by returning an HTTP 200 response). If your server does not respond in time or returns a non-200 status, the delivery is treated as failed.
The system will retry delivery up to 5 times using an increasing delay (linear backoff) between each attempt. After the 5th failed attempt, the webhook is marked as failed and deleted - no more automatic retries occur.
The table below shows the delay between the previous failed attempt and the next retry.
| Attempt | Delay |
|---|---|
| 1 | 1 min |
| 2 | 8 min |
| 3 | 57 min |
| 4 | 6 hrs 40 min |
| 5 | 46 hrs 40 min |
Note:
- If the endpoint is disabled or deleted, the system stops retrying immediately.
- You can manually trigger tests for disabled endpoints from the RiskOS™ Dashboard.
- For auto-enrolled transactions, retries will continue indefinitely until a successful delivery (2xx response) occurs.
Security requirements
- The endpoint URL must be publicly accessible.
- The server must be configured to use HTTPS and TLS 1.2 (or later).
- The TLS certificate installed on the server must be uploaded to RiskOS™ when registering the endpoint.
- The endpoint should only accept requests from the following IPs:
Production
34.230.131.8334.199.1.10435.199.32.202/3254.209.34.129/32100.24.247.109/3244.195.229.53/32
2. Register the endpoint in RiskOS™
Follow the steps below to create a webhook for Watchlist Monitoring or Case Management events in the RiskOS™ Dashboard:
Note:
To limit traffic, configure your endpoint to receive only the event types required for your integration – either
Case ManagementorMonitoring.
- Go to Developer Workbench > Webhooks.
- Select the Watchlist Alerts tab.
- Click New Webhook.
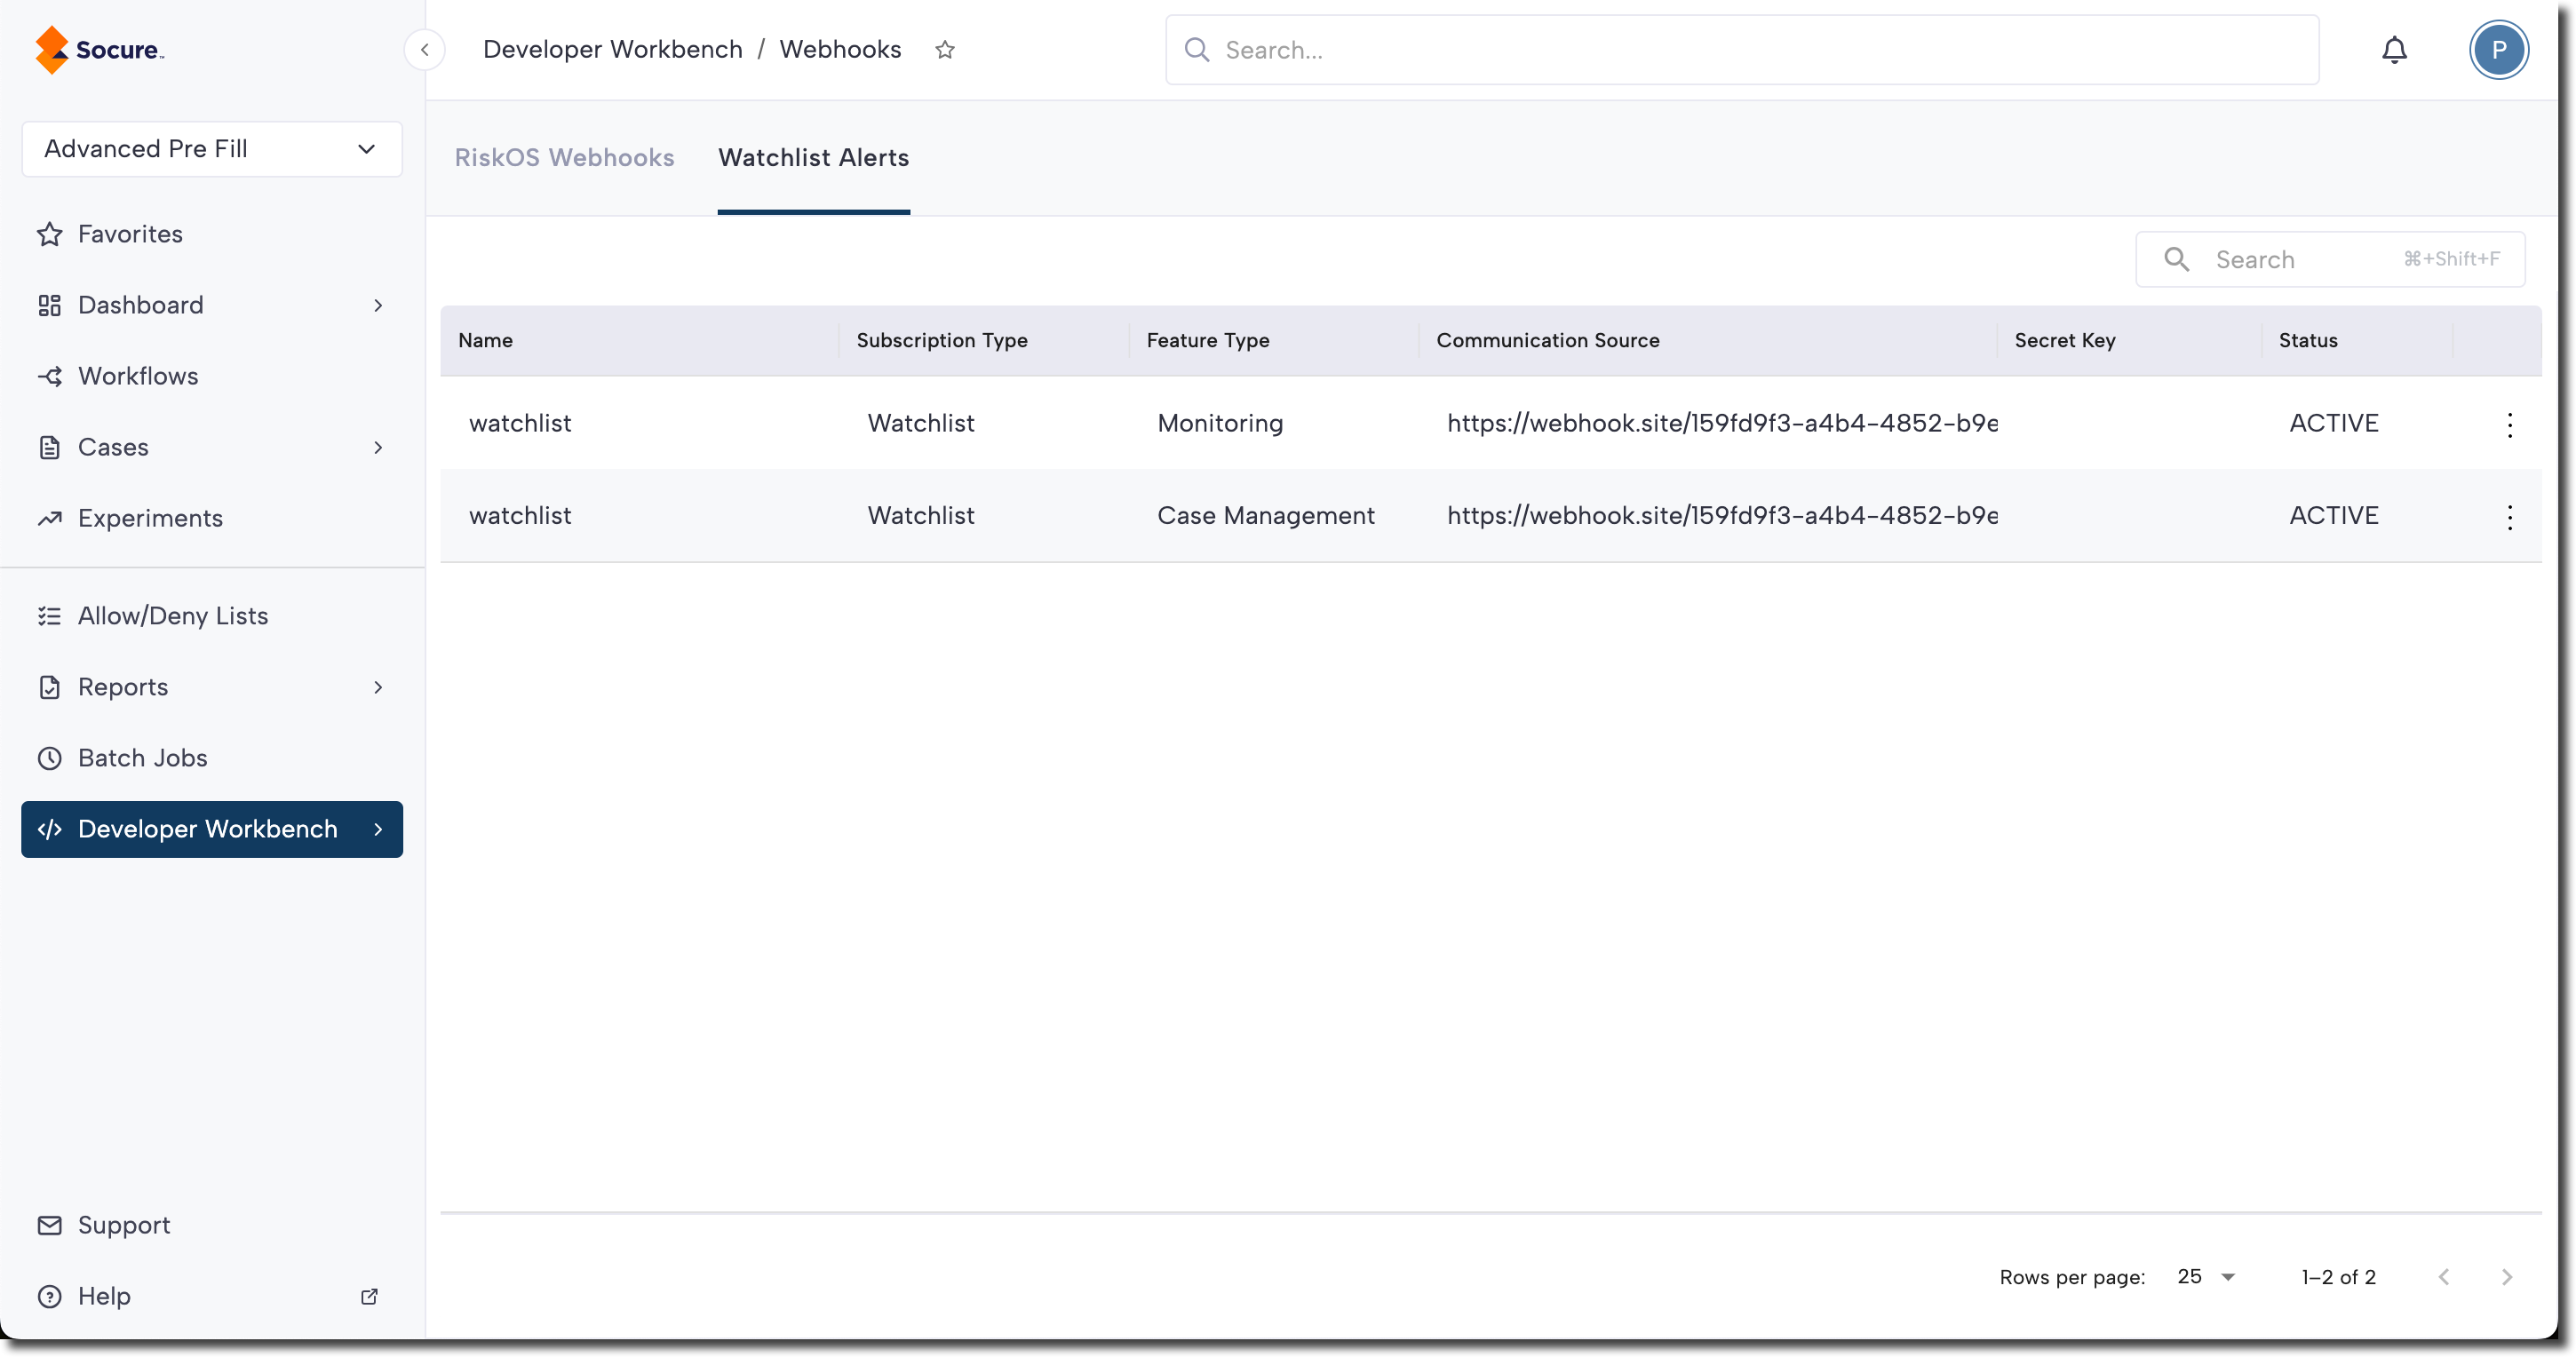
- Fill out the following fields:
- Feature Type: Select the type of Watchlist event you want to subscribe to:
Monitoring: Receive events when watchlists are updated for monitored entities.Case Management: Receive events when a case is approved or closed in the RiskOS™ Dashboard.
- Communication Mode: Choose how you'd like to receive notifications:
Webhook: Sends an HTTPS POST request to your specified endpoint.Email: Sends event details via email.
- Subscription Channel Name: A unique name to identify this webhook subscription.
- Webhook URL: Only applicable for Communication Mode
Webhook. Provide the publicly accessible HTTPS endpoint where events should be delivered. - Email: Only applicable for Communication Mode
Email. Provide valid email address - Alert Types: Configure the event types (Add, Change, Delete) that you want to be notified.
- (Optional) Click Show Advanced to configure:
- Secret Key: Add a token to verify the authenticity of incoming events.
- TLS Certificate: Upload the TLS certificate used by your server. Supported formats include:
.PEM,.CSR,.CER,.CRT,.KEY.
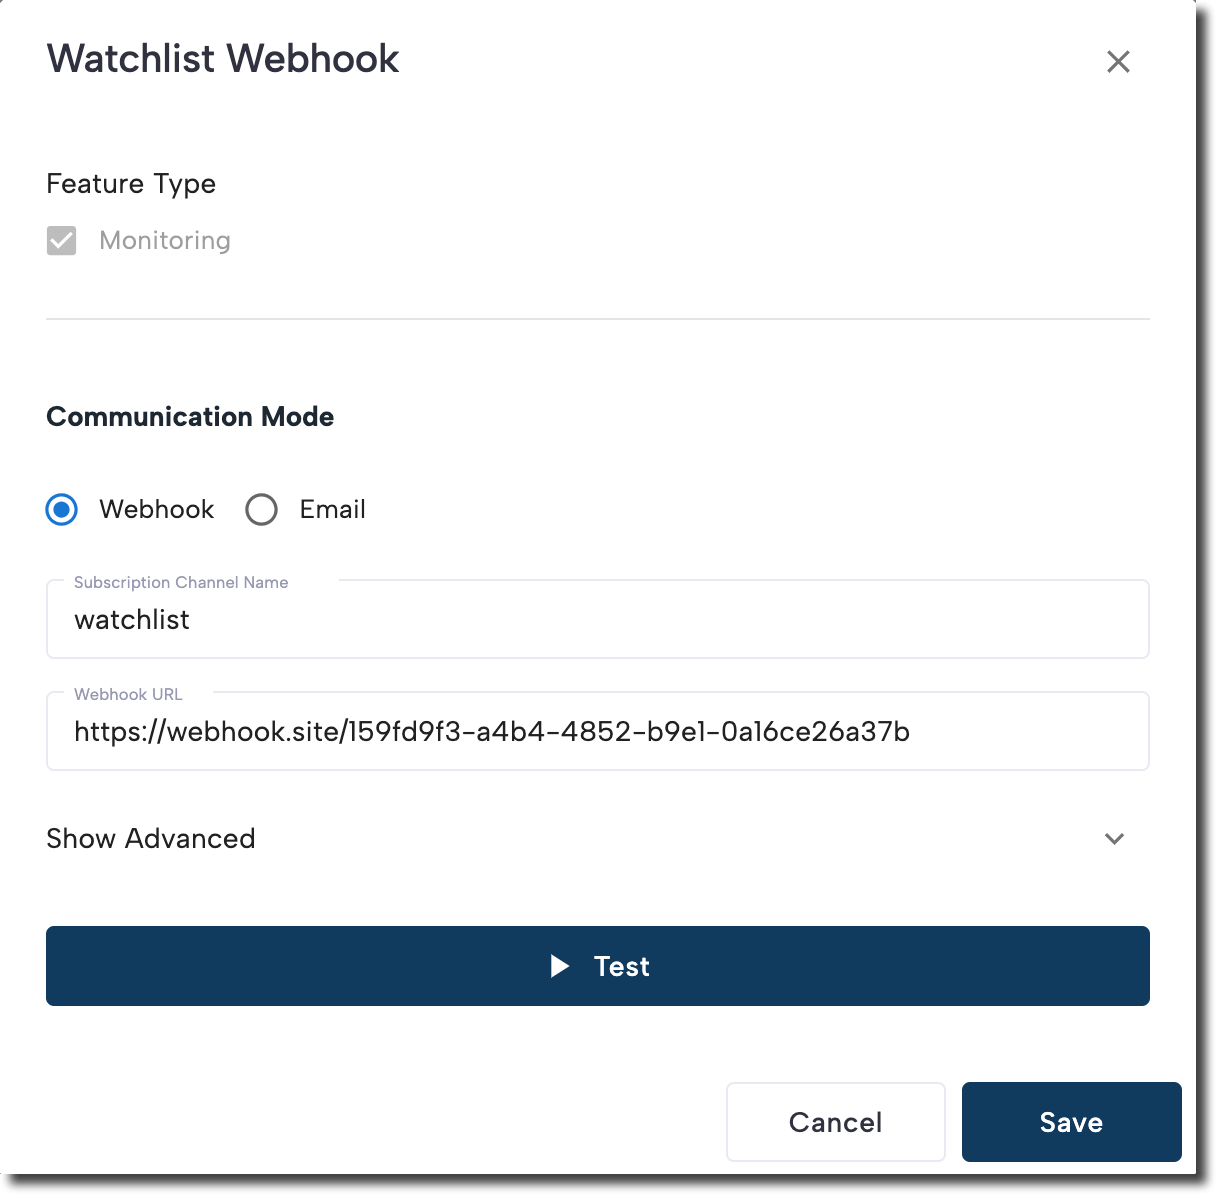
- Click Test to send a test event. If your endpoint returns a
200 OK, a "Validation complete" message is displayed. - Click Create to create the webhook.
- Feature Type: Select the type of Watchlist event you want to subscribe to:
Edit or disable a webhook
To make changes to an existing webhook, click the three-dot menu next to it and choose View/Edit or Deactivate from the menu.
Troubleshooting failed webhooks
If your webhook isn’t receiving events, use the following checklist to identify and resolve common issues:
-
Confirm public access
Ensure your webhook endpoint is publicly accessible over the internet. -
Check for a valid response
The endpoint must return an HTTP200 OKstatus. Use tools like Hurl.it to test the response. -
Allow traffic from Socure IPs
Verify your server allows traffic from the specified IP ranges. -
Validate TLS certificate
If you're using certificate pinning, ensure the certificate is valid and trusted by the server receiving the request.
Note:
Self-signed certificates are not supported.
-
Disable custom headers
Ensure custom headers are not required for processing the request. -
Still having issues?
Contact your Solutions Consultant team and include the webhook endpoint URL for further investigation.
Test your webhook endpoint
You can manually test your webhook endpoint from the RiskOS™ Dashboard to confirm it’s set up correctly.
- Go to Developer Workbench > Webhooks.
- Select the Watchlist Alerts tab.
- Locate the webhook you want to test.
- Click the three-dot menu next to the webhook.
- Click View/Edit option
- Select Test.
This triggers a sample event to be sent to your configured endpoint. If your endpoint responds with 200 OK, the test is considered successful and you’ll see a “Validation complete” confirmation message.
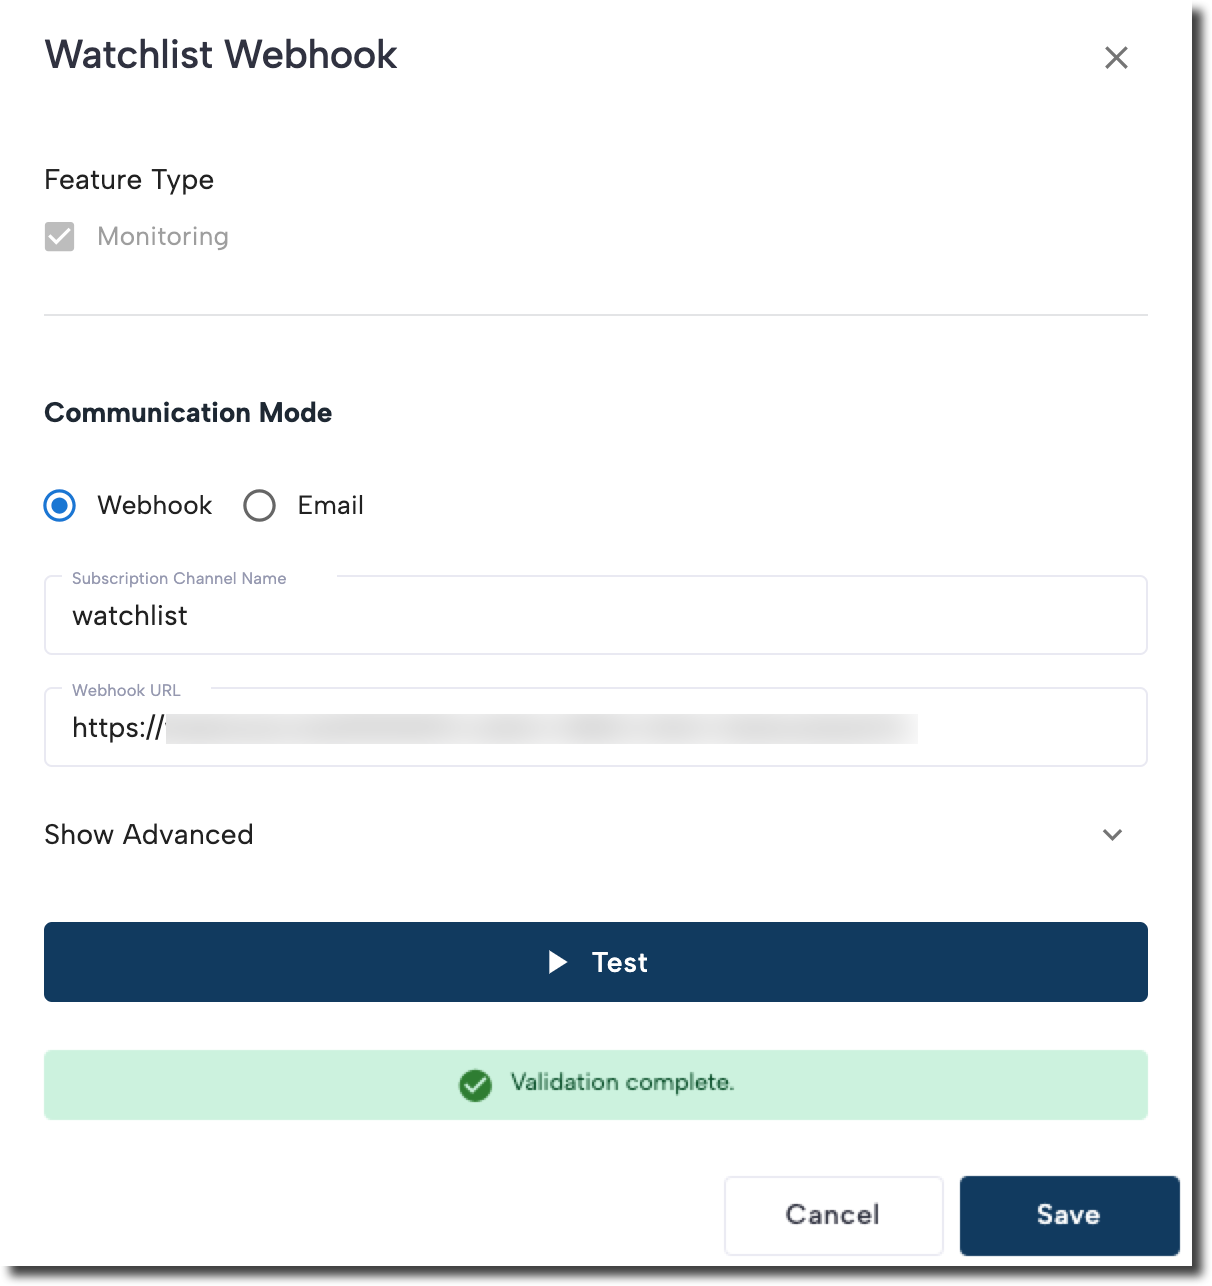
Send notifications to your email
If you configured watchlist webhooks to receive email alerts, you will receive automated email notifications when a monitored entity is matched, updated, or removed from a global watchlist.
Sanctions and Enforcement monitoring email notification
Triggered when a monitored entity matches a sanctions or enforcement watchlist.
The alert includes key details such as match fields and status (e.g., Added, Updated, Removed).
Adverse Media monitoring email notification
Triggered when a monitored entity matches an adverse media source in your configured watchlist.

Updated 16 days ago